Ivie IE-45 LEQ - Loudness Equivalent Analysis User Manual
Quick start, Leq-35, Leq main leq octave leq dose ln
LEQ-35
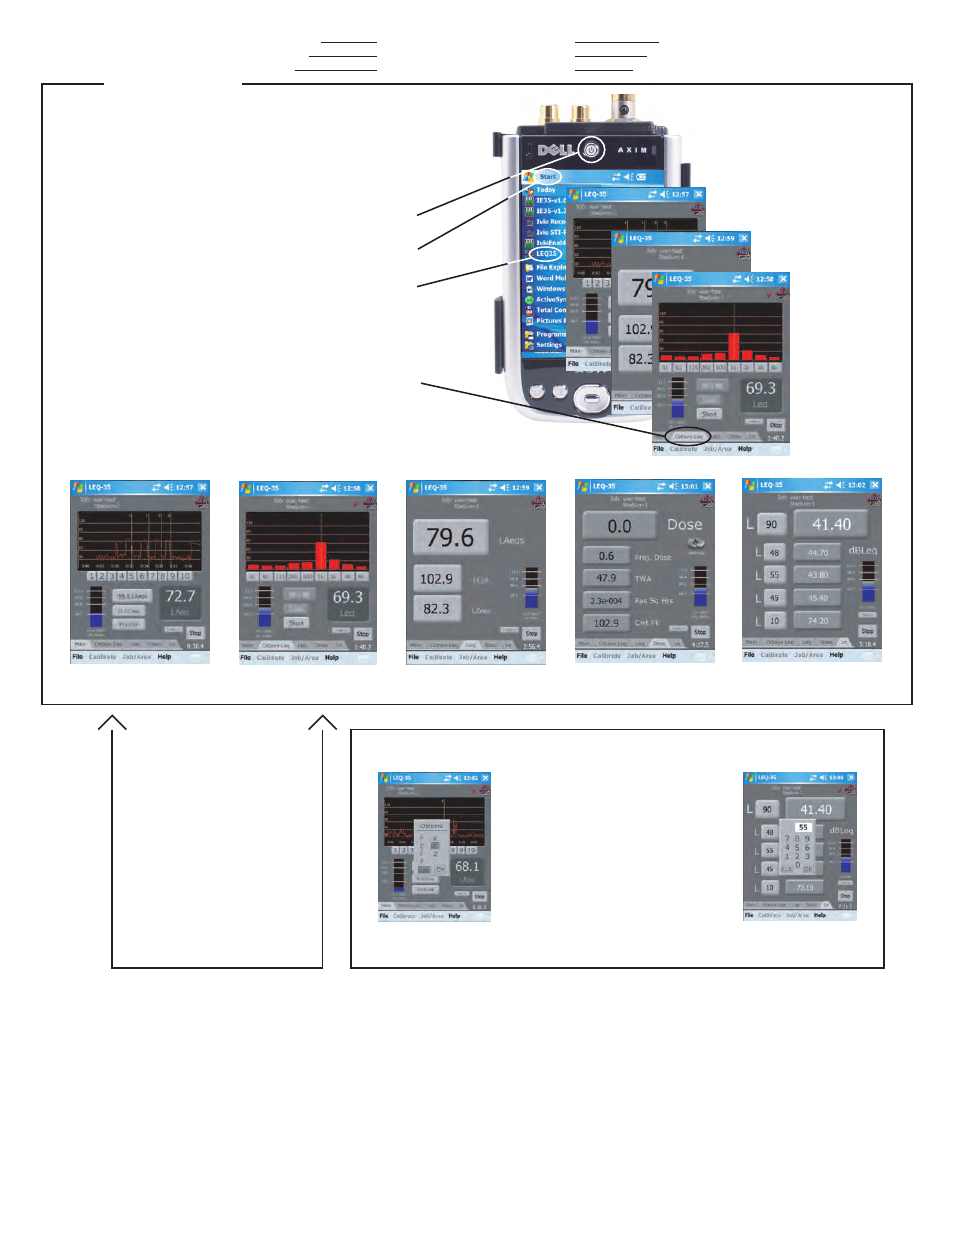
Quick Start
1. Insert the Axim into the IviePAL jacket
2. Press the power button to turn on the system
3. Using the stylus, tap on "Start"
4. Using the stylus, tap on "LEQ-35"
5. Select your microphone of choice, and
calibrate if necessary
6. Tap on a function tab
Microphone Calibration: Note: If you purchased the complete IE-35 system, or the IviePAL jacket and microphone at the same time from the
factory, they were calibrated to each other at the factory. A factory Certificate of Calibration is included with each IviePAL jacket/Microphone
combination. If you purchased a complete IE-35 system including a Dell Axim X51v, the calibration number has been entered into your software
and you DO NOT NEED to complete the calibration procedure below.
If you have supplied your own Axim, YOU MUST follow the Initial
Calibration Procedure below.
Periodic Calibration may be performed in the field if you own an SPL Calibrator. The procedure for this is listed below.
Step 1 - With the Axim inserted into the IviePAL jacket, enter into the Calibration mode by selecting the "Calibrate" choice at the bottom of the screen.
Step 2 - Select which microphone you are going to calibrate to the IviePAL jacket.
(The LEQ software remembers the calibration values for up to six different microphones)
Step 3 - From the microphone selection window now displayed, tap the Calibrate button
Step 4 - Follow steps 1 - 3 at the bottom of the calibration screen.
Step 7 - Tap the "Done" button.
Step 8 - Tap the "OK" button to accept the calibration.
LEQ Main LEQ Octave LEQ DOSE Ln
Cursors
Cursors are available in both the main
and the octave screens. In the octave
screen, the single cursor indicates the
octave selected. The octave frequency
selected and its Leq are shown on the
dark buttons. To select a different
octave, tap the octave cursor button
In the main screen, the cursors are event
markers. Pressing an event marker
button (1-10) will instantly mark the
data flow with the selected marker
number. It is possible to reuse marker
numbers so that specified numbers can
be assigned to indicate specific types of
events.
Data Buttons
Dark colored data buttons cannot be
changed. Light colored ones can. To
change the data being displayed by a
light colored data button, press the
button. An "Options" pop-up will
appear. The left column allows
selection of response: Fast, Slow,
Impulse, Peak or Leq. The right
column allows selection of weighting
A, C or Z (unweighted).
Select the desired response and
weighting. Tap OK. The newly
defined data format will be displayed
on the data button.