Aervoe Wind'N Go Vers-A-Light User Manual
Wind ‘n go® vers-a-light #7820
Wind ‘N Go® Vers-A-Light #7820
IMPORTANT SAFEGUARDS
Read all instructions before operating
•
Do not look directly at the light; may cause injury to your eyes
•
Do not use in flammable or explosive environments
•
Do not operate at temperatures above 120°F or below 32°F
•
To reduce the risk of electric shock, do not submerge the unit or its accessories in any liquid. Unit is
•
water resistant but not waterproof.
This unit is not intended for use in explosive atmospheres or locations
•
Turn off all lights before charging
•
Store in a clean dry place when not in use
•
Do not use alcohol, flammable or other solvents on or near this unit. Only clean with warm water and
•
soft cloth.
Protect LED lens from damage and scratching
•
Administer close supervision when using around children
•
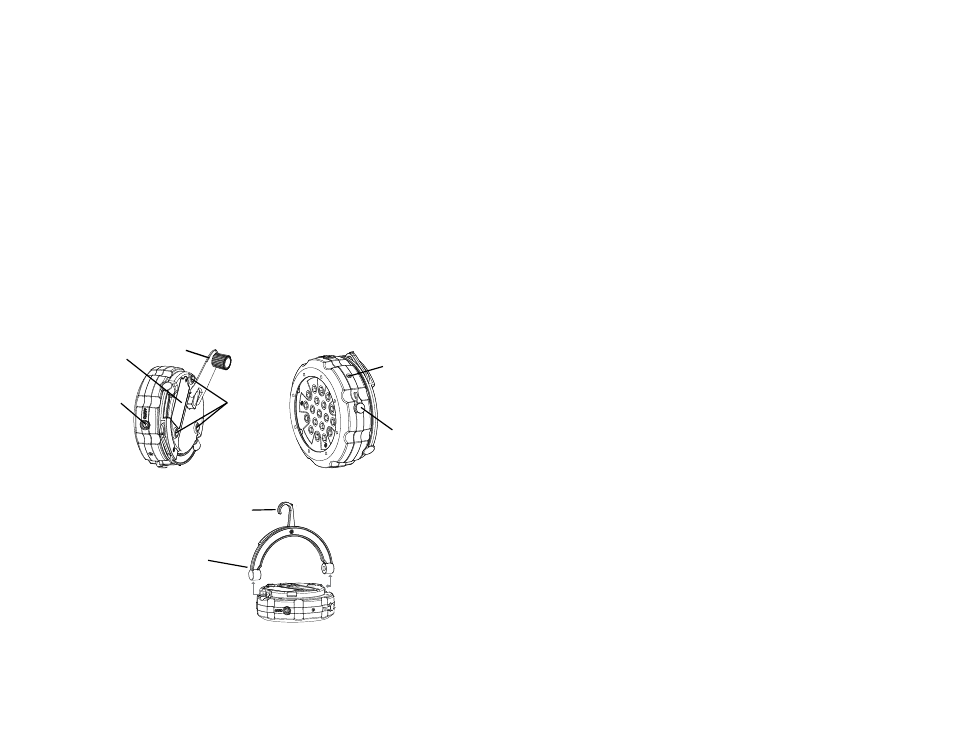
PARTS IDENTIFICATION
CHARGING THE UNIT
Before charging, turn off the light. The battery is rechargeable but may be replaced if needed. Use a small
Phillips head screwdriver to remove the single screw securing the BATTERy cOmPARTmEnT. Replace the
battery with an identical 3.6V 800 mA ni-mh battery.
Dynamo charging:
Open the
1.
HAnD cRAnk and rotate clockwise at approximately 120 cycles/minute for a minimum of one
minute. Winding for a longer period of time will yield longer power durations.
The charging indicator on the light will illuminate red during charging and turn green once charging is
2.
complete.
close the
3.
HAnD cRAnk.
USB charging
Using the included USB charging cable, plug the USB end into a computer or other USB charging
1.
device and the male end into the Dc In/OUT PORT of the light.
The Red charging indicator on the light will illuminate during charging and change to green once
2.
charging is complete.
120V OR 12V charging (adapter not included):
A Power Adapter kit #7991, is available from Athena Brands and includes a 120V wall charger and a 12V car
1.
charger. Refer to the information under Technical Information for specifications.
Plug the Dc output plug from either adapter into the
2.
Dc In/OUT PORT of the unit and then plug the 120V Ac
or the 12V Dc adapter into the appropriate electrical socket (depending on which charger is being used).
The charging indicator on the light will illuminate red during charging and change to green once
3.
charging is complete. Allow 5 hours to achieve a full charge.
LIGHT OPERATION
Press the On/OFF button:
1 time for low-level light
•
2 times for high-level light
•
3 times for 3 red LEDs in a steady light
•
4 times for 3 red LEDs blinking an S.O.S. message
•
5 times for off
•
CELL PHONE CHARGING
Plug one end of the adapter cable into the Dc In/OUT port of the unit and the other end into your cell
1.
phone. This tip fits most nokia ® phones. If this tip does not match your cell phone, cell Phone
Adapter kit #7995 is available from Athena Brands and includes additional adapter tips to match your
specific phone. Go to www.athenabrands.com for a list of phones supported by this kit.
Rotate the HAnD cRAnk as described in Dynamo charging above to generate power to your cell
2.
phone. Longer talk time may be achieved with additional winding.
HANGING
The handle folds out from the body of the light and may be used to grip it like a flashlight
1.
The handle may also be detached so that it may be hung on large diameter pole or tree branch. Pull
2.
outward at the swivel point to detach it from the body of the light.
A hook folds out from the handle to hang from a string line or other small diameter object
3.
MAGNETS
There are three magnets on the back of the light that may be used to attach it to a car or other metal object
for hands-free illumination.
Hanging Hook
Removeable Handle
Hand Crank
Battery Compartment
On/Off Button
DC In/Out Port
Charging Indicator
Magnets