Aervoe 60-Watt Power Cell User Manual
Sierra wave, Watt power cell #9660
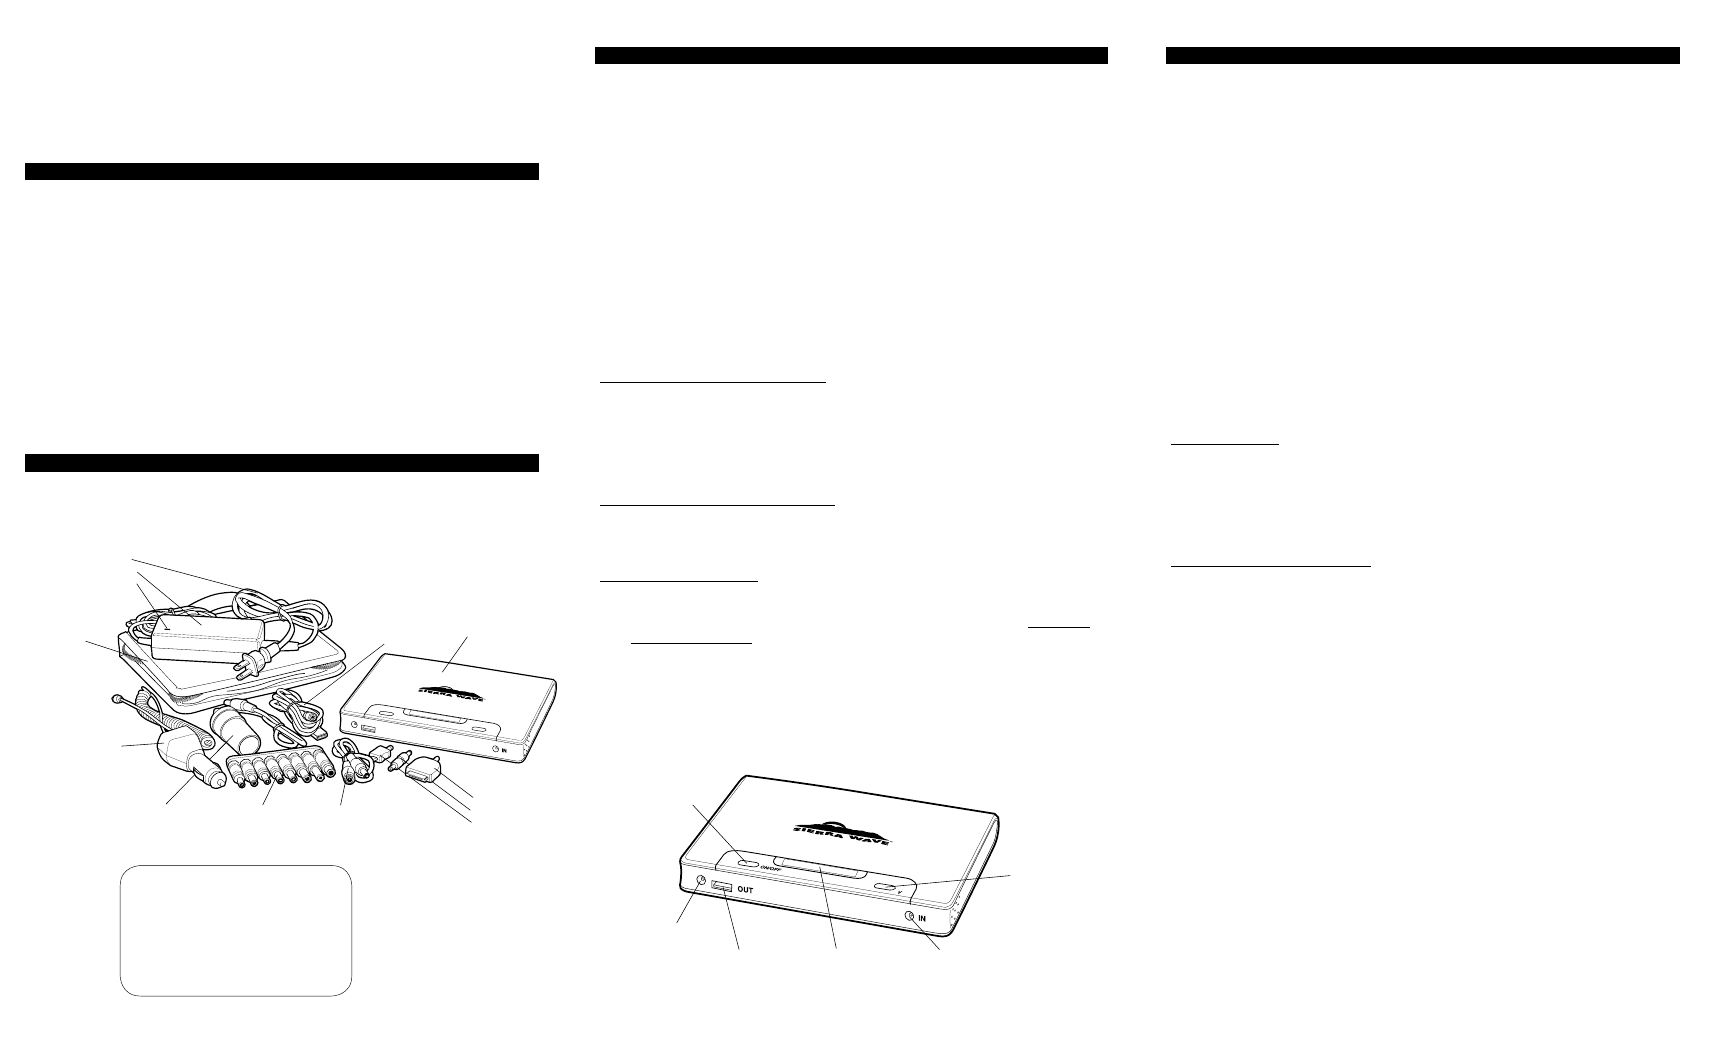
120V AC Wall Charger includes:
Power Cord
Power Supply
LED Indicator
Storage Case
12V DC Vehicle Charger
Barrel Power Adapter
Laptop Adapter
Cable
Adapter Tips including:
Apple®
SolaDyne®/Wind ‘N Go®
Micro USB
Power Cell
USB Adapter Cable
Laptop Tips
CHARGING
The Power Cell may be charged at the same time it is operating other devices. For optimum
charge time, disconnect all other devices while charging and disconnect once a full charge is
reached or when stored for more than a day. It is recommended that the Power Cell be charged
every 30 days.
LCD DispLay anD Charging information
•
Press the ON/OFF buTTON for 3 seconds to turn the Power Cell ON or OFF. The LCD
will illuminate and display the default 5V voltage and the bATTERY METER will show the
existing battery capacity (1 bar shows a low battery, 4 bars is a fully charged battery).
When charging, the Meter will blink and it will stop blinking and all 4 bars will be shown
when fully charged. The Power Cell will automatically shut down if idle for 10 minutes.
•
Low battery protection: If the battery level becomes too low a beep will sound to alert
you to recharge. If not recharged quickly the Power Cell will shut down.
•
Overcharge protection: Once a full charge has been achieved, the internal charge
controller will prevent overcharging. However, it is best to remove power source once
charging is complete.
•
Automatic overload, temperature, and short circuit protection will automatically power off
the Power Cell if it detects over limit ranges. To reset you will need to power it back up
using any of the above charging methods.
120V AC Wall Charging (adapter included):
1.
Connect the POWER CORD to the POWER SuPPLY. Plug the male DC output plug into
the DC IN PORT of the Power Cell and then plug the 120V AC WALL CHARgER into an
electrical outlet.
2.
The LED INDICATOR on the AC charger will be red during charging and turn green when
charging is complete.
3.
If the Power Cell fails to charge, check to make sure all connections are secure.
12V DC Vehicle Charging (adapter included):
1.
Plug the male DC output plug into the DC IN PORT of the Power Cell and then plug the
12V DC VEHICLE CHARgER into a 12V power receptacle.
2.
If the Power Cell fails to charge, check to make sure all connections are secure.
Solar Charging (not included):
The instructions below are for Sierra Wave Solar Collectors #9510 or #9530.
1.
Connect the 12V DC VEHICLE CHARgER to the DC IN PORT of the Power Cell.
2.
Plug the 12V end of the VEHICLE CHARgER into the barrel power adapter that comes
with the solar collector. Then connect it to the solar collector. For the #9510 use the 15V
DC port on the Power Port Hub and for the #9530 plug it directly into the DC Out cord.
3.
Follow the instructions included with your solar collector. Solar charging will be most
effective on a bright sunny day. Repositioning the solar panel throughout charging will be
required to capture the best angle of the sun.
4.
If the Power Cell fails to charge, check to make sure all connections are secure.
LAptop AdApteR tIps
#4717 (4.70mm x 4.75mm) HP, ASuS, Lg
#5010 (5.50mm x 4.75mm) Samsung, Lg
#5517 (5.50mm x 4.75mm) ACER
#5521 (5.50mm x 4.75mm) HP, ACER, NEC, Toshiba
#5525 (5.50mm x 4.75mm) HP, ACER, NEC, Toshiba
#6014 (5.50mm x 4.75mm) Sony
#6330 (5.50mm x 4.75mm) NEC, Sony, Toshiba
#7406 (7.40mm x 4.75mm) HP, Dell
DC Out Port
USB Out Port
DC InPort
Voltage Selection
Button
ON/OFF
Button
LCD Display Shows
Battery Meter
Voltage Selection
Charging Activity
Sierra Wave
®
60-Watt Power Cell #9660
The 60-Watt Power Cell is a dependable source of portable power to operate a variety of portable
electronic devices. The Power Cell is capable of providing different power outputs to support
the voltage requirements of different portable electronic devices. It may be charged from the
included adapters or from optional Sierra Wave solar collectors (sold separately). Once charged,
the high-capacity lithium ion batteries and intelligent circuitry provide reliable power for your
devices such as smart phones, MP3/iPods, eReaders, tablet and laptop computers, cameras,
and more.
IMpoRtANt sAFeGUARds
Read all instructions before operating
Warning to reduce the risk of electric shock, injury, or damage to this product:
•
Do Not submerge the unit or its accessories in any liquid or use in wet weather
•
Do Not short circuit, expose to heat, fire, cause damage to the batteries, or reverse
polarity (+/-)
•
Do Not disassemble due to risk of injury
•
Do Not use in flammable or explosive areas
•
Do Not block vents or cover unit during use
•
Discontinue use if electronic components or wires are exposed
•
Store in a clean dry place when not in use
•
Administer close supervision when using around children
THERE ARE NO uSER SERVICEAbLE PARTS. ALL REPAIRS MuST bE PERFORMED bY AERVOE
INDuSTRIES, INC. OR AN AuTHORIzED REPAIR FACILITY. FAILuRE TO FOLLOW THESE
guIDELINES CAN DAMAgE THE uNIT, CAuSE INjuRY, AND VOIDS THE PRODuCT WARRANTY.
CALL AERVOE FOR ADDITIONAL INSTRuCTIONS OR TROubLESHOOTINg INFORMATION.
pARts IdeNtIFICAtIoN
UsING stoRed poweR
CAUtIoN: before use, confirm that your electronic device is compatible with the Power Cell
using the listed specifications. Failure to follow these instructions could result in damage to
your device or the Power Cell. Only use the included adapters or other quality adapters matching
these specifications. Make sure the Power Cell has between 2 and 4 bars on the bATTERY
METER before charging another device.
sELECting optionaL VoLtagE
•
Check your device’s operating instructions for specifications related to choosing the
right DC Out voltage. Select the appropriate Voltage Output by pressing the VOLTAgE
SELECTION buTTON and cycling through the available options: 5V, 9V, 12V, 16V, 19V or
21V. Choosing the wrong voltage output will not allow proper charging and may cause
damage to your device or the Power Cell.
•
Once a voltage is selected it will be locked-in to prevent accidental voltage changes,
which could cause damage. To select another voltage your device must be detached first.
DEViCE Charging instruCtions:
•
Once connected to your device using any of the methods below, turn on the Power
Cell and your device will immediately start charging. Charging can be verified by small
moving dots in the LCD DISPLAY under the voltage selection. Once charging is complete,
unplug it from the Power Cell.
•
Some Apple
®
devices may display “this device is not supported” if the proper voltage is
not selected or if the battery level is too low. Fully charge the Power Cell and verify the
correct voltage before retrying.
uSb Output (5V/2A):
•
May be used simultaneously with other DC OuTPuTS to charge other devices (except for
9V selection).
•
Connect your device specific uSb charging adapter to the uSb OuT PORT and the other
end to your device. Or use the included uSb ADAPTER CAbLE and TIPS and plug the
male end of the CAbLE into the uSb OuT PORT of the Power Cell. Plug the appropriate
TIP into your device.
DC Output (9V, 12V, 16V, 19V & 21V):
•
bARREL POWER ADAPTER (included)
1.
use this adapter to charge using your device’s 12V vehicle charger.
2.
Plug the bARREL POWER ADAPTER into the DC OuT PORT of the Power Cell.
3.
Connect your 12V vehicle charger into the bARREL ADAPTER and the other end
into your device.
•
LAPTOP CONNECTION
important: When using a Dell brand laptop, please note the following. It is not
possible to charge the internal battery using the Power Cell. It can only operate the
laptop directly from the Power Cell, due to built-in controls by Dell. To override, remove
the internal battery to operate the laptop and prevent the DELL compatibility error code.
For all other laptop brands the Power Cell can charge the internal battery or directly
operate the laptop. However, if the laptop fails to charge from the Power Cell then
remove the laptop battery and retry.
1.
Select either 16V, 19V, or 21V depending on your model requirements. Laptops
will not charge on any of the other voltage selections.
2.
Connect the LAPTOP ADAPTER CAbLE to the appropriate LAPTOP TIP, plug the
TIP into your laptop, and the other end into the DC OuT PORT.