Aervoe Power Center 100 User Manual
Max burton, Power center #6994
IMPORTANT SAFEGUARDS
Read all instructions before operating. Failure to follow all instructions may cause serious injury or
property damage. Keep a copy with the Power Center or inside the Jumper Cable access door for
reference.
CAUTION: To avoid electric shock and injury:
• Do not submerge the unit or its accessories in any liquid
• Keep electrical outlets and cables dry and out of severe weather
• Make sure all cables and adapters are connected correctly and in good condition. Never use
if they become worn or wires are exposed.
• Contains high voltage electronics and battery
•
Keep upright on a level surface to prevent obstructing vents
•
Do not look directly at the spotlight
•
Do not operate at temperatures below 14
ºF (-10ºC) or above 120ºF (49ºC)
•
Observe proper battery disposal requirements for your area and follow removal and
replacement instructions in the Care and Maintenance Section
•
Administer close supervision when using around children
NOTES AbOUT chARGING AND USING STORED POwER:
Stored power may be used at the same time the unit is charging using any of the following methods.
A built-in Battery Protection Circuit is included and audible beeps and visual cues on the LCD
Display will alert any over voltage, low voltage, or over heating conditions.
chARGING ThE POwER cENTER
120V Charging:
1.
Plug the included 120V AC adapter into an electrical wall outlet
2.
Plug the other end of the adapter into the DC IN #1 PORT of the unit
3.
The BATTeRy LeVeL INDICATOR will blink with the available battery capacity on the LCD
DISPLAy while charging.
12V Charging:
1.
Plug the included 12V DC adapter into a vehicle power recepticle
2.
Plug the other end of the adapter into the DC IN #2 PORT of the unit
3.
The BATTeRy LeVeL INDICATOR will blink with the available battery capacity on the LCD
DISPLAy while charging.
Dynamo Hand Crank Charging:
1.
Open the HAND CRANK arm and rotate clockwise at approximately 80-120 cycles/minute.
CAUTION: Turning at speeds greater than 120 cycles/minute may cause the unit to overheat.
2.
The BATTeRy LeVeL INDICATOR will blink with the available battery capacity on the LCD
DISPLAy while charging. Charging times will vary depending on crank speed and existing
battery level.
3.
Close the HAND CRANK.
Solar Charging (solar panel not included):
1.
Plug a compatible solar panel into the DC IN #2 PORT using the cord that comes with the solar
panel.
2.
Follow the instructions included with your solar panel and place it and the POweR CeNTeR in
direct sunlight.
3.
The BATTeRy LeVeL INDICATOR will blink with the available battery capacity on the LCD
DISPLAy while charging. Charging time will depend on the solar collector used and the
intensity of sunlight available.
NOTe: The Power Center will charge to 14.5V DC and 100% capacity initially from all methods
above and then settle at 13V DC and 85% capacity.
SPOTlIGhT OPERATION
Press the ON/OFF button:
•
1 time for 1 watt spotlight
•
2 times for flashing red 3 LeD emergency light
•
3 times for off
120V Ac POwER SUPPly (100 watt-hour)
1.
Press and hold the AC button for 3 seconds until AC OUTPUT appears on the LCD DISPLAy. It
is now ready to operate an appropriate 120V device (100 watts or less).
2.
Insert the 120V plug of the device into the 120V AC OUTPUT.
3.
The temperature and device wattage will be displayed on the screen.
4.
To deactivate the AC power supply, remove the plug and press the AC button for 3 seconds
until the AC Output function disappears.
12V Dc POwER SUPPly (100 watt-hour)
1.
Insert the plug of a 12V device into the 12V DC OUTPUT. It is now ready to operate an
appropriate 12V device (150 watts or less).
2.
To deactivate the DC power supply, remove the plug from the outlet.
USb cONNEcTION
1.
Press and hold the USB button for 3 seconds until USB OUTPUT shows on the LCD DISPLAy.
It is now ready to operate an appropriate device.
2.
Insert the plug of the USB device into the USB PORT.
3.
To deactivate the USB function, remove the plug and press the USB button for 3 seconds until
the USB Output function disappears.
VEhIclE JUMP STARTER
CAUTION: To prevent short circuit, explosion, and serious injury, keep metal parts away from the
positive and negative clamps and keep the clamps from touching each other. Check the condition of
the vehicle battery’s poles before connecting the jumper cables.
1.
Instructions and diagrams are also printed inside of the jumper cable door.
2.
Make sure the battery capacity is above 12V DC prior to jump starting. If it is not, use any of
the charging methods above to bring it up to the 12-14V range.
3.
Open the CABLe DOOR and take out the ReD and BLACK CLAMPS.
4.
Unscrew the BLACK NUT from the NegATIVe TeRMINAL and connect the RINg on the BLACK
wIRe to the NegATIVe TeRMINAL.
5.
Screw the BLACK NUT back onto the NegATIVe TeRMINAL to ensure a good connection.
6.
Repeat the process for the ReD NUT and ReD wIRe for the POSITIVe TeRMINAL.
7.
Clamp the black clamp to the negative pole of the car battery first, then clamp the red clamp to
the positive pole.
8.
Start the vehicle. If the vehicle fails to start, use the hand crank for 10 minutes or longer to
boost the power in the battery. If the vehicle still does not start after several attempts the
vehicle’s battery may be defective or reached it’s life expectancy and need to be replaced.
Consult a qualified repair facility.
clOcK
1.
The time should appear in the LCD DISPLAy. If it isn’t, press and hold the AC button to switch
back to clock display.
2.
Press and hold the SeT button until the hour blinks. Press AC to increase or USB to decrease
the setting.
3.
Press SeT button and the minutes will blink and set as above.
4.
Press the SeT button again to change between 12 and 24 hour formats.
cARE AND MAINTENANcE
•
Clean the body with a damp cloth. Soap and water may be used but it should never be
immersed or allow liquid to enter any open electronic circuits. Do not use any harsh solvents
or chemicals.
•
Store in a well-ventilated, dry environment.
•
Unit may be stored fully for 90+ days and it will be ready for use. It should be checked every 3
months and kept charged.
•
Battery Disposal:
•
Dissipate all battery power from unit. Have a qualified electrician verify the battery meter
is at 0%
•
Remove the 12 housing screws on the back panel. Remove battery and carefully
disconnect the wires from battery.
•
Dispose or recycle the old battery in accordance with all local disposal requirements.
•
Replace with a new battery with equal specifications by reversing the steps above.
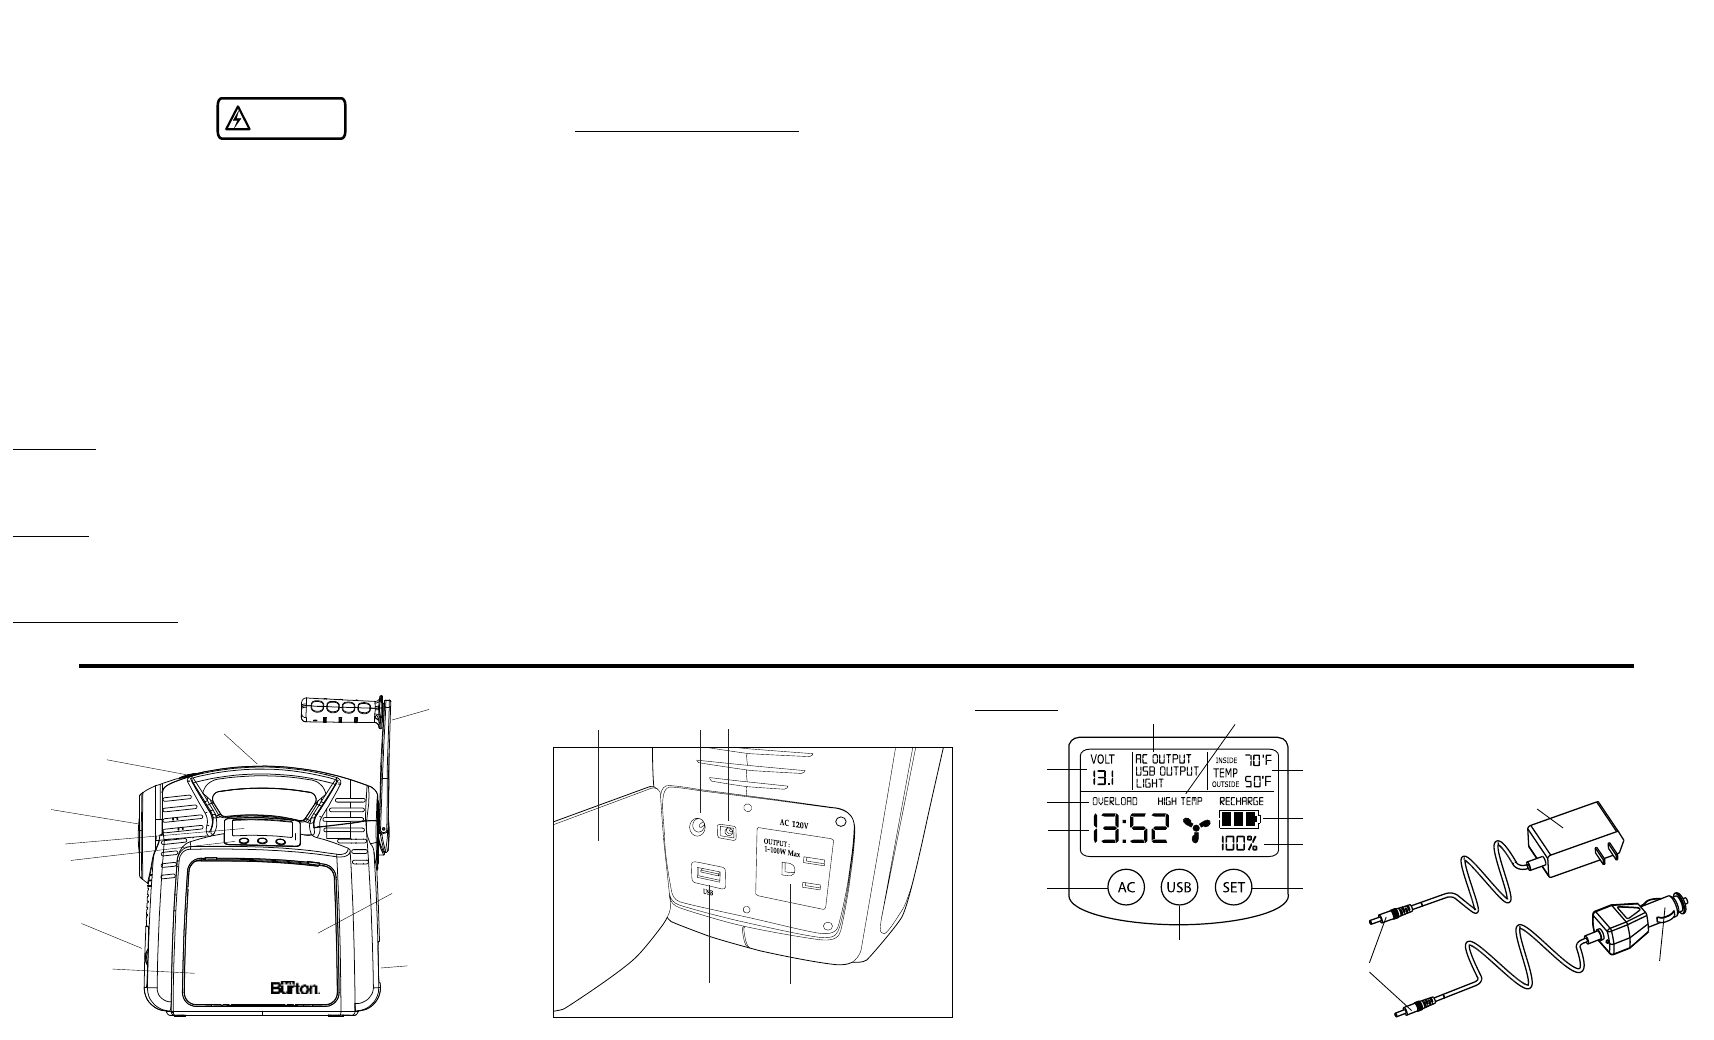
Power Center
Spotlight/Flasher On/Off Button
Spotlight
LCD Display
Control Panel
Handle
Hand Crank
Jump Start Cable Access
Charging
Input/Output
Access
12V DC Output
& Fuse
Not visible (inside access door):
• 120V AC Inverter Fuse
• LCD Display Reset Button
Charging Access Door
USB Output
120V AC Output
120V AC In 12V DC In
DC IN #2
DC IN #1
.
W A R N I N G
HIGH VOLTAGE
5
Warning
Indicator
Warning
Indicator
Battery Level
Indicator
Battery Capacity
AC Watt/Clock
AC Output
Function
USB Output
Function
Clock Set
Current
Battery
Voltage
Temperature
Operation
Function
Control Panel
Max Burton
®
Power Center #6994
PARTS IDENTIFIcATION
Male Plug
120V AC Charging
Adapter
12V DC Charging
Adapter