HOT GRIPS Heat Trollers - Warm 'N Safe by First Gear User Manual
HOT GRIPS Hardware
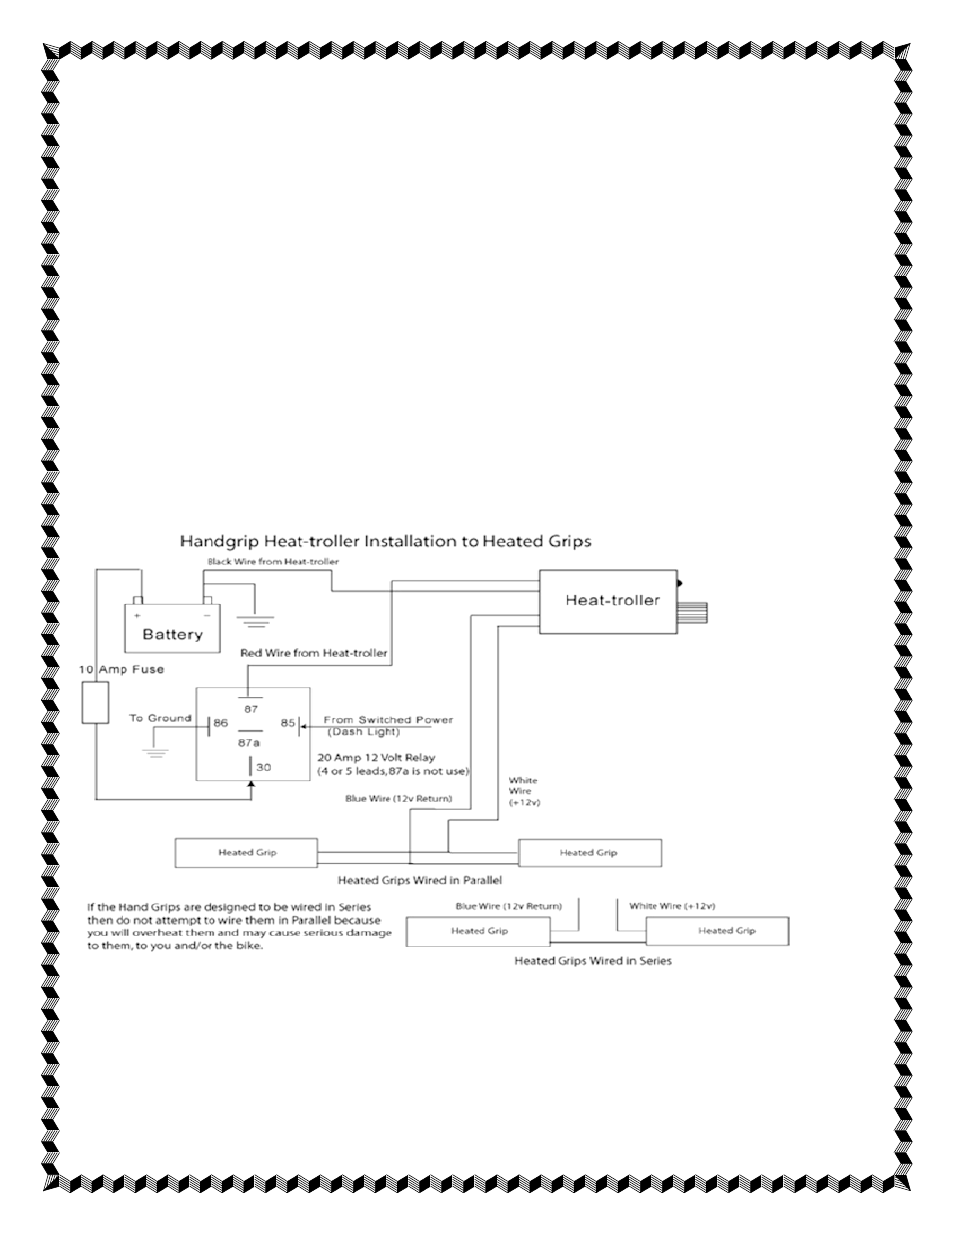
Heat‐Troller™ (for heated grips) Hot Grips® Wiring Instructions
This is how the Heat‐Troller™ should be wired up using Hot Grips®.
HOWEVER, WE HAVE JUST LEARNED THAT SOME MODELS OF
HEATED GRIPS HAVE TO BE WIRED IN SERIES! IF THEY ARE DESIGNED TO BE WIRED IN SERIES, DO NOT WIRE IN PARALLEL TO GET MORE
HEAT. IT WILL CAUSE THE GRIPS TO OVERHEAT AND FAIL, AND WILL POSSIBLY DAMAGE YOUR ELECTRICAL SYSTEM.
1. Turn knob on Heat‐Troller™ to off position and make sure it is unplugged from power.
2. Determine where the switch and LED should be mounted on your vehicle. The LED should be placed in your line of sight and
not hidden behind the knob. Please note that the switch and LED are mounted on a circuit board which may be broken apart at
score line if you prefer to mount the switch in a different place than where you mount the LED. Clip through the cable tie holding
the board to the cable, strip back the casing of the cable as far as needed, and then reattach a cable tie (included) for strain relief.
3. Drill a hole through the mounting surface for the switch using a 9/32 inch or 17/64 inch drill bit. We recommend a Unibit #1
drill bit. If the mounting surface is too thick for the threads of the switch, an adaptor piece (included) may be needed. The collar
of the nut fits into the hole through the fairing and will screw to the shaft of the switch, holding it in place. The hole drilled
through the fairing will need to be made large enough for the collar to fit into it. Drill a hole for the LED using a 7/64‐inch drill
bit. Use hot glue or waterproof caulking to hold the LED in place. If you are going to use a relay, on a 5 pin relay, ignore pin 87A.
N
N
No
o
ottte
ee ttth
h
he
eerrre
ee a
aarrre
ee tttw
w
wo
o
o ssse
eetttsss o
o
offf h
h
he
eea
aattte
eed
d
d g
ggrrriiip
p
psss a
aab
b
bo
o
ov
vve
ee,,, o
o
on
n
ne
ee iiisss iiifff y
yyo
o
ou
u
u h
h
ha
aav
vve
ee a
aa ssse
eettt w
w
wiiirrre
eed
d
d iiin
n
n “““P
P
PA
A
AR
R
RA
A
ALLLLLLE
EELLL”””,,, a
aan
n
nd
d
d ttth
h
he
ee o
o
ottth
h
he
eerrr iiifff iiin
n
n “““S
SSE
EER
R
RIIIE
EES
SS”””...
The Heat‐Troller™ wiring shows a universally available RELAY for the following reason: The best way to add an accessory like
heated grips or heated clothing is thru a RELAY. When you use a RELAY, which is triggered by something like your dash lights,
then you eliminate the possibility of accidentally wearing down your battery if you leave the accessory on. It does involve more
wiring, but well worth the effort. RELAYS are available at auto parts stores and they are $5.‐$10. If you install a 10 amp relay,
then you can use it to control up to 10 amps of total accessories. If you install a 20 amp relay, then you can control up to 20 amps
of accessories. Hot Grips® are 2.5‐3 amps total for the pair, depending on the length and model. Do not run more accessories
(total amps) than your electrical system has the reserve power for, or you will have a dim headlight and run down the battery.