Interactive Toy Concepts Neptune User Manual
Instruction manual, Complete package contents and component breakdown, Quick-start instructions - controller mode
The Neptune is a delicate machine, before removing it from the packaging please read the instructions!
12
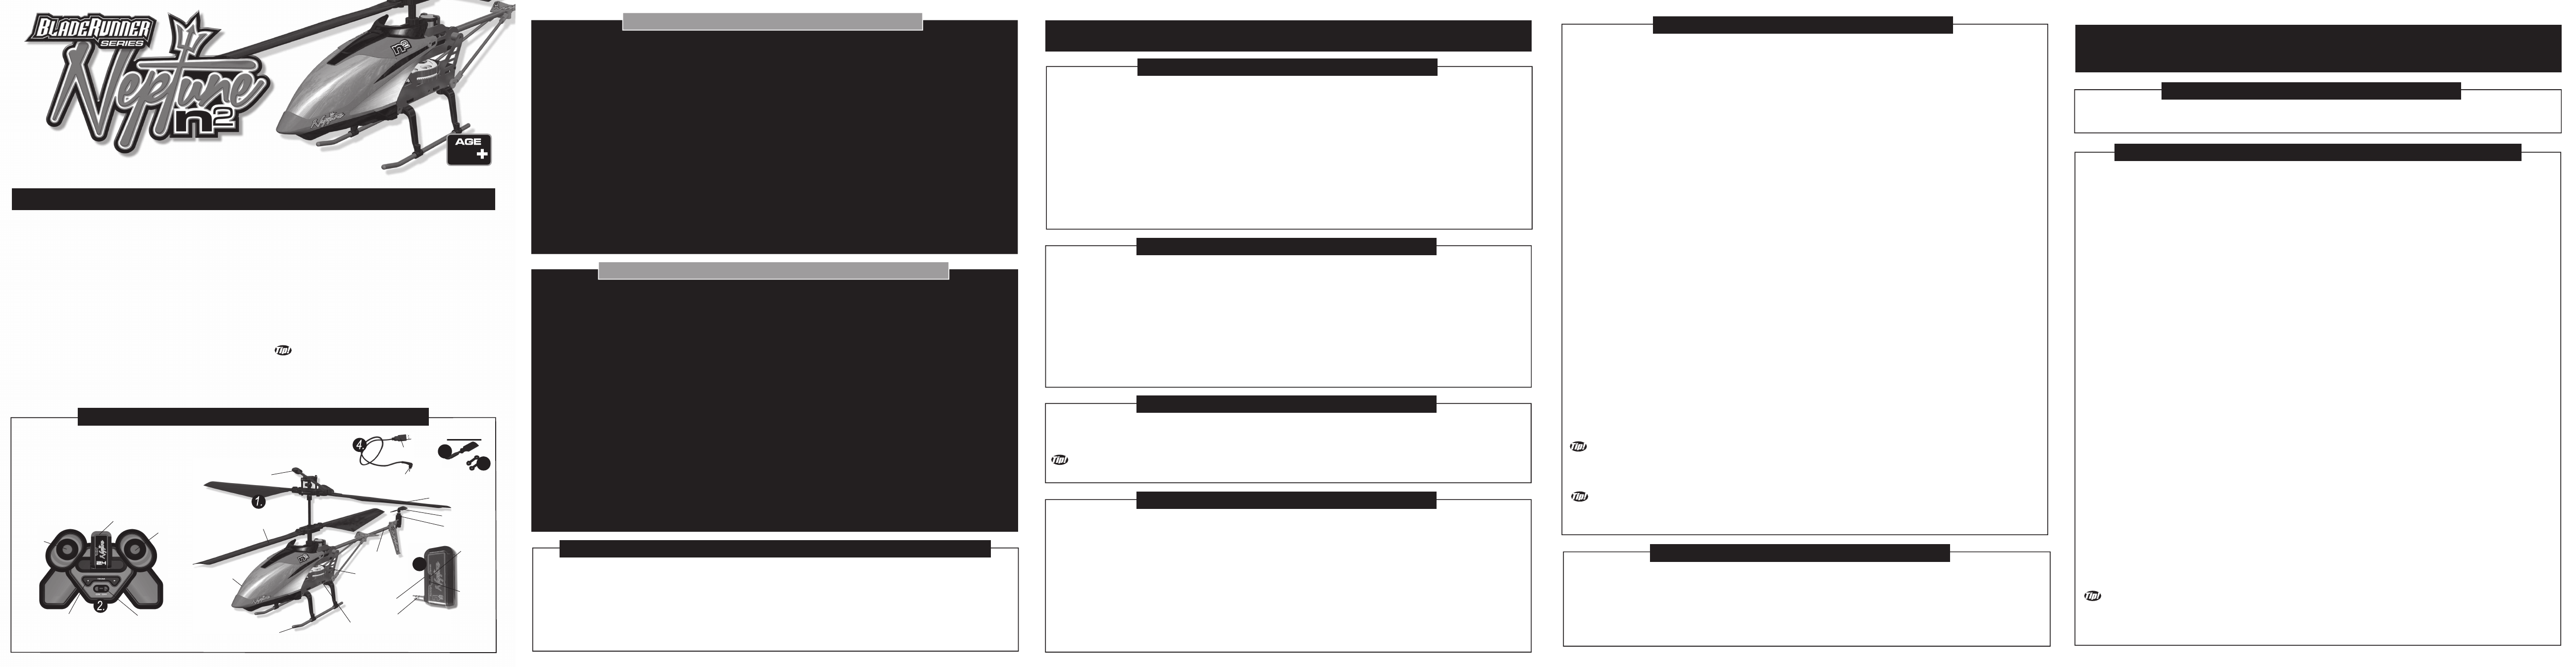
COMPLETE PACKAGE CONTENTS AND COMPONENT BREAKDOWN:
Welcome to the BladeRunner Neptune Helicopter! The Neptune brings advanced, 3-Channel, flying technology to flyers
who are looking for great performance from an indoor Helicopter. The Neptune has built-in advanced gyroscope
technology for providing an ultra-smooth flight, and balance control assistance. In addition, the Neptune Helicopter has
digital proportional control. The Neptune is operable by Infrared Control with 3 bands A, B and C. This allows for the
operation of up to 3 Neptune Helicopters in one area at the same time. The Neptune Helicopter can be operated by the
IR Dongle and the Controller included with this package, once they have been connected. Alternatively, the
BladeRunner Neptune Helicopter can also be controlled by connecting the IR Dongle to one of several "Smart Control
Devices". For example, smartphones such as an iPhone* or Android** phone can be used to operate the Neptune. The
Neptune Helicopter can also be operated by an Android** tablet, iPod Touch or an iPad*. The Neptune Helicopter has
a built-in, non-removable, rechargeable 3.7 Volt Lithium-Polymer Battery. There are 2 AAA Batteries required for the
Neptune Helicopter's Controller. Most Smart Control Devices also have built-in, rechargeable batteries and do not
require separate Batteries either. Do not throw away this instruction manual as it contains valuable information for the
operation of your Neptune Helicopter as well as warranty information. The helpful tips in this Instruction Manual will
improve your skill and enhance your experience. Look for these symbols for extra help.
UNPACKING YOUR BLADERUNNER NEPTUNE HELICOPTER:
WARNING:The Neptune is a delicate machine, before removing it from the packaging please read the instructions!
To prevent damage during shipping, the Neptune is securely fastened in the package. Please ensure that all of the
tie-down and fastening locations are unfastened before attempting to remove the Neptune Helicopter from the
package. Be very careful when removing the Neptune to prevent damaging the Helicopter.
USB CHARGING CABLE
REPLACEMENT
TAIL ROTOR
REPLACEMENT
CONNECTORS
USB
connector
1 circular charging plug
1. 1 x BladeRunner Neptune Helicopter
2. 1 x IR Dongle
3. 1 x Controller
4. 1 x USB Charging Cable
5. 2 x Balance Bar-to-Upper Rotor Connector
6. 1 x Replacement Tail Rotor
7. 1 x Instruction Manual
1. Turn on the Neptune Helicopter and wait until the Red LED stops blinking.
2. Insert IR Dongle into the slot on the front of the Controller. Rotate the IR Dongle until it sits upright in the Controller.
3. Turn on the Controller. The LED on the top of the Controller (behind the IR Dongle) will light up.
4. The Neptune Helicopter was designed to operate in 3 Bands as follows:
A) To configure the Neptune Helicopter and Controller to operate in Band A, move the Left Stick up once to initiate
Throttle Control. The Controller's Power LED will flash once.
B) To configure the Neptune Helicopter and Controller to operate in Band B, move the Right Stick all the way up and
hold it there while you move the Left Stick up once to initiate Throttle Control. Release both Sticks. The Controller's Power
LED will flash twice.
C) To configure the Neptune Helicopter and Controller to operate in Band C, move the Right Stick all the way down
and hold it there while you move the Left Stick up once to initiate Throttle Control. Release both Sticks. The Power LED will
flash three times.
5. Push the Left Stick up again gradually. The Main Rotors will start to spin and the Neptune Helicopter will lift off the ground.
Use the Left Stick to control the altitude of your Neptune Helicopter.
6. If the Neptune Helicopter's body is spinning in the air, adjust this by pressing the Trim Pad to the left or right to counter the
unwanted rotation.
7. Use the Right Control Stick to control the Forward, Reverse, and Left / Right steering of the Neptune Helicopter.
8. When finished flying, land your Neptune Helicopter by gently pushing the Left Stick all the way down. If you need to stop
flying immediately, press the Emergency Stop Button.
QUICK-START INSTRUCTIONS - CONTROLLER MODE:
The Neptune Helicopter and IR Dongle both have a built-in, non-removable, non-replaceable, rechargeable Lithium-Polymer Battery. Do
not tamper with this Battery. Tampering with this Battery is dangerous and will void the warranty. The Controller requires 2 AAA Alkaline
batteries to operate. To ensure that your particular Smart Control Device has sufficient power during the operation of the Neptune
Helicopter, consult the manufacturer's specifications for your specific model.
Both the Neptune Helicopter and IR Dongle must be charged using only the USB Charging Cable provided. The Neptune Helicopter needs
to be charged prior to the first flight. Please charge the Neptune Helicopter before the first flight for optimal performance. It is necessary to
charge the Neptune Helicopter before all subsequent flights where the Internal Battery has been depleted on the previous flight. The IR
Dongle also needs to be charged occasionally. Follow the below steps to charge your Neptune Helicopter and IR Dongle and to install
Batteries into your Controller.
NEPTUNE BATTERY AND CHARGING REQUIREMENTS:
1. Ensure the Neptune Helicopter's On / Off Switch is in the OFF position. Both Red LEDs on the Neptune Helicopter will turn off.
2. Plug the USB Connector into the power source (most likely a laptop computer) first.
3. Once the USB Connector is securely plugged into the power source, connect the Circular Charging Plug into the Charging
Port located at the bottom of the Neptune Helicopter. Make sure the power source is turned on and is delivering power through
the USB Charging Cable. Most laptops will only transmit power through the USB port if they are turned on.
4. Charging will start automatically. Note, the Red LED at the bottom of the Neptune Helicopter will light up during charging
even though the Neptune Helicopter is turned off.
Charging will take 30 - 45 minutes for up to 4 - 6 minutes of flight.
5. Once the charging is complete, the Red LED on the bottom of the Neptune Helicopter will turn off.
6. Make sure to unplug the Circular Charging Plug from the Neptune Helicopter’s Charging Port first. Secondly, unplug the
USB Charging Cable from the USB port on the power source.
7. The Neptune Helicopter is now ready to fly.
CHARGING THE NEPTUNE HELICOPTER:
WARNING: Always insert the USB Charging Cable’s USB Connector into the USB power source before inserting the Circular Charging Plug
into the Neptune Helicopter or into the IR Dongle.
CHOOSING YOUR FLYING LOCATION:
Please note that the Neptune Helicopter is intended to be flown indoors only. The Indoor flying area should ideally be roughly 16’ x 16’ (5 meters x 5 meters) with
the standard household ceiling height as a minimum. The Infrared control range of your Neptune helicopter is up to 16’ (5 meters), and varies depending on
interference within the operational environment. The IR Dongle uses a safe infrared beam to communicate with the Neptune Helicopter. An infrared beam is very
similar to a beam of light so it is important to stay in visual range of the Neptune Helicopter at all times during flight or control will be lost. When flying your
Neptune Helicopter be careful to avoid contact with any objects such as furniture, plants, electronics, and any other items which can break easily. The Neptune
Helicopter has Rotor Blades that spin at relatively high speeds and could potentially damage some household objects. Avoid operating the Neptune Helicopter
around pets or people, and especially crowds. If the Neptune is stepped on or otherwise crushed, it will sustain damage that would not be covered under warranty.
Ensure that people around you are aware that you are playing with the Neptune Helicopter. Be aware of changes in your operational environment and play safe!
WARNING: The spinning propellers can cause injury to people, animals and plants as well as damage to furniture and other
property. To avoid the risk of injury or damage, stay clear of spinning propellers and fly carefully. Always keep a minimum
distance of about 6 feet (1.83 meters) between the spinning propellers and people, pets, or other objects.
Continued.
TM
TM
Neptune IR Dongle
Major Components:
3.
5.
Neptune Helicopter
Major Components:
Operate
Green LED
Connector
Balance bar
Top Rotor
Bottom Rotor
Tail Rotor
Tail Motor
Tail Boom
Landing Gear
On / Off Switch
(Right Side)
Regardless of which Smart Control Device you are using, the basic operation of the Neptune Helicopter is the same. Follow
these easy instructions to connect your Neptune Helicopter and IR Dongle to your Smart Control Device.
IF APPLICABLE, ENABLE YOUR SMART CONTROL DEVICE’S AIRPLANE MODE WHENEVER YOU FLY THE
NEPTUNE HELICOPTER. IF AIRPLANE MODE IS NOT ENABLED, INCOMING CALLS ON THE SMART CONTROL DEVICE
WILL DISRUPT THE OPERATION OF YOUR NEPTUNE HELICOPTER AND MAY CAUSE IT TO CRASH!!
CONNECTING AND SETTING UP THE NEPTUNE HELICOPTER SYSTEM:
Charging port
Recharge
Green LED
INSTRUCTION MANUAL
6.
OFF/ON Stick
Right Stick
Left Stick
IR Dongle
in Position
Trim Pad
Neptune Helicopter
Transmitter Components:
1. Download the free "NEPTUNE CONTROL" App from the Apple App Store*, or from Google Play**.
2. Turn on Airplane Mode.
3. Install IR Dongle into Smart Control Device.
4. Turn up the volume on your Smart Control Device to the maximum setting. This will establish the best signal to the IR Dongle.
5. Launch NEPTUNE CONTROL App.
6. a) Press the Options Button to access the Options Screen. On the Options Screen, select Band A, B, or C, which corre-
sponds to the IR band of your particular Neptune Helicopter.
6. b) On the Options Screen, select the Joystick Mode or Motion Mode. Please note, Motion Mode requires more skill and
experience to use. It is intended as an advanced mode of control. Exit the Options Screen.
7. Turn on Helicopter and wait until Red LED stops blinking.
8. Push the Left Slider (Throttle Control) all the way up and down on the NEPTUNE CONTROL App to activate the Helicopter.
9. Push the Left Slider (Throttle Control) up again gradually. The Main Rotors will start to spin and the Neptune Helicopter will
lift off the ground. Use the Left Slider (Throttle Control) to control the altitude of your Neptune Helicopter.
10. If the Neptune Helicopter's body is spinning in the air, adjust this by moving the Trim Slider to the left or right to counter the
unwanted rotation.
11. a) In Joystick Mode use the Right Control Pad to control the Forward, Reverse, and Left / Right steering of the Neptune
Helicopter.
11. b) In Motion Mode, tilt the Smart Control Device to control the forward - reverse, and left - right turning of the Neptune
Helicopter.
12. When finished flying, land your Neptune Helicopter by gently pushing the Left Slider (Throttle Control) all the way down.
If you need to stop flying immediately, press the Emergency Stop Button.
QUICK-START INSTRUCTIONS - SMART CONTROL DEVICE MODE:
1. Plug the USB Connector into the power source (most likely a laptop computer) first. Once the USB Connector is securely
plugged into the power source, connect the Circular Charging Plug into the Charging Port on the IR Dongle. Make sure the power
source is turned on and is delivering power through the USB Charging Cable. Most laptops will only transmit power through the
USB port if they are turned on.
2. Charging will start automatically. Note, the Red Charge LED on the IR Dongle will light up.
Charging will take 30 - 45 minutes for up to 90 minutes of operation.
3. When the IR Dongle is fully charged, the Red Charge LED will turn off.
4. Make sure to unplug the Circular Charging Plug from the IR Dongle’s Charging Port first. Secondly, unplug the USB Charging
Cable from the USB port on the power source.
5. The IR Dongle is now ready for use.
CHARGING THE IR DONGLE:
1. Open the Battery Compartment Door on the back of the Neptune Controller by sliding it down.
2. Insert the 2 AAA Batteries as shown. Make sure to respect the polarity.
3. Replace the Battery Compartment Door.
When the Controller's Batteries are low on power, the Controller's LED will be flashing. It will be necessary to stop flying and
replace the 2 AAA Alkaline Batteries in the Controller.
INSTALLING BATTERIES INTO THE CONTROLLER:
Neptune Helicopter LED Functions:
Frontal Red LED is off:
-Neptune Helicopter is turned off and is either charging or not charging, or;
-The Neptune Helicopter is turned on, but the Internal Battery charge is depleted, or;
- The Frontal Red LED has been turned off with a switch in the NEPTUNE CONTROL App.
Frontal Red LED is flashing:
-The Neptune Helicopter is turned on and is initializing its Gyro, or;
- the Internal Battery charge is low.
PRODUCT LED FUNCTIONS:
Frontal Red LED is on:
-Neptune Helicopter is turned on and the Gyro is initialized. (Please note, it is possible to turn the Frontal Red LED off
with a switch on the NEPTUNE CONTROL App.)
Charging Red LED is on:
-The Neptune Helicopter is turned off and is charging.
Charging Red LED is off:
-The Neptune Helicopter is not charging.
Neptune IR Dongle LED functions:
Green LED is flashing:
-The IR Dongle connected to the Controller or Smart Control Device and is in operation.
Green LED is off:
-The IR Dongle is not in operation.
Red LED is on:
-The IR Dongle is charging. (It will turn off once the IR Dongle is finished charging)
Red LED is off:
-The IR Dongle has finished its charge cycle.
-The IR Dongle is not charging.
Neptune Controller LED Functions:
Red LED is off:
-The Controller is off.
Red LED is flashing:
-The Controller's Batteries are low on power.
Red LED flashes only once:
- The Controller has just been successfully synced with the Neptune Helicopter through Band A.
Red LED flashes only twice:
- The Controller has just been successfully synced with the Neptune Helicopter through Band B.
Red LED flashes only three times:
- The Controller has just been successfully synced with the Neptune Helicopter through Band C.
Red LED is on continually:
-The Controller is synced with the Neptune Helicopter.
CHARGE TIME VARIES BASED ON NEPTUNE HELICOPTER’S OR IR DONGLE'S INTERNAL BATTERY CHARGE
CONDITIONS. TYPICALLY AFTER A 4 - 6 MINUTE FLIGHT THE HELICOPTER WILL NEED A 30 - 45 MINUTE CHARGE.
TYPICALLY AFTER 90 MINUTES OF USAGE THE IR DONGLE WILL NEED A 30 - 45 MINUTE CHARGE.
YOU DO NOT NEED TO WAIT FOR THE CHARGE ON THE NEPTUNE HELICOPTER OR IR DONGLE TO BE 100%
COMPLETE TO FLY. SHORTER CHARGE TIMES = SHORTER FLIGHT TIMES. FOR THE LONGEST FLIGHT TIMES PLEASE
LET THE NEPTUNE HELICOPTER FINISH ITS CHARGE CYCLE.
PRODUCT LED FUNCTIONS: -Continued
Please refer to the section "QUICK-START INSTRUCTIONS - CONTROLLER MODE" to connect, set-up and operate your
Neptune Helicopter in Controller Mode.
CONTROLLER MODE:
SMART CONTROL DEVICE MODE:
SMART CONTROL DEVICE COMPATIBILITY:
There is a broad range of Smart Control Devices which are compatible with your Neptune Helicopter. For the latest updates on
Device compatibility, it is recommended to check the latest information at the following website: www.interactivetoy.com.
For Apple iOS*:
iPhone 4, iPhone 4s, iPhone5, iPad 2, 3, & 4,iPad Mini, iPod Touch 4G, iPod Touch 5G*. With iOS 5.0* or up.
For Android** based phone devices:
Dual core processor required. Android OS 2.3.5** or up, Multi-touch screen.
For Android** based Tablet devices:
Dual core processor required. Android OS 3.2** or up, Multi-touch screen.
DOWNLOADING YOUR NEPTUNE CONTROL APP:
The NEPTUNE CONTROL App is available as a free download for all Neptune compatible Smart Control Devices. There are
some differences in the methods for downloading the NEPTUNE CONTROL App for your particular device. It is recommended
to download the latest NEPTUNE CONTROL App update for your specific Smart Control Device. The NEPTUNE CONTROL
App updates may contain information on Device compatibility, troubleshooting tips, new features and replacement part availabil-
ity. Follow the basic steps as described below to download the appropriate NEPTUNE CONTROL App for your specific Smart
Control Device:
Apple* based Smart Control Devices:
1. Access the Apple App Store*
2. Use the Keywords "NEPTUNE CONTROL" to search for the latest version of the NEPTUNE CONTROL App.
3. Download and install the NEPTUNE CONTROL App on your specific Apple* based Smart Control Device. For a description
of all current compatible Apple* based Smart Control devices see section “SMART CONTROL DEVICE SPECIFICATIONS”.
Android** based Electronic Smart Control Devices:
1. Access Google Play**.
2. Use the Keywords "NEPTUNE CONTROL" to search for the appropriate version of the NEPTUNE CONTROL App.
3. Download and install the NEPTUNE CONTROL App on your specific Android** based Smart Control Device. For a description
of all current compatible Android** based Smart Control devices see section “SMART CONTROL DEVICE SPECIFICATIONS”.
Continued.
Charging port
Charging port
red LED (rear)