La Crosse Technology TX61U-IT User Manual
La Crosse Technology Sensors
1
TX61U-IT
Wireless 915 MHz
Solar-Powered Temperature Sensor
The TX61U-IT sensor sends the collected outdoor temperature to your existing
Wireless Display (not included) by way of a 200 Ft wireless signal.
INVENTORY OF CONTENTS
1.
One TX61U-IT solar-powered wireless temperature sensor
2.
Mounting hardware
3.
Instruction manual
IMPORTANT NOTES ON SETUP AND OPERATION
•
Place the TX61U-IT sensor in a dry, shaded area. Please avoid a location
with direct sun, as it will cause incorrect temperature readings.
•
The TX61U-IT sensor consumes solar power and uses the internal
rechargeable batteries to store the collected power.
•
The sensor features a high-efficiency modern solar panel that maintains a
full charge with minimal light; do not place in direct sun light.
•
Fog and mist will not harm the sensor but direct rain must be avoided.
•
The TX61U-IT sensor has a wireless range of 200 feet (60.96 m). Keep in
mind that the 200 ft range equates to an open air scenario with no
obstructions, and that radio waves DO NOT curve around objects. The
actual transmission range will vary depending on what is in the path of the
signal. Each obstruction (roof, walls, floors, ceilings, thick trees, etc.) will
effectively cut signal range in half.
Example: If the TX61U-IT Sensor, with a 200 feet (60.96 m) range, is
mounted on an exterior wall, the signal must then pass through one
exterior wall, one interior wall, and across the 10 feet (3 m) width of the
room between the 2 walls to reach the Wireless Display. The first wall will
reduce the range to 100 feet (30.48 m), and the second wall will reduce the
range to 50 feet (15.24 m). Factoring in the 10 foot room, this leaves a
maximum of 40 feet (12.92 m) of remaining signal range.
This allowance is typically enough for a frame wall with non-metallic siding;
however certain materials can reduce range even further. Metal siding,
stucco, and some types of glass can reduce signal range by as much as ¾
or more, compared to the ½ reduction typical of most obstructions. It is
possible to receive a signal through these materials, however maximum
range will be much less due to their tendency to absorb or reflect a much
larger portion of the sensor’s signal.
•
The TX61U-IT sensor measures and transmits signal about every 8
seconds when its battery voltage is higher than 2.4V.
•
Once the batteries are inserted into the Wireless Display (not included), it
will search for the signal transmitting from the TX61U-IT for a few minutes.
If the Wireless Display fails to receive the outdoor temperature, this means
that the TX61U-IT is either located too close or too far from the Wireless
Display. Please adjust the location of the TX61U-IT sensor and try again. If
it fails again, please restart the set up procedure (see below).
SETTING UP
Step 1. It is important to allow sufficient light to reach the solar panel while
activating the sensor. Make sure the lights are on in the setup room and
the solar panel is facing a 60W light bulb or brighter - do not cover with
hands or other objects. To begin the set up process, use the included
plastic reset rod to GENTLY PUSH the reset button once in the hole on
the front of the sensor with the LCD/solar panel facing a light source. All
LCD segments will light up briefly. The code number and the security
code (for example, “20”) of the model will be displayed sequentially. Next,
the battery voltage will be shown on the LCD, it should be higher than
2.4V to maintain normal operation. Then the current temperature will
appear on the sensor's LCD, and it will start to transmit the wireless
temperature signal.
Note:
When the voltage of the TX61U-IT sensor is lower than 2.4V, the
transmission of signal stops and “LO” is displayed on the LCD for
approximately 2 seconds before the sensor enters into the "IDLE" mode.
In the "IDLE" mode, the LCD turns off. The sensor will check and charge
up the internal rechargeable battery automatically. When the battery
voltage rises up to 2.5V, the LCD will turn on and transmission of signal
will start again.
Step 2. Insert the batteries into the Wireless Display (not included) within 2
minutes of performing the start up process for the TX61U-IT. Once the
batteries of the Wireless Display are in place, all segments of its LCD will
light up briefly. Then the indoor temperature and the time (displayed as
12:00) will appear on the Wireless Display. If they do not appear after 30
seconds, please reinstall the Wireless Display batteries and try again.
Once the indoor data is displayed, proceed to the next step.
Step 3. After the Wireless Display is powered up, it will start receiving wireless
temperature signal from the TX60U-IT sensor. If reception is successful,
the outdoor temperature will appear on the Wireless Display. If this does
not happen after 5 minutes, please remove the batteries from the
Wireless Display and go back to Step 1.
Step 4. To ensure sufficient 915 MHz wireless communication, the final distance
between the Wireless Display and the TX61U-IT sensor should be no
greater than 200 feet (60.96 meters) open air.
Note:
If the TX61U-IT is placed in a dark environment for 24 hours, it will enter
into the "STOP" mode to save power. The LCD will turn off and it will stop
transmitting the wireless temperature signal. If this happens, please press the
reset button on the TX61U-IT sensor to wake it up again. Afterwards, if the
voltage is higher than 2.4V, the LCD will turn on again and resume the
transmission of the wireless temperature signal. However, if the voltage is lower
than 2.4V, “LO” will appear on the LCD and the sensor will enter into "IDLE"
mode.
If the battery voltage is lower than 2.4V, please relocate the TX61U-IT sensor to
a brighter environment in order to charge up the internal rechargeable batteries
to continue normal operation.
BATTERY INFORMATION
Wireless Display
To replace the batteries in the Wireless Display:
1.
Lift up the battery compartment cover and remove the batteries.
2.
Please take note to install the batteries with the proper polarity as it
relates to the battery (+) (-) diagram inside the battery compartment.
The batteries will fit tightly (to avoid start-up problems please ensure
that the batteries do not spring free).
3.
Replace compartment cover.
Please follow the "SETTING UP" steps listed in the previous section of this
manual to ensure that the wireless temperature reception is successful.
TX61U-IT Wireless Solar-Powered Temperature Sensor
The TX61U-IT sensor DOES NOT have replaceable batteries.
1.
The TX61U-IT sensor consumes solar power and charges the
internal battery pack up automatically. No battery replacement is
needed.
Help us to keep our environment clean. Please take used batteries from the
Wireless Display and the TX61U-IT sensor to an authorized depot for recycling.
MOUNTING
THE TX61U-IT Sensor
The sensor can be mounted onto a wall using the included screws
MOUNTING WITH SCREWS
1.
Remove the mounting bracket from the TX61U-IT sensor.
2.
Place the mounting bracket over the desired location.
3.
Mark the mounting surface with a pencil through the two screw holes of
the bracket,.
4.
Screw the mounting bracket onto the mounting surface. Ensure that the
screws are tight against the bracket.
5.
Insert the TX61U-IT sensor into the bracket.
TABLE STANDING AND OTHER MOUNTING OPTIONS
With the mounting bracket installed at the bottom or on the top of the TX61U-IT
sensor, the user can place it on any flat surface.
Before permanently fixing the TX61U-IT sensor wall base, place all units in the
desired locations to check that the outdoor temperature readings are receivable.
In event that the signal is not received, relocate the TX61U-IT sensor or move
them slightly as this may help the signal reception.
Note:
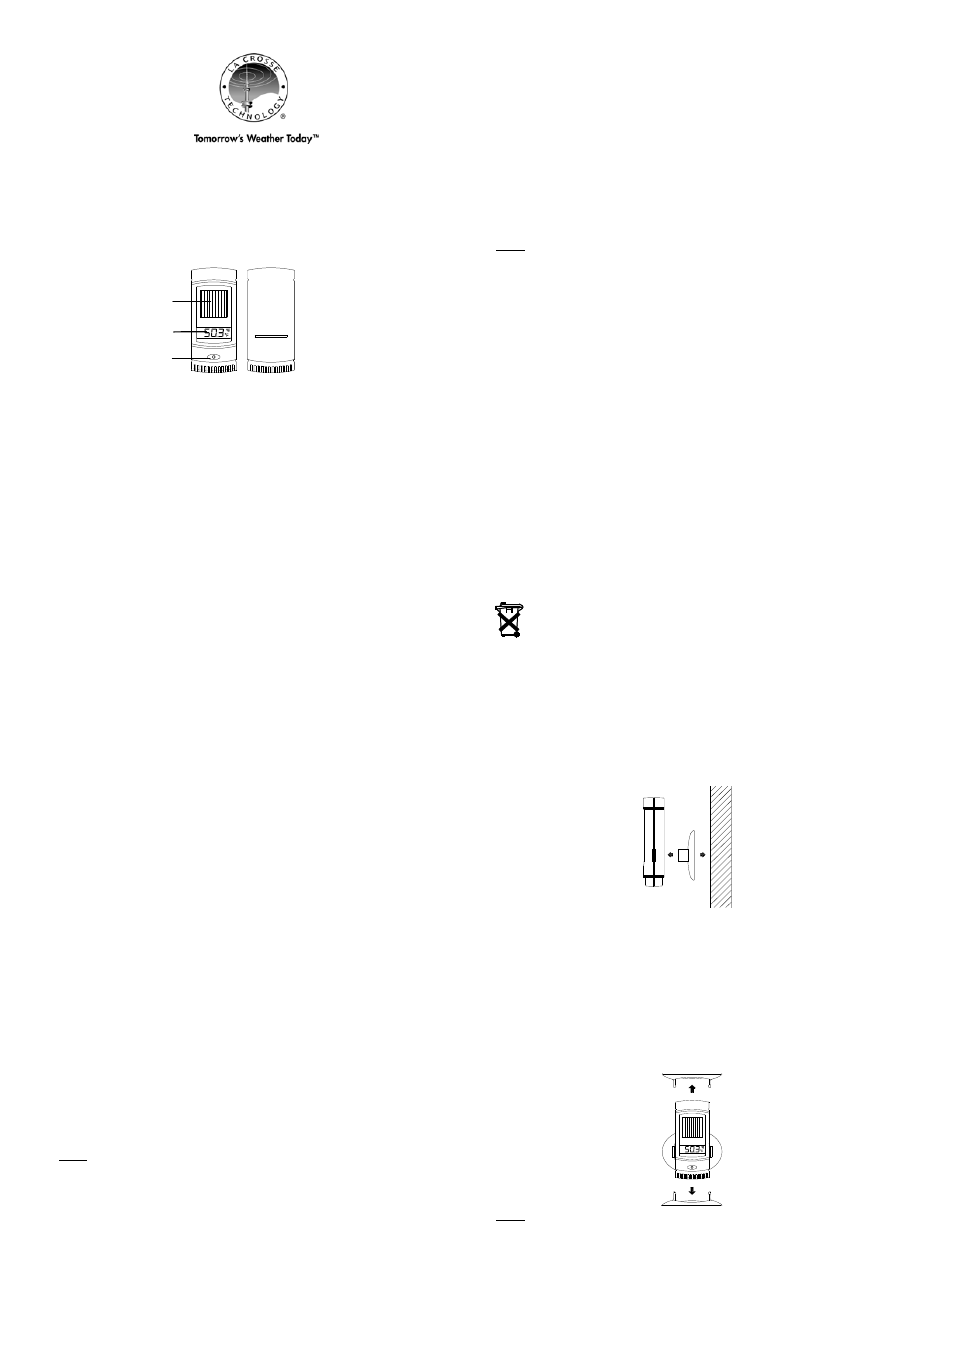
Reset button
Solar cell
LCD
Document Outline
- INVENTORY OF CONTENTS
- SETTING UP
- 1. Lift up the battery compartment cover and remove the batteries.
- 2. Please take note to install the batteries with the proper polarity as it relates to the battery (+) (-) diagram inside the battery compartment.
- The batteries will fit tightly (to avoid start-up problems please ensure that the batteries do not spring free).
- 3. Replace compartment cover.
- TX61U-IT Wireless Solar-Powered Temperature Sensor
- The TX61U-IT sensor DOES NOT have replaceable batteries.