La Crosse Technology WS-9031U User Manual
Ws-9031u quick set-up instructions
WS-9031U Quick Set-up instructions
1)
Insert two AA batteries into the remote transmitter.
2)
Insert three AA batteries into the Weather Projection Station and/or plug into wall.
Note: When starting or restarting your weather projection station the transmitter should be started first and then your
weather projection station. After power is supplied (either battery or AC) ensure that no buttons are pressed
for 15 minutes. This will allow time for the weather projection station to communicate with the remote
transmitter as well as receive the WWVB signal.
3)
Wait 15 minutes for WWVB reception and remote temperature and humidity.
4)
If there is no WWVB reception, manually set the time, date and time zone (instructions are also in the Manual Settings
section of the main manual).
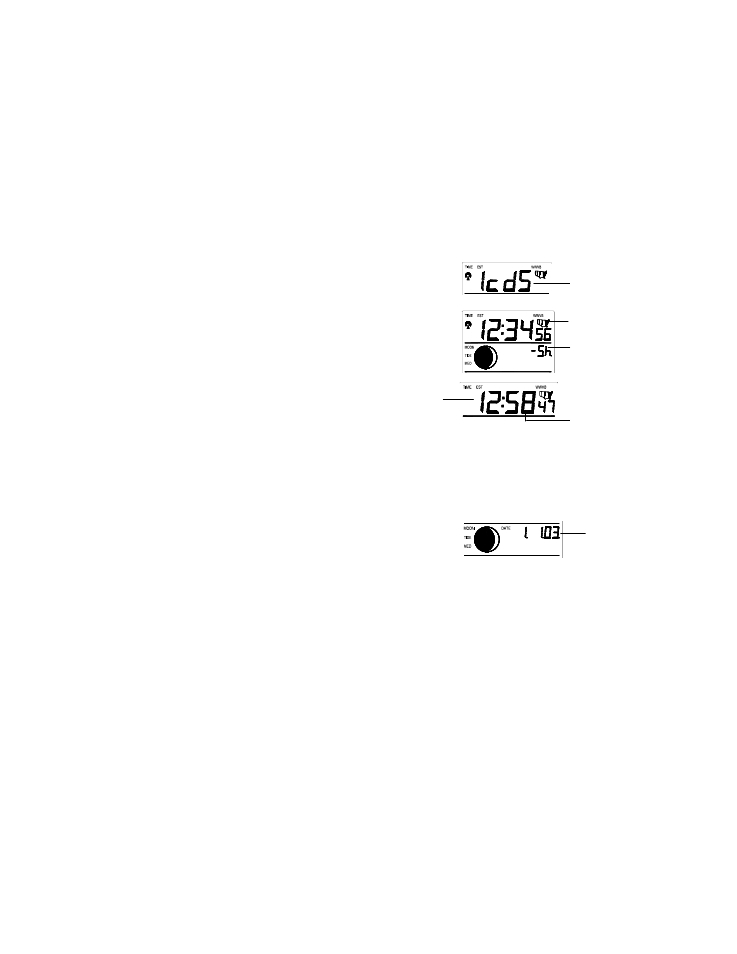
Manually setting the time zone and time
1)
Press and hold the SET button (located on the back of the unit) until
the LCD digits start flashing.
2)
Press and release the SET button once or until the current TIME ZONE
is displayed.
3)
Press and release the CH/+ key to advance the time zone to your time
zone.
4)
Press and release the SET key four times or until the
HOUR digit begins to flash.
5)
Press and release the CH/+ key to select the correct
hour. “PM” will appear for hours from 12 noon until
midnight.
6)
Press and release the SET key to advance to the MINUTE setting mode.
7)
Press and release the CH/+ key to select the correct minute.
-Optional- setting the Day, Month and Year (This will be set automatically upon WWVB reception)
8)
Press and release the SET key to advance to the YEAR setting mode.
9)
Press and release the CH/+ key to select to the correct year.
10) Press and release the SET key to advance to the MONTH setting
mode.
11) Press and release the CH/+ key to select to the correct month.
12) Press and release the SET key to advance to the DAY setting mode.
13) Press and release the CH/+ key to select the correct day of the month.
14) Press and release the SET key three times to complete the settings or wait 15 seconds and the display will exit the set-
up screen automatically.
Note: All manual settings will be updated and corrected once the WWVB signal is received (typically overnight
when the signal is strongest).
5)
Place the WS-9031U in your desired location.
6)
Mount the transmitter in a shaded area protected from rain, where remote temperature and humidity measurements are
desired (on the North side of a house for example).
Note: When placing and mounting the transmitter and weather projection station please keep in mind that the
transmitting distance from the transmitter to the weather projection station is 80 feet. Any obstacles (such as
walls) will decrease the effective range of the transmission.
Note: The remote transmitter is weather resistant but not waterproof. High humidity and mist will not damage the
transmitter but direct rain will. The maximum range between the transmitter and weather projection station is
80ft. open air (no obstructions). Any resistance (i.e. walls, furniture, etc) between the two will decrease the
effective operating range.
7)
The projector will activate and remain on if the Weather Projection Station is plugged in. If only batteries are used, the
projector will only be activated when the SNOOZE button is pressed.
8)
See “How to use the projector” instructions for projection direction, etc.
Last digit flashing
Time Zone Flashing
(-5h equals Eastern
Time zone or GMT –5)
U.S. Time
zone map
Hour flashing
Minutes flashing
Year
Date and month (24hr time format)
Month and date (12hr time format)