POPScreens B043A User Manual
POPScreens Players
Push Button
Interactive
Activation
Detachable battery
b o x
s u p p o r t i n g
6-C cell battery
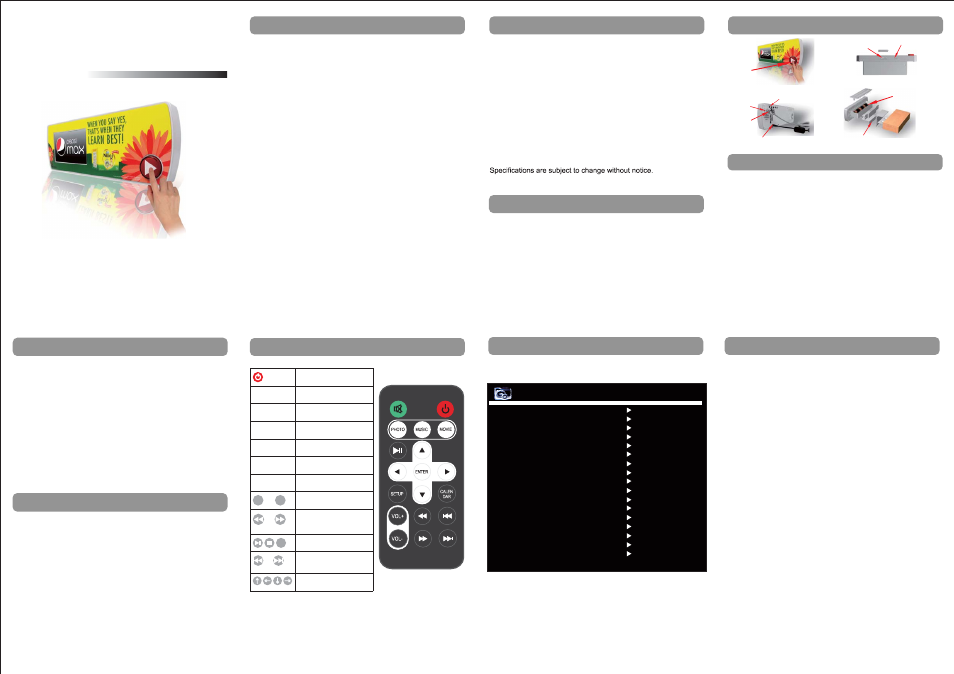
Shelf mounting bracket
SD card slot with
security cover
Direct USB access
for auto content by
USB key
DC 9/12V Input Jack
Quick Control Buttons for
adjusting Vol, brightness
and colors
Playback Mode
Switch
A n t i - t h e f t
cable fixing
hole
5. Auto Download from USB
Add new files into SD card by Using USB
(1)
(2) When unit playing, insert USB into USB slot.
(3) The new files stored in the USB would replace the old files
stored in the SD card
(4) After download finishes, please pull out the USB and the unit
would playback new
automatically.
(5)
Set up a folder “pop1” and “pop2” in the USB key and put
inside the folder the media files you want to update into the
SD card.
media files
If the playback mode is switched at “M1”, there is still no
problem to have a “pop2” folder in the SD card.
- Put the playback mode switch at "M1"
- Save a “pop1” folder in the SD card and copy media files
inside this “pop1” folder.
- Open the SD card security cover and insert SD card
- Once connected to power, the device will playback the
media files in SD card for one time, after go to stand-by
mode while the button keeps flashing; Once the button is
pressed, the button stops flashing and all the media files in
the SD card would be played for one time; After playback,
the device would enter into the standby mode automatically
again while the button is still flashing
4. Playing
2) Playback Mode M2
- Put the playback mode switch at "M2"
- Save 2 folders in the SD card, one named “pop1”, the other
one named “pop2”, and copy media files inside the 2 folders.
- Open the SD card security cover and insert SD card
- Once connected to power, the button would be flashing and
the device will play in loop the media files in folder “pop1”.
When press the button(button stops flashing), playback the
media files from folder “pop2” for one time, and then go back
to loop playback the media files in folder “pop1” with the
button flashing.
(6) Important Notice: C-cell battery and power adaptor
cannot be used at the same time. Otherwise there is
a risk of burning the battery
(B043A)
4.3"
OPERATING MANUAL
INTERACTIVE PUSH BUTTON MEDIA PLAYER
Please keep this operating manual for future reference
TABLE OF CONTENTS
8.SPECIFICATION..........................................................8-9
1.INTRODUCTION............................................................2
2.SAFETY PRECAUTIONS................................................ 2
3.FRONT, BACK AND SIDE VIEW OF PLAYER...................... 3
4.PLAYING...................................................................3-4
5.AUTO DOWNLOAD FROM USB.......................................4
6.REMOTE CONTROL OPERATION....................................5
7.SYSTEM SETUP.........................................................6-7
1. Introduction
Before operating the player, please read this user manual
thoroughly, and retain it for future reference. Please check unit
package to confirm accessories.
Main Features
(1) 4.3” TFT LCD panel with stereo output
(2) SD card as storage and playback media
(3) USB as auto download media
(4) Playback mode: 2 playback modes
(5) Power supply: 6 C-cell battery or DC power adaptor.
2. Safety Precautions
(1) The unit is for indoor use only.
(2) To reduce the risk of fires or electric shock, do not expose the
unit to rain or moisture.
(3) Do not block the ventilation holes on the back of unit at any time.
(4) Do not subject the unit to severe shocking
(5) Prevent any foreign matter falling into the external slot.
(6) Do not open the case of the unit. There is a risk of electric
shock, and there are no user serviceable parts inside. Opening
the case will void your warranty.
2
1
3
3. Front, back and side view of player
4. Playing
6.Remote control operation
7. System Setup
Stop playing and press “SETUP” key on the remote control. Press
UP/DOWN key to move the cursor
4
5
6
7
1) Playback Mode M1
Power On/Off
NO SOUND
Playback photo files
Playback music files
Playback video files
Enter the SETUP menu
Set up the CALENDAR
Volume Up /
Volume Down
Fast Playback 2×,
4×,6×,8× / Fast Play
forward 2×,4×,6×,8×
Return to previous file /
Advance to the next file
Move the cursor up/
down/left/right
Pause / Stop / Enter
MUTE
PHOTO
MUSIC
Movie
SETUP
CALENDAR
V+
V-
ENTER
14) Exit
13) Set Date
Set up the current date
12) Set Time
Set up the clock display
11) Default
Read
9) TFT Saturation
10) OSD Language
-4 --- 4
English, Francaise, Deutsch, Italiano, Espanol, Portugues,
Nederlands, Polski
8) TFT Contrast
-4 --- 4
7) TFT Brightness
-4 --- 4
6) Movie
On/off
Full Screen, Fit Screen
On/off
On/off
3) Show Type
4) Photo
5) Music
7. System Setup
VER:1.0
Interval Time 5 SEC.
Transition Effect Random
Show Type Full Screen
Slide Mode Normal
Browse
Thumbnail
Photo On
Music On
Movie On
TFT Brightness 0
TFT Contrast 0
TFT Saturation 0
OSD Language Englist
Repeat Mode
All
USB Source
SD/MMC
Default
Read
Set Time
10:57:22
Set Date
2012/09/12
Exit
1) Interval Time (For photo display only)
Off, 5 Sec, 10 Sec, 15 Sec, 30 Sec, 1 Min, 3 Min
2)Transition Effect (For photo display only)
Down, Bar Button UP, Rect Converge, Rect Spread, Rhombus,
Compression, Cross Comb, Silk, Mask, Dissolve, Fade in Fade
Out, Flip, Reel, Move Zoom, Random, No Effect, Blinde
Horizontal, Blind Vertical, Color Ratio Hor, Color Ratio Ver,
Expansion Hor, Expansion Ver