Radionic ZX Series User Manual
Zx/rx series, Led undercabinet fixture, This product is product warranty period: 1 year
ZX/RX Series
LED Undercabinet Fixture
SAFETY PRECAUTIONS:
Read all safety precautions and instructions carefully before installing or servicing this fixture. Failure to comply with these
instructions could result in potentially fatal electric shock and/or property damage.
To reduce the risk of fire, electric shock or injury to persons:
Install in accordance with the National Electrical Code and local codes.
Do not handle an energized fixture or attempt to energize any fixture with wet hands or while standing on a wet or damp
surface.
Use only insulated staples or plastic ties to secure cords.
Route and secure cords so that they will not be pinched or damaged.
Not intended for recessed installation in ceilings, soffits, or cabinets.
Be sure to mount the fixture on a surface that is structurally sound. Mounting brackets/screws are intended for installation on
wood surfaces. Do not install over a heat source. Do not install directly over water (such as fish tanks, sinks, laundry tubs,
etc.).
NOT FOR USE WITH DIMMER SWITCH.
This fixture is intended to be used for general indoor lighting in dry locations only.
This portable lamp has a polarized plug (one blade is wider than the other) as a safety feature. This plug will fit in a polarized
outlet only one way. If the plug does not fit fully in the outlet, reverse the plug. If it still does not fit, contact a qualified
electrician. Never use with an extension cord unless the plug can be fully inserted. Do not attempt to defeat this safety
feature.
Consult a licensed electrician if any problems occur or for any installation other than simple mounting and plugging in with
cord provided.
There are no user serviceable parts in this LED fixture. Do not attempt to replace LEDs and/or driver/power supply.
INSTALLATION INFORMATION:
1. Select a suitable mounting location, under cabinets, shelves, desks, or over work benches. The fixture should be
installed within 55” of an electrical outlet.
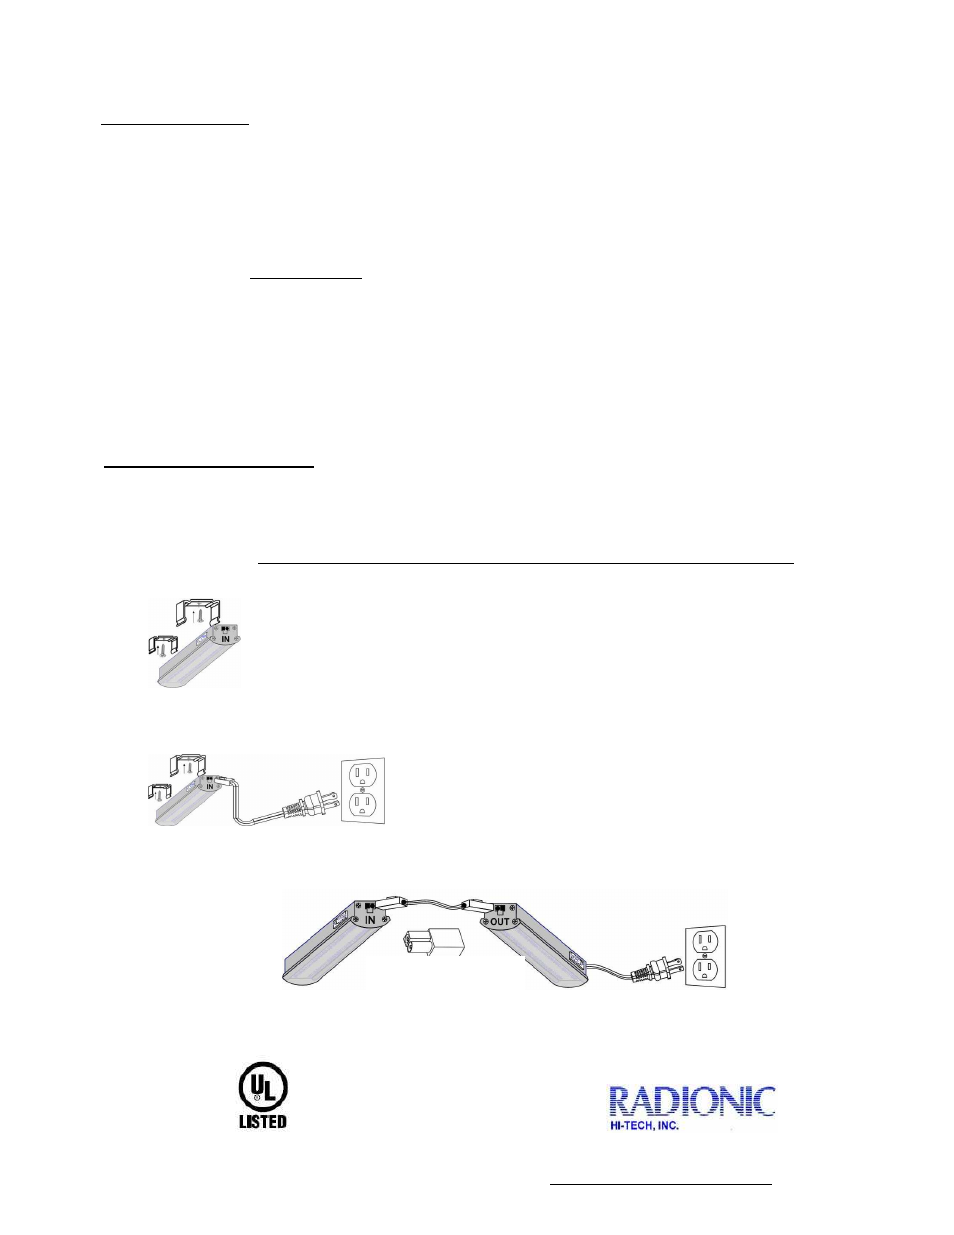
2. Use the mounting brackets/screws (provided) OR
double-sided tape (provided) to mount the fixture (do not use other
types of double-sided tape). If using mounting brackets, mount brackets first, then snap in fixture (see diagram below). If
using double-sided tape, clean surface with alcohol first and allow to dry prior to applying the double-sided tape. Do not
place delicate objects under the fixture for a few weeks until you are sure that you have securely mounted the fixture.
3. The “plug” end of the of the 5’ cord with plug (included) plugs directly into a 120V outlet. The other end of the cord
should be inserted into the end of the fixture labeled “IN.” Take up excess cord and secure with a tie.
4. Linking Additional Fixtures: Unplug fixture from 120V outlet before inter-connecting fixtures. Up to 12 fixtures may be
linked together using the connecting cable OR the very small black direct connector (provided).
5. If you wish to remove this fixture AFTER installation, use a small screwdriver to slightly bend the mounting
bracket TOWARDS you and then gently twist the fixture AWAY from you. If one end of the fixture is unobstructed, it can
also easily be slid out of bracket.
This product is
Product warranty period: 1 year.
Made in China
http://www.radionic.net/pdf/Warranty.pdf
(OR Direct Connector)