Sloan Tank and Valve Installation User Manual
Tank and valve installation instructions, Install toilet tank to bowl, Install refill tube
Tank and Valve
Installation Instructions
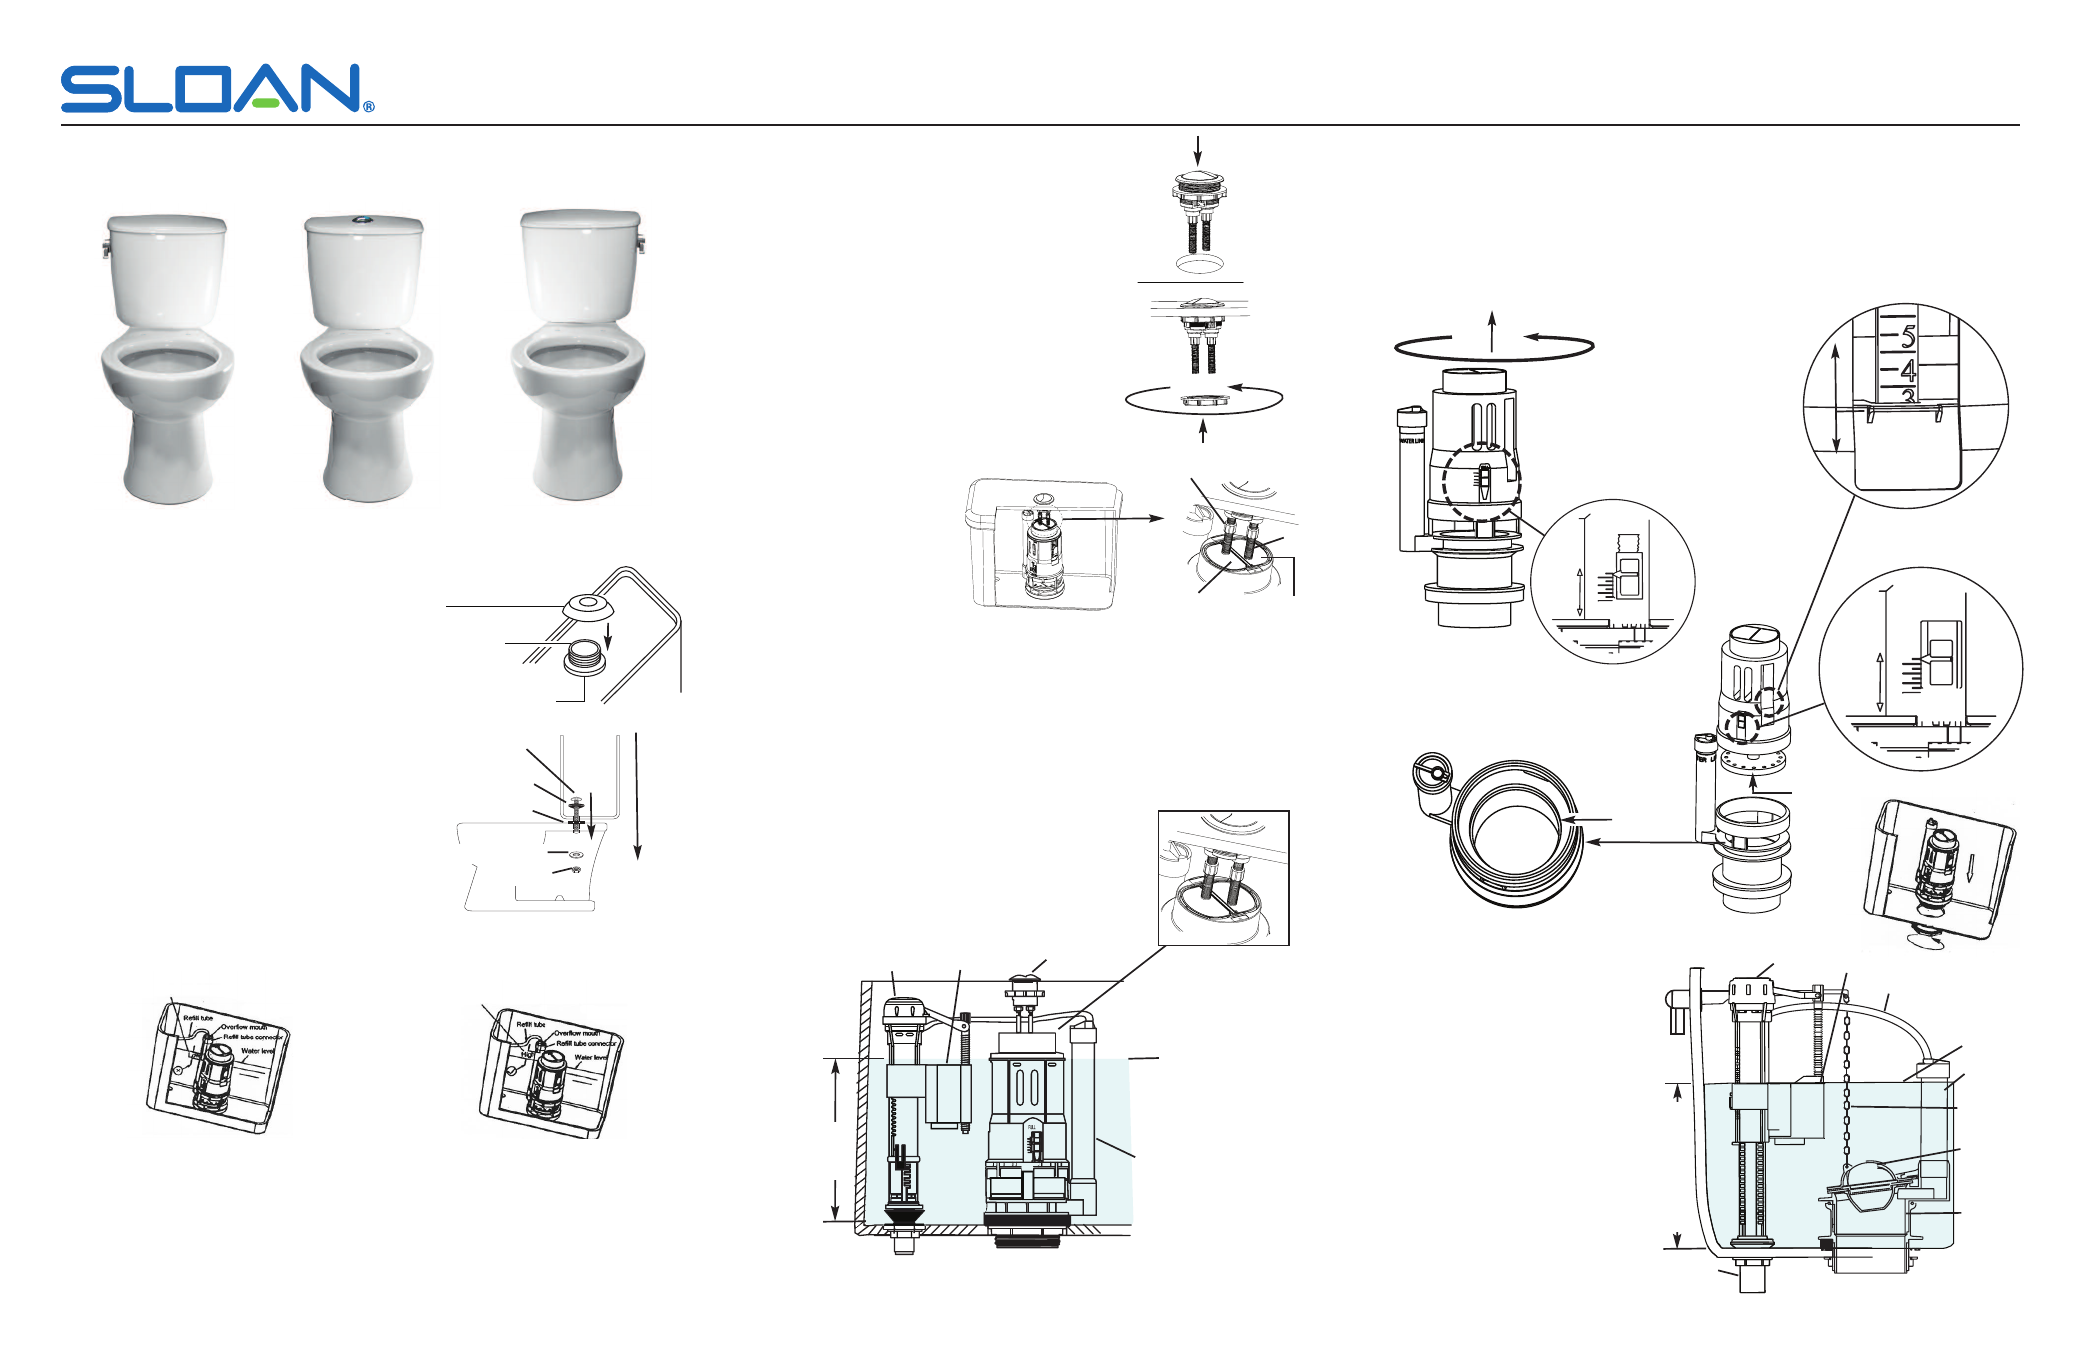
1. INSTALL TOILET TANK TO BOWL
Turn the tank upside down and rest on protective
padding. Install the tank gasket over the bottom
threads of the flush valve, making sure that the
tank gasket covers the flush valve nut and the
tapered side is toward the bowl.
Lift the tank, right side up and position the tank on
the bowl by centering the gasket and aligning holes
on the bowl. Install tank bolts with included rubber
washers tapered side down, through tank mounting
spacers and bowl. Secure with metal washers and
nuts (see illustration). Tighten bolts alternately enough
to achieve a watertight seal.
DO NOT OVERTIGHTEN.
2. INSTALL REFILL TUBE
With the valve installed, the critical level mark on the fill valve (identified by a CL mark) should be at
least 1” (25 mm) above the top of the water level. Water temperature should be in the range of 45º F (2º
C). Water supply static pressure range: 20psi-80psi.
DO NOT USE CHLORINE OR ANY CHEMICAL COMPONENT. USE OF SUCH PRODUCTS WILL RESULT IN
TANK DAMAGE, MAY CAUSE FLOODING, PROPERTY DAMAGE AND WILL VOID WARRANTY. DO NOT
OVERTIGHTEN NUTS, TANK OR BOWL.
Tank Gasket
Flush Valve Threads
Flush Valve Nut
Tank Bolts
Rubber Washers
Metal Washers
Metal Nuts
Left Handle
Dual Flush
Right Handle
THE RIGHT CHOICE
We thank you for your purchase. Our products are 100% tested but should you have any questions,
please contact us by phone or visit our website.
Incorrect if lower than
water level.
Correct if higher than
water level.
3. INSTALL DUAL FLUSH BUTTON TO TANK
Insert button assembly through top of tank lid.
The buttons should be rotated so the smaller blue
button is aligned with the blue button on the flush
valve.
Securely tighten nut.
DO NOT OVERTIGHTEN
To ensure both buttons flush correctly, the bottom of
each push rod must be flush with the top surface of
the flush valve cylinder. If rods are not
flush, adjust the length of each rod by
loosening adjustment nut and re-adjust
the push rod. Tighten lock nuts after
any adjustments.
NOTE: Dual flush valve assembly in tank
is factory installed.
Adjustment Lock Nuts
Push Rods
Dual Flush
Cylinder Surface
White Actuator
Full Flush
1.6 GPF/6.0 Lpf
FULL
7
5
3
1
MIN
MAX
HALF
7
5
3
1
FIG. 1
MIN
MAX
FULL
7
5
3
1
FIG. A
Base
MIN
MAX
HALF
7
5
3
1
Top View
Valve Seat
Dual Flush Tank
Dual Flush Valve
Fill Valve
Dual Flush
Push Button
Waterline
To adjust dual flush cartridge assembly (full and
reduced flush):
• Adjust flush volume by moving water ad-
justment clip up or down to desired flush as
in Figure “A” and “B” (factory setting at 8”
min.)
• For a refined adjustment, move adjustment
clip up or down for desired flush volume
(Fig. C) (factory setting at 3½” Min.)
For maintenance and cleaning:
• Rotate dual flush assembly counter clockwise
(Fig.1) and lift off base (Fig. 2). Reverse this
procedure for re-assembly.
• Check valve seat for debris and valve seal
for wear.
• If necessary, the flush valve can be removed
by unscrewing the flush valve nut (Fig. 3).
MIN
MAX
HALF
7
5
3
1
FIG. 2
FIG. C
MIN
MAX
HALF
7
5
3
1
FIG. B
Valve Seal
Code No: 0816427
Rev. 3 (02/11)
WATER LINE
Fill Valve
Refill tube
Waterline
Overflow
Tube
Flapper
Chain
Flapper
Flapper
Valve
Water
Supply
FIG. 3
5. INSTALLATION OF FLUSH HANDLE
(SINGLE FLUSH TOILETS)
Remove left-hand nut and washer from
handle assembly and insert through left
side or right side of hole in tank. Reinsert
the nut and washer then hand tighten to
secure the handle assembly to the tank.
Connect the flapper chain to the handle
mechanism ensuring the proper slack.
Connect the refill tube from the fill valve
to the overflow tube. Verify refill tube is
adjusted so it is not below the waterline.
NOTE: Handle points down on tank
exterior.
NOTE: Flapper fill valve assembly in tank
is factory installed.
4. ADJUSTMENTS AND OPERATIONS OF DUAL FLUSH TOILETS
Make sure the water level is at the marked water line. Test flush the toilet several times to ensure proper
operation. If dual flush valve does not operate properly, improve flush by:
• Verifying the bottom of each push rod is flush with the top surface of the dual flush valve cylinders.
• Adjusting the water level with the fill valve
• Adjusting the flush volume as in the next step
• When replacing the fill valve, check for the correct float cup height as shown in the figure.
Float Cup
Fl
oa
t
C
up
H
ei
gh
t
(s
ee
t
ab
le
o
n
re
ve
rs
e
si
de
)
8
½
”
(2
1
6
m
m
)
Turn and lift
to remove
Float Cup
Mounting Spacers