Soundtube FP6020-II User Manual
Assembly & installation instructions
Assembly
& Installation
Instructions
8005 W. 110th St., Suite 208 Overland Park, KS 66210
www.mseaudio.com | 913.663.5600 | www.soundtube.com
Install Instructions For:
SS30 speakers
913.663.5600 | 855.663.5600 | www.soundtube.com
Box contents
1 Speaker Housing
2 Rubber Washers
1 Steel Washer
1 Black Steel Coupling w/ Brass Reducer
1 Parabolic Reflector
2 Wire Nuts
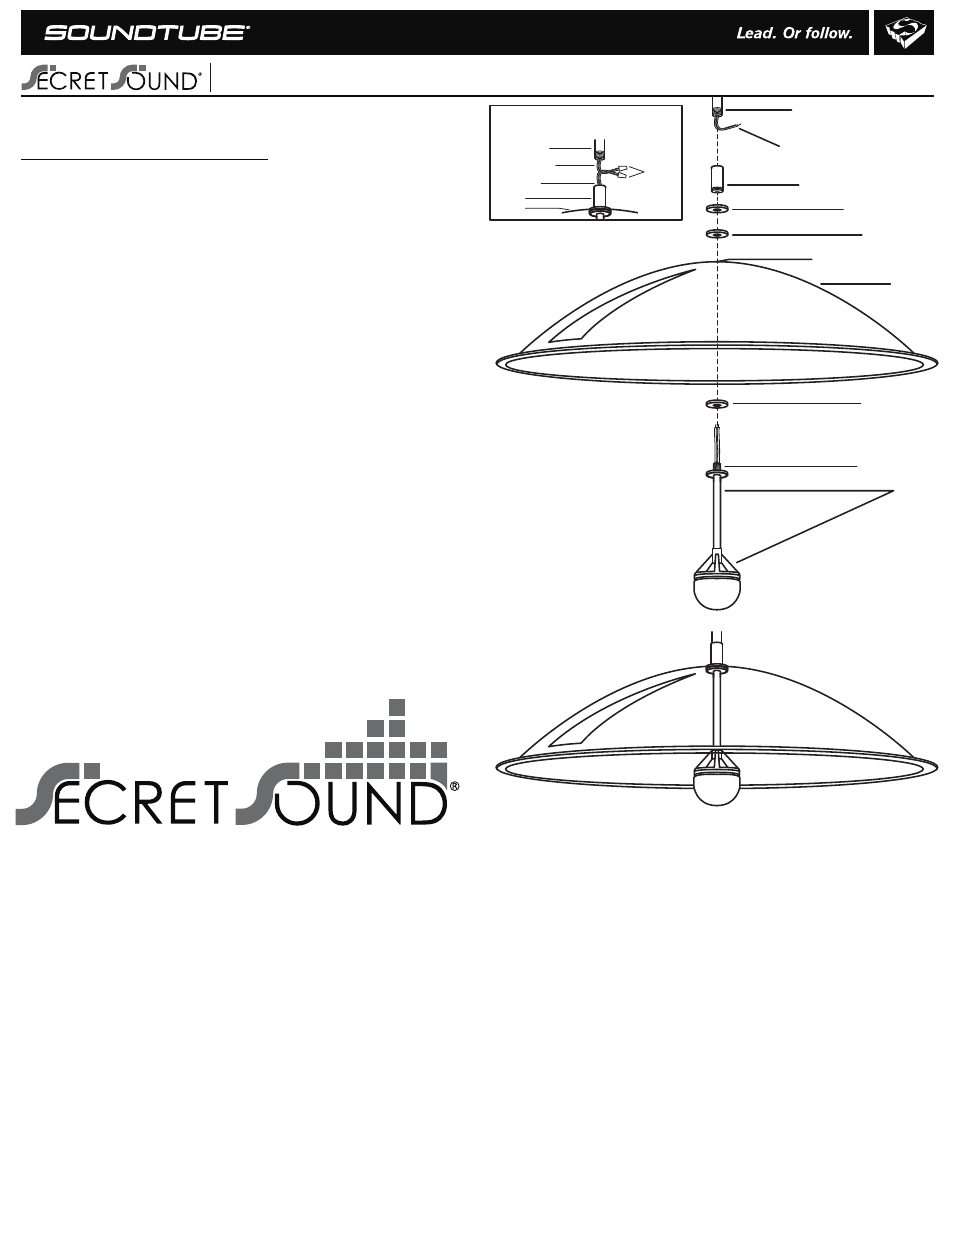
Assembly
The recommended method of assembling the speaker is to first
slip one black rubber washer onto the threaded nipple at the top
of the speaker stem. Next, insert the threaded nipple and speaker
wire through the hole in the parabolic reflector, and slip the
remaining rubber and steel washers onto the end of the nipple
protruding through the parabola. Now thread brass reducer and
coupling onto the nipple and hand tighten them firmly. The speak-
er can now be handled as a unit.
Wiring Connections
The Secret Sound speaker operated in the same manner as any
conventional speaker. It will work with any amplified sound
source, and can be connected to the sound source using either
16 or 18 gauge standard speaker wire.
(Speaker wire not included)
Ceiling-Mounted Rigid Conduit
(Not Included)
Speaker Wire From Sound Source
(Not Included)
Coupling With Brass Reducer
Black Steel Washer
Rubber Washer
Hole In Center Of Parabola
Parabola
Rubber Washer
Threaded Nipple
Speaker
Installation
The Secret Sound installation is similar to that of a ceiling-mount-
ed electrical map. The black steel coupling has ½” inside threads
which can be attached to standard rigid electrical conduit with ½”
outside threads. This conduit is generally mounted directly to the
ceiling using a standard electrical junction box. Once you have
mounted your rigid conduit from the ceiling, bring the speaker
wired from the sound source through the conduit so approxi-
mately two inches of wire are protruding from the threaded
bottom end. Before connecting the speaker, position it on a
steady ladder or scaffold near the end of the ceiling mounted
conduit. Now connect the wire ends from the coupling to the
ends of your wire coming from the sound source. Once the wires
are connected, “pre-rotate” the speaker 6 or 8 times count-
er-clockwise. This will prevent the speaker wire connection from
becoming too twisted when threaded onto the coupling. Thread
the coupling onto the end of the conduit and hand tightened
firmly. The speaker is now ready to operate. The speaker can be
mounted at any height off the floor with minimal affect on the
diameter or quality of the bean of focused sound. The parabolic
reflection can be painted without affecting the speaker perfor-
mance, although it is recommended that the underside be paint-
ed with a gloss finish to insure optimum sound reflection.
Completed Assembly
Ceiling-Mounted
Conduit
Speaker Wire from
Sound Source
Speaker Wire
From Speaker
Coupling
Parabola
Connection Details
Wire Nuts