Amped Wireless TAP-EX - High Power Touch Screen Wi-Fi Range Extender User Manual
Read first, Tap-ex, Setup guide
Wi-Fi Router
Wi-Fi Range Extender
Dead Zone
Home/Office Network
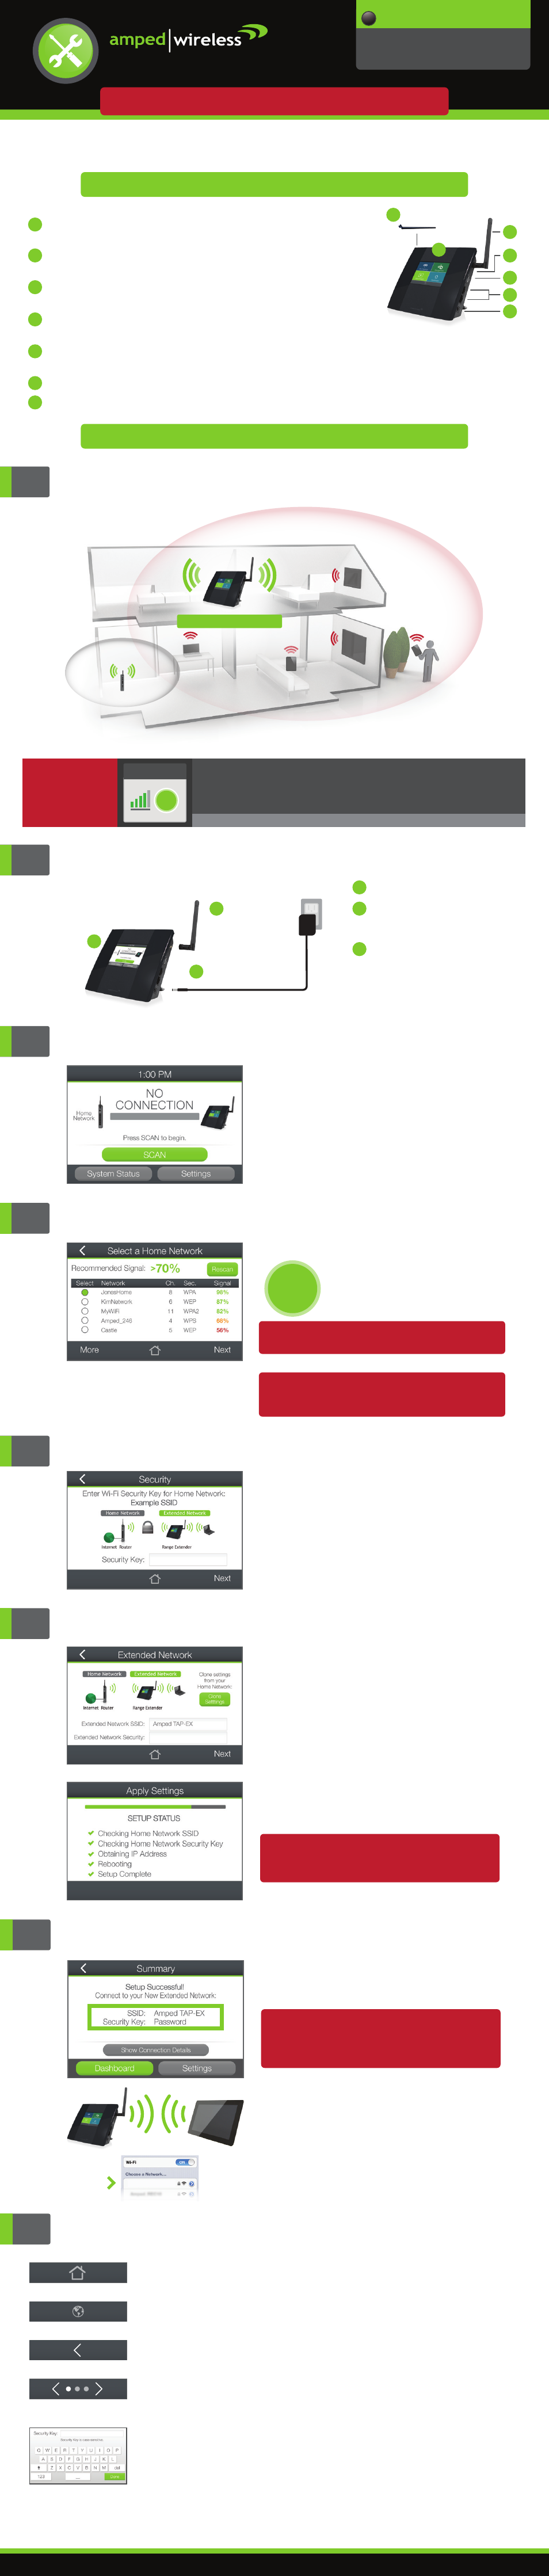
Find an Optimal Setup Location Between your Wireless Router
and your Wireless Dead Zone
1
IMPORTANT:
PLACE THE
RANGE EXTENDER IN A LOCATION
WHERE IT CAN RECEIVE A STRONG SIGNAL
FROM YOUR WIRELESS ROUTER.
This can be done before or after setup is complete. The Range Extender will save your settings.
RECOMMENDED
SIGNAL STRENGTH
>70%
v091914
See back for additional connection instructions and features.
READ FIRST
SETUP GUIDE
HIGH POWER TOUCH SCREEN WI-FI RANGE EXTENDER
GOT QUESTIONS?
Phone: 888-573-8820 or 909-217-3168
Email: [email protected]
Web: www.ampedwireless.com/support
?
Scan for a Home Network to Extend
4
Select the Wi-Fi network that you wish to extend.
Tap
Next
to continue.
If you do not see your desired wireless network, move
the Range Extender closer to the router and scan again
as it may be out of range.
Recommended Signal
Select the Wi-Fi network with a signal
strength greater than
70% for the most
reliable connection.
>70%
Poor signal connections may cause slow speeds or
dropped connections.
TAP-EX
2
Power on the Range Extender
Attach the included antenna.
a
Attach the Power Adapter to the
Range Extender’s power port
and an available power outlet.
b
The Amped Wireless logo will
appear as the unit boots up, then
the Dashboard screen will appear.
c
a
b
c
3
Welcome to the Dashboard
The Dashboard will provide you with the current status
of the Range Extender.
Tap
Scan
to find available networks to extend.
Note: The Setup Guide will refer to the existing network that you wish to extend
as the
Home Network. The new, expanded network will be referred to as your
Extended Network.
7
Setup Summary
At this point you can connect your Wi-Fi devices to
your Extended Network using the Wi-Fi network
name and password on the screen.
If you haven’t already positioned your Range Extender
in an optimal location, you may do so now. All Range
Extender settings are saved and can be safely
powered off for relocation.
You may also attach any wired network devices to
the wired ports on the side of the Range Extender.
If you experience any problems during this process,
please contact Amped Wireless Elite Support:
Phone:
888-573-8820
or
909-217-3168
Email:
Web:
www.ampedwireless.com/support
Amped TAP-EX
Navigating the Touch Menu
Tap the
Home
icon, found on the bottom of many screens,
to return to the Dashboard at any time.
Tap the
Globe
icon, found on the bottom of the Settings
screen, to change the language of the menu.
Tap the
Left Arrow
, found on the upper left corner of many
screens, to navigate back to the previous page.
Tap the
Left
or
Right Arrow
to navigate between multiple
pages for one screen. The dots in this example indicate
there are 3 pages to see.
Tap on a
Blank Field
to access a keyboard or keypad
for entering in information such as your Network ID and
Security Key.
Home Button:
Language Selection:
Back Arrow:
Navigation:
Keyboards/Keypads:
If your Home Network has security enabled, you will
need to enter the key here.
Tap
Next
to continue.
5
Home Network Security Settings (if necessary)
6
Configure Settings for your Extended Network
The default ID of your Extended Network is:
Amped TAP-EX
If you choose to
Clone Settings
from your Home
Network, the wizard will copy the SSID and Security
Key of your Home Network. The SSID of the Extended
Network will have a "_RE" at the end of its name. For
example: Home_Network_RE
You can also manually enter a new Network ID and
Security Key. The new Security Key must be at least 8
characters long.
Tap
Next
to apply the settings.
The Setup Wizard will apply your settings. Please be
patient. If there are any problems with the connection
a prompt will appear letting you know what to fix.
3
5
6
7
Stylus
4
2
1
3.5" LCD touch screen. Displays the user
interface for configuring the Range Extender.
Input tool that assists in navigating the LCD
touch screen menu.
RJ-SMA antenna connector. Compatible with all
antennas that have RP-SMA connectors.
Button used to reset device. Push down once to reboot, hold
down for 5-10 seconds to reset to factory default settings.
USB 2.0 Port used to attach USB storage devices, such as a USB flash drive or external hard
drive, for file sharing.
LCD Screen:
Stylus:
Antenna
Connector:
Reset:
USB Port:
RJ-45 ports for connecting wired computers or network devices.
Power adapter port. DC 12V 1A.
Wired Ports:
Power (PWR):
1
2
3
4
5
6
7
Setting Up Your Range Extender
Getting to Know the Range Extender