Linkskey LKV-248AUSK User Manual
Quick installation guide, Lkv-248ausk
Q uick Insta lla tion G uide
Applicable m o dels: LKV-248AUSK
LKV-248AUSK
4-port USB PS/2 KVM w/ Audio & Mic
Quick Installation Guide
Thank you for purchasing the LKV-248AUSK With our highly
reliable
and
quality product, user can enjoy countless benefits
from using it.
The KVM Switch is a Plug-and-Play device for installation. For a
quick start on installation and operation, please follow the
instructions below for correct setup sequence:
The correct setup sequence is … …
(1) Connect the sh ared keyboa rd, m onitor and m ouse (and
optional speaker set an d m icrophon e) to the KV M Switch
first, an d then connect your com puters.
(2) Power up your connected com puters…
Since the KV M Switch receives power from the com puter’s USB and PS/2
interface, it is powered up when you connect the KVM Switch to a PC. But
if you intend to use the USB hub ports for bigger devices, you should plug
in the external power adapter.
Out-of-the-box Installation
LK V -248A U S K
Introduction
The LKV-248AUSK
provides Audio&Mic
switching
to
offer
you uninterrupted multimedia experience with KVM Switching.
With its multi-platform support for PC and Macintosh G3/G4,
iMAC, this KVM Switch allows you to
access,
control,
boot
and
reboot
multiple
USB-enabled multimedia
computers
using only one keyboard, video, mouse and a speaker set
and microphone. Built-in with a 4-port USB Hub, it is designed
specifically for sharing your USB keyboard, mouse and other
USB devices with four USB-enabled PCs.
Before you install
The default setting of LKV-248AUSK
is appropriate for most
systems.
In fact, you do not need
to
configure
the
KVM
Switch
before
installation. Yet particular caution has to be
taken before installation:
If you do not want to use PS/2 keyboard/m ouse and want to use U SB
keyboard/m ouse instead, you m ight need to disable the PS/2 option and
enable the USB option in the BIO S setting of your PC, especially when
som e older com puters m ight not be able to autom atically detect the input
devices.
U SB keyboard user m ust n ote: if you use a USB keyboard
instead of a PS/2 one, you will not be able to utilize the hotkey
function . In order to use the hotkey function fully, it is recom m ended to
use a PS/2 keyboard. Also you have to “sync” your hub port control
and PC port selection (i.e. green PC port LED and red U SB hub
port LED should be align ed) so that your PC can find your USB
keyboard and m ouse.
Take the KVM Switch out of the box and begin installation….
If you are con necting w ith any com pute r using PS/2
interface, DO N O T TRY to connect the KVM Switch to the com puters
while the com p uters are still in powered-on states. O therw ise, the
com p uter will have difficulty recognizing your shared keyboard and
m ouse. H owever, if you are connecting it all with U SB-enab led com puters,
there is no such lim itation since it is hot-pluggable.
S tep 1. M ake sure all the computers that are to be connected to the KVM
Sw itch and their peripherals are in pow ered-off state. If not,
pow er them off before you proceed w ith the follow ing steps. (If
you are connecting w ith com pute rs using the PS/2 interface)
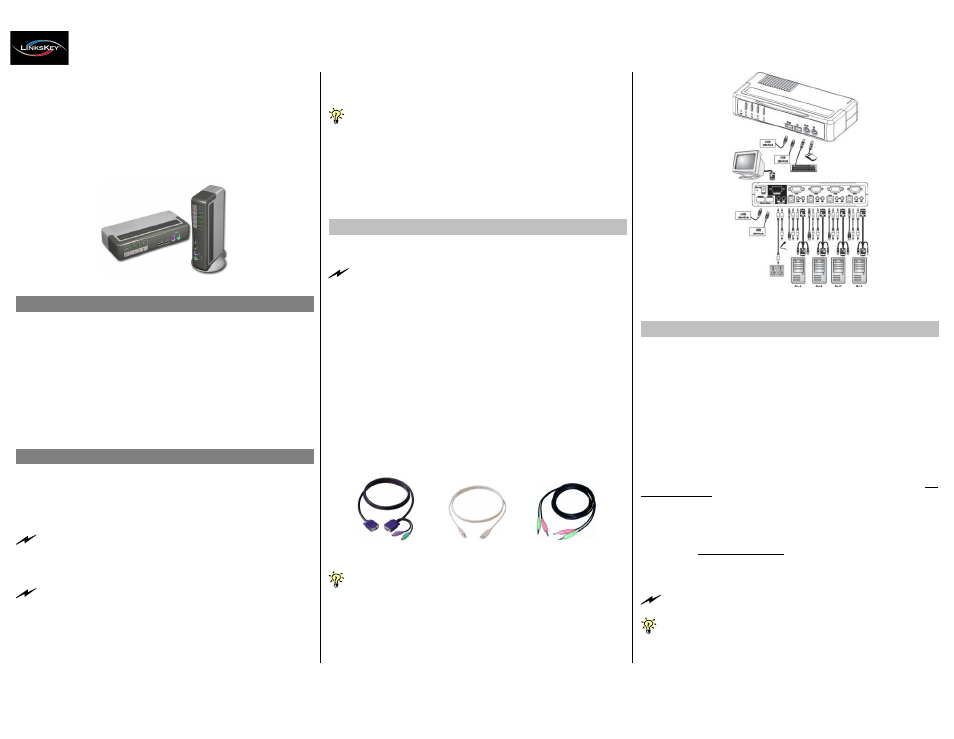
S tep 2. Connect the shared PS/2 (or USB) keyboard, m ouse and m onitor
and a speaker set and microphone as w ell as other shared
USB devices to the KVM sw itch. Also it is reco m m e nd ed to
con nect the external p ow er adapter to your K V M S w itch, if
you intend to use U S B hub po rts for bigger devices.
S tep 3. Connect each of your com puters to the KVM sw itch, using only
our Slim 3-in-1 com bo KVM cable, USB (Type A-to-Type B)
cable and audio & Mic cables (see the pictures below).
S lim 3-in-1
U S B cable
Audio- M ic
K V M com b o cable
(
TypeA-to-TypeB)
C om b o C able
If you are using USB com puters, you can use standard VGA cables
and USB cables for connectio ns to PCs instead of the Slim 3-in-1
KVM com bo cable.
S tep 4. (Now your KVM Switch should have been pow ere d-up… .) Power
up
the
connected
computers.
After your com puters
are
pow ered up, the keyboard and m ouse w ill be recognized and
now you can begin operating the K VM sw itch.
LK V -248A U S K
Easy Operation
There are two methods to control your KVM Switch for either
simultaneous or independent PC / USB hub port / Audio&Mic
channel selection: using the front-panel push buttons or a
hotkey sequence.
Front-panel buttons
The front-panel buttons let you have direct control over KVM
switch operation and channel switching. Simply press the PC
button for PC port switching, and press the USB button for USB
hub port control switching. If you want to enable the binding of
PC/Hub port/Audio&Mic switching, use the hotkey sequences.
See
Quick Reference Sheet
Keyboard hotkeys
A
keyboard
hotkey
sequence
consists
of
three
specific
keystrokes:
See Quick Reference Sheet
H otkey seq uence = ScrL k + ScrL k + C o m m a n d k ey
Each keystroke w ithin a hotkey sequence should be pressed w ithin 2
seconds. O therwise, the hotkey sequence w ill not be validated.
For detailed Hotkey sequences and their corresponding functional
comm ands, please refer to the Quick reference sheet.
30-170-7009-658-14
Rev. 1.4
Copyright© All rights reserved. Dec 2004