Linkskey LKV-9208 User Manual
Quick installation guide
Quick Installation Guide Applicable models: LKV-9208IP / LKV-9216IP 8/16-port IP KVM Switch
Page 1 of 4
Rev. 1.22 Copyright© All rights reserved. 2006
LKV-9208IP/LKV-9216IP
Prima IP
8/16-port Cascadable Rackmount IP KVM Switch
Dual Support for both USB and PS/2 computers
w/ serial power control
& PPP Sever/client connection support via external modem
Quick Installation Guide
Thank you for purchasing the LKV-9208IP/LKV-9216IP Prima IP
KVM Switch – a full - featured IP KVM Switch for remote
computer control over IP! This Quick Installation Guide will help
you connect the Prima IP KVM Switch to computer/servers and
install it within your networking environment for remote client
access across Intranet/Internet.
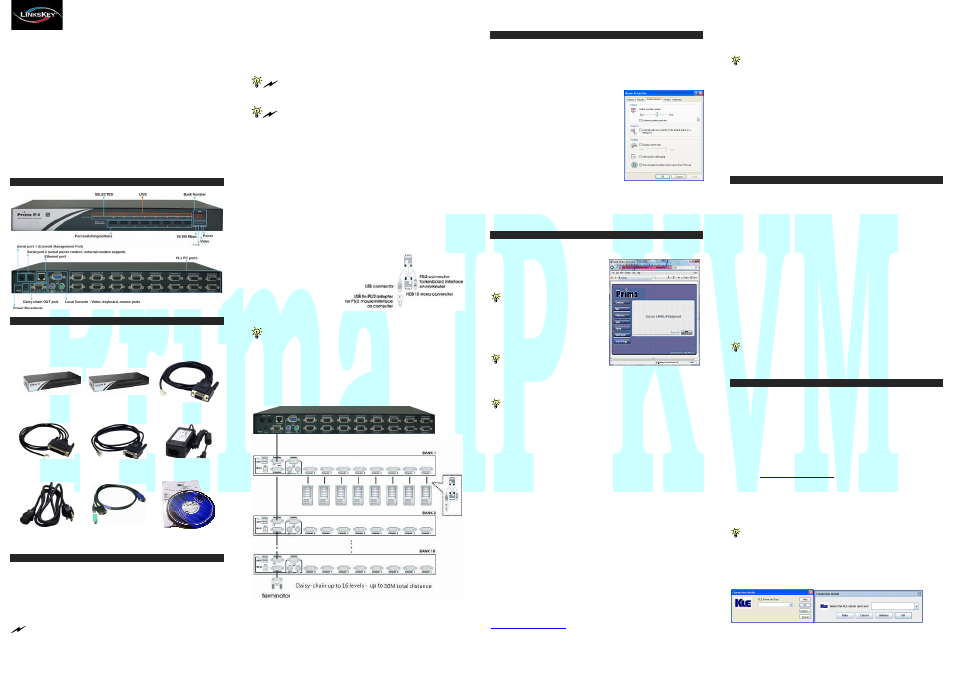
Front-Panel and Rear Panel Overview
Take out the Package contents
Take out the Prima IP and the accessories from the packaging box, and
check whether you have all these items in the Prima IP packaging box.
.
Begin your Prima IP installation …
1.
Power on the Prima IP: Plug the Power adapter into the power
receptacle on the backside of the Prima IP KVM Switch.
2.
Set up your local console: Connect a PS/2 keyboard, mouse, and
monitor to the Prima local console ports.
3.
Connect to computers: Connect each of you computers to a PC port
on the back panel of Prima IP, each using a USB PS/2 KVM combo
cable (Types of cables depend on your package).
If you are using any PS/2 computer: Please make sure all of your PS/2
computers are powered off before connecting to the KVM Switch. Otherwise, the
non-PnP PS/2 interfaces might not recognize the PS/2 keyboard and mouse later.
However, USB computers do not have this limitation.
3.1
Make sure (at least the PS/2) computers that are to be connected to
the KVM switch are powered off. If not, power them off before
you proceed with the following steps.
If you use only one single Prima IP KVM switch in non-
cascaded application, you should ignore step 3.2, 3.3, and 3.4 and jump
directly to step 4.
If you want to daisy-chain multiple Prima KVM Switches to the
[master] Prima IP KVM switch, go to step 3.2. You can daisy-chain up
to 16 levels of KVM Switches.
3.2
Use the daisy-chain cable (M-HDB15-HDB15-F) to connect the
DaisyChain OUT Port (HDB 15 female) of the [master]
Prima IP KVM Switch to the DaisyChain IN Port (HDB 15
male) of the second Prima KVM switch. Then connect the
power adapter cord to the second Prima KVM switch to power
it on.
3.3
If you have yet another switch to be daisy-chained, just repeat Step
3.1 to connect them. You can daisy-chain up to 16 units.
Remember to plug a Terminator onto the Daisy-chain Out
Port of the last Prima KVM switch unit.
3.4
(Now your Prima IP KVM switch, and those Prima KVM Switches
daisy-chained below should have been powered-up and
initialized….
) Connect each computer to a PC port on the
backpanel of the KVM switch(es). You should use the special
USB-VGA KVM
Combo Cable (or
3-in-1 USB PS/2
KVM
Combo
Cable with the
USB-to-PS/2
adapter)
for
connection to a USB computer (PS/2 computer). (Other types
of cables may be used accordingly.)
The special 3-in-1 USB PS/2 KVM Combo Cable provides a
PS/2 keyboard connector, a USB connector and a HDB video
connector for the computer connection. When connecting with a USB
computer, just plug the USB connector to it and leave the PS/2
connector free. When connecting with a PS/2 computer, just add a
USB-to-PS/2 adapter to the USB connector and you’ll have a PS/2
connector for mouse. DO NOT try to connect both USB connector
and PS/2 keyboard connector to a computer at the same time.
4.
Boot up connected computers (if they are not powered-on yet): On
the Prima local console, you should switch to every computer and verify
that the keyboard, mouse and monitor are all working on each of the
connected server(s).
Prepare your computers for Prima IP connection
1.
Turn off the mouse acceleration and the “Snap to” option on each
of your computers/servers: Mouse synchronization can function
properly only when these two options are turned off on all connected
computers. Taking Windows XP/Server 2003 for example: Go to
Control Panel/Mouse/Pointer speed
and set the mouse speed to be at the
exact middle of the scale, then uncheck
both the Enhance Pointer Precision option
and the Snap to option. For more details,
please refer to the User Guide, Section 2.2.
2.
Use a
more common display
frequency such as 60 Hz / 72 Hz / 75 Hz
and pixel dimension: We suggest you use
more standard display modes, such as:
800x600@60Hz / 72 Hz / 75 Hz
1024x768@60Hz / 70 Hz / 75 Hz
1280 x 1024@60 Hz
1600 x 1200@60 Hz
3. Disable transitional effect: Go to
Control Panel/ Display / Appearance / Effects
. And then uncheck the
option to disable transition effects such as Fade for the menus and tool
tips. This will much improve your video quality when you are using
Medium or Low Quality as your Prima IP video filter setting.
Configure Prima IP for viewer connection within LAN
1.
Connect the Prima IP to your LAN: Connect the Ethernet port of
the Prima IP to one of the LAN port on your network switch/hub within
your LAN, using a Cat5 UTP cable.
(Since the Prima IP accessories do
not include a UTP cable, you should
prepare one for use!
)
Upon connection to LAN, the Link
LED will be lit to indicate ready
Ethernet connectivity. If it is not lit,
that means the connection is not
ready. An orange 10/100M LED is lit
to indicate a 100 Mbps connection;
otherwise, it’s 10 Mbps connection.
If your LAN is using different
network segment other than 192.168.1.xxx, you might consider
configuring one computer to have an IP address of 192.168.1.xxx such
that you can access the Prima web and then change Prima IP address to
one appropriate for your regular IP segment.
The factory default IP settings of Prima IP as you receive it in the
packaging box are such as:
Port base:
5900
IP address:
192.168.1.200
Subnet mask:
255.255.255.0
Default gateway:
192.168.1.254
DNS:
192.168.1.1
2.
Log in Prima IP Web management interface: Access the Prima IP
web management interface by a standard browser connection. Just type
in the address bar of your browser:
https://<IP_address>:<PortBase+8>
For example: https://192.168.1.200:5908
and log in with the following username and password:
Username: superuser
Password: superu
3.
Configure Prima IP TCP/IP settings: go to the LAN TCP/IP page to
configure settings such as port base, IP address, Network Mask,
Gateway
and DNS server.
For example, we could configure Prima IP such as followings:
Port base:
6080
IP:
192.168.1.36
Subnet mask:
255.255.255.0
Default gateway:
192.168.1.11
DNS:
192.168.1.1
With these settings, it means you’ll use 6080 for viewer port base and
6088 for SSL browser connection. For example, you should type
https://192.168.1.36:6088
in the browser address bar for Prima IP Web
management access. And then within the viewer prompt window,
You should type: 192.168.1.36:6080
Note that the DNS setting is required only when you want to use the
mail alert function to notify users about specific server alert events via
e-mail.
4.
Validate new settings: Click Submit button below to commit it to
Prima IP flash memory. Then go to the Apply Setting Page, and click the
Apply Setting button to make new settings effective on the Prima IP.
5.
Verify the presence of Prima IP within your LAN: try to ping the
IP address of Prima IP from any computer on your LAN. For example,
in the DOS box you type:
ping 192.168.1.36
…. and it should reply your pinging.
You can now access Prima IP using any computer within your LAN
environment.
Configure router/firewall settings for internet access
To allow access to the Prima IP behind corporate firewall/router, please
configure the following settings on your router (not on your Prima IP):
1.
Configure a virtual server on your router: you should configure (or
ask your net admin to configure for you!) a virtual server as mapped to
the Prima IP’s local IP address
2.
Open a port range (<port_base> ~ <port_base_+_9>) both inbound
and outbound for the virtual server: you should open a port range
according to what you have configured as port base for Prima IP in
previous steps. Taking previous example, if we configure Prima IP as
having a port base of 6080, then we should open port range 6080~6089
(that is, <port_base> ~ <port_base +9>) both for inbound and outbound,
in which,
<port_base> = 6080 is the Prima IP viewer connection port
<port_base + 8> = 6088 is the browser SSL connection port
<port_base + 9> = 6089 is for viewer internal communication, etc.
For example:
Router internet IP
virtual server (port range open)
Prima IP’s local IP
61.232.134.120
virtual server (port 6080~6089 open)
192.168.1.36
Once you have changed the port base of your Prima IP, you should
also modify the port range open on your router accordingly, if you want
internet access to come across.
Test Prima IP viewer connection from LAN and Internet
After you have installed Prima IP within your KVM Switch / server(s) /
networking environment, you could now test the viewer connection from
LAN and across Internet.
1.
Access Prima IP Browser Management Interface: Use a standard
browser to access Prima IP web management interface. Enter the valid
IP address and browser port number <port_base +8> within your
browser address bar.
https://IP_address:browser_port
Taking previous case for example, you should enter
https://192.168.1.36:6088
Then login with the default account:
User name: superuser
Password: superu
2.
Download and install the Win32 viewer program: Go to the
Download
page, download and install it on your computer client. After
installation, you’ll see a Prima IP viewer desktop icon on the desktop.
You can download either win32 viewer or java viewer. The java
viewer will require Java Runtime Environment 1.5.0 or above to be
already installed on your computer client. Java viewer won’t need
installation process, just double-click on it to run the java program.
3.
Run the viewer program: double-click the Prima IP viewer desktop
icon and the Connection Details box appears.
Win32 viewer login Java viewer login
1. Prima IP 8 x 1
[Depends on
package]
1. Prima IP 16 x 1
[Depends on
package]
2. Console
Management Cable
[RJ12-RS232-F]
3. Modem serial cable
[RJ12-DB25]
4. Power control cable
[RJ12-RS232-M]
5. External Power
Adapter (Out: 9V 2A;
IN: 100~240V)
6. Power Chord
7. Combo-free USB PS/2
KVM cable [C-KVM-SC
Series]
8. Installation Guide &
Support CD-ROM