Kichler 10565 User Manual
Kichler Hardware
Safety InStructIonS
read thIS fIrSt
Keep theSe InStructIonS
This fixture is intended for installation in accordance with the National Electric Code (NEC) and local code specifications.
Failure to adhere to these codes and instructions may result in serious injury and/or property damage and will void the warranty.
If you have any doubts concerning installation, contact a qualified licensed electrician.
Date Issued: 8/29/08
IS-10563-BL
Before Installing:
1. This fixture can only be used with Kichler
®
Cabinet Lighting fixtures and accessories.
2. This fixture must be installed using interconnect
cables 10573 (9”), 10572 (14”), 10571 (21”)
connected to wire module 10570 or existing
Kichler
®
Cabinet Lighting fixture and can also
be used by directly connecting to another
Kichler
®
Cabinet Lighting fixture.
3. Maximum number of lamps per run can not
exceed 30 lamps.
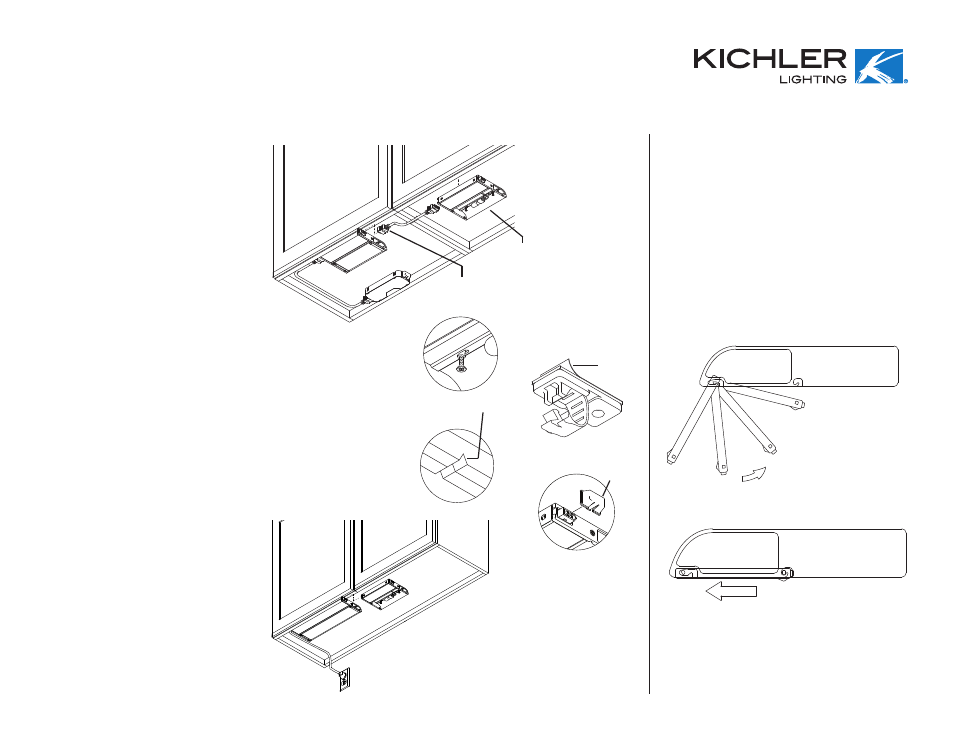
INTERCONNECT
CABLE
BULB COMPARTMENT
NOTCH
BACKING
CONNECTOR
COVER
* Installations using Interconnect cable:
1. Determine desired location for mounting fixture.
Mounting surface should be a minimum of 1/2” thick
and approximately 2 1/2” clearance for interconnect
cable should be allowed at both ends of fixture.
2. Position fixture against mounting surface with bulb compartment towards back.
3. Drive pre-installed screws into mounting surface until fixture is secure. If screws
are difficult to install, remove screws and bushings, mark holes, and drill 1/16”
maximum pilot holes.
4. Connect fixture to existing Kichler
®
Cabinet Lighting system using interconnect
cable.
5. Hold interconnect cable to mounting surface and determine best path for cable.
If interconnect cable is being run from cabinet to cabinet a notch such as a “V”
could be cut in cabinet side panels to help keep cable out of sight.
note: Interconnect cable is not intended for use through or concealed behind
walls, floors of ceilings.
6. Peel backing off retaining clip(s) and affix to desired location(s). Surface should
be as clean as possible.
7. Slip cable into clip(s) and snap closed.
8. If this will be the last fixture in a run, use connector cover over connector not
being used.
* Installing fixture to fixture:
1. Align connector on end of new fixture with
connector on end of existing fixture.
2. Push new fixture to existing fixture until fixtures
are flush and connectors snap together.
3. Drive pre-installed screws into mounting surface
until fixture is secure. If screws are difficult to
install, remove screws and bushings, mark
holes, and drill a 1/16” maximum pilot holes.
4. If this will be the last fixture in a run, use
connector cover over connector not being used.
* Illustrations are shown using wire module and
portable installations. But this unit can be used in
any combination using Kichler
®
Cabinet Lighting
fixtures and accessories.
FIXTURE TO FIXTURE
USING INTERCONNECT CABLE
RETAINING
CLIP
4.
opening diffuser:
• Turn off fixture and allow to cool.
• Place finger tip on tab of each diffuser end cap.
• LIft and slide diffuser at tabs.
• Lower that edge of diffuser
closing diffuser:
A. Swing edge of diffuser with tabs up toward
fixture until pegs by tabs slip into slots in
middle of fixture end caps.
B. Slide tabs forward allowing pegs to seat in
slots.
A.
B.
3.
5.
6.
8. & 4.