Sealey FSW70 User Manual
Fsw70, Floor sweeper 700mm, Fig.1 fig.2
INSTRUCTIONS FOR:
FLOOR SWEEPER 700MM
MODEL No:
FSW70
Thank you for purchasing a Sealey product. Manufactured to a high standard this product will, if used according to these instructions
and properly maintained, give you years of trouble free performance.
1. SAFETY INSTRUCTIONS
2. INTRODUCTION
IMPORTANT: PLEASE READ THESE INSTRUCTIONS CAREFULLY. NOTE THE SAFE OPERATIONAL REQUIREMENTS, WARNINGS & CAUTIONS.
USE THE PRODUCT CORRECTLY AND WITH CARE FOR THE PURPOSE FOR WHICH IT IS INTENDED. FAILURE TO DO SO MAY CAUSE
DAMAGE AND/OR PERSONAL INJURY AND WILL INVALIDATE THE WARRANTY. PLEASE KEEP INSTRUCTIONS SAFE FOR FUTURE USE.
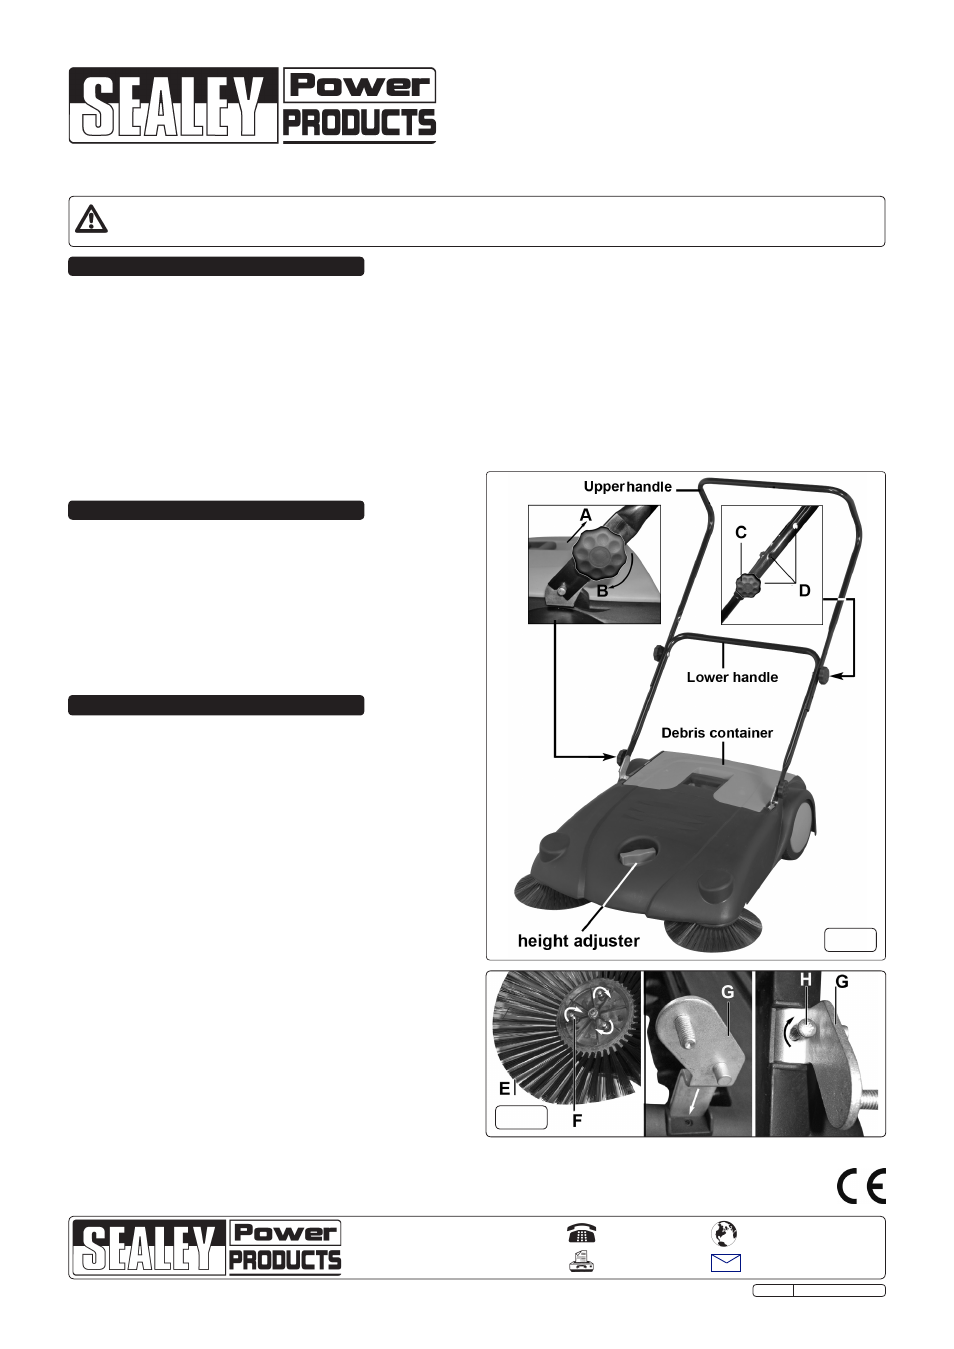
3.1 Circular brushes: Attach each brush to its hub using the 6
screws provided (3 for each brush). Ensure each brush is
correctly seated before tightening. See fig.2E&F.
3.2 Handle brackets: Insert the right hand bracket into the slot
near the front corner of the debris collector with the thread and
spigot facing outwards as shown in fig.2G. Secure the bracket
using the 25mm self tapping screw provided, as shown in
fig.2H. Mount and secure the left hand bracket in the same
way.
3.3 Lower Handle: Take the lower handle tube and place the slots
in the flattened ends over the threaded spigots on the handle
brackets. Ensure that the open slots at each end of the lower
handle are engaged with the plain spigot on the mounting
brackets. Retain the handle in place by screwing a black
plastic knob onto each threaded spigot. See fig.1B.
3.4 Upper Handle: The upper handle has three alternative
mounting holes in the flattened portions of the handle. Align
the chosen mounting holes with the holes in the upper part of
the lower handle and insert the supplied coach bolts through
both frames and retain with the black plastic knobs supplied as
shown in fig.1C&D.
3.5 Handle stowage: The handle can be folded down for storage
purposes. Loosen the lower mounting knobs and pull the
handle upwards to disengage the slotted ends from the plain
spigots on the mounting brackets. See fig.1B&A. Hinge the
handle forwards and allow it to rest on the body of the sweeper.
3.6 Use: Ensure the handle height is correctly adjusted for the
convenience of the operative. Make sure that the handle
fixings are tight and the debris container is properly
seated within the main body of the sweeper. Work
methodically up and down the area to be swept, ensuring that
each 'pass' overlaps the previous one. To ensure the efficiency
of the brushes, push the sweeper at a good, even pace. To
capture larger pieces of debris the basic clearance of the
sweeper can be raised a further 20mm by rotating the height
adjuster seen in fig.1 clockwise. Check the debris container
regularly by lifting it out. Empty it if required. Place it back into
the sweeper as shown in fig.1. Periodically, clean the exterior
of the sweeper with a damp cloth.
3. ASSEMBLY & USE
Ensure that the sweeper is only used on hard/dry surfaces.
Ensure that the dirt collection hopper is present and properly
seated before commencing sweeping.
The sweeper is for indoor use only.
Do not leave the sweeper unattended, where it could become a
hazard to other people or traffic in the sweeping area. For
example, in a warehouse situation.
Do not allow anyone to ride on the sweeper.
Do not use the sweeper for any purpose other than that for
which it was designed.
Do not use the sweeper to clear up hazardous materials or any
material that may attack the plastic chassis of the sweeper.
Do not use the sweeper on wet surfaces.
NOTE: It is our policy to continually improve products and as such we reserve the right to alter data, specifications and component parts without prior notice.
IMPORTANT: No liability is accepted for incorrect use of this product.
WARRANTY: Guarantee is 12 months from purchase date, proof of which will be required for any claim.
INFORMATION: For a copy of our latest catalogue and promotions call us on 01284 757525 and leave your full name and address, including postcode.
01284 757500
01284 703534
Sole UK Distributor, Sealey Group,
Kempson Way, Suffolk Business Park
,
Bury St. Edmunds, Suffolk,
IP32 7AR
www.sealey.co.uk
Web
Original Language Version
FSW70 Issue: 1 - 11/11/11
Suitable for maintaining any hard floor and ideal for removing dirt,
dust and debris from large surface areas. Features 4-brush system
with two side brushes and two further brushes set underneath the unit
to easily lift debris into the hopper. Fitted with tubular handle and
adjustable castor wheel that raises the sweeper 20mm enabling
larger pieces of debris to be swept up.
Model No ...................................................................................FSW70
Operating Width .........................................................................700mm
Hopper capacity ..............................................................................20ltr
fig.1
fig.2