Sealey BS104 User Manual
Workshop cycle stand, Bs104, Instructions for
INSTRUCTIONS FOR:
WORKSHOP CYCLE STAND
MODEL NO:
BS104
Thank you for purchasing a Sealey product. Manufactured to a high standard this product will, if used according to these instructions
give complete satisfaction.
IMPORTANT: PLEASE READ THESE INSTRUCTIONS CAREFULLY. NOTE THE SAFE OPERATIONAL REQUIREMENTS,
WARNINGS & CAUTIONS. USE THE PRODUCT CORRECTLY AND WITH CARE FOR THE PURPOSE FOR WHICH IT IS INTENDED.
FAILURE TO DO SO MAY CAUSE DAMAGE OR SERIOUS PERSONAL INJURY AND WILL INVALIDATE THE WARRANTY.
PLEASE KEEP THESE INSTRUCTIONS SAFE FOR FUTURE USE.
Maintain the stand in good condition, replace or repair damaged parts. Use recommended parts only. Non authorised parts may be
dangerous and will invalidate the warranty.
Before use ensure that all stand nuts and bolts are tight and that moveable and clamping parts are in good working order.
Place stand on a sound level surface offering adequate working clearance for its function. Keep area clean, tidy and free from unrelated
materials. Ensure there is adequate lighting.
Remove ill fitting clothing. Remove ties, watches, rings, and other loose jewellery, and contain long hair.
Maintain correct balance and footing. Ensure the floor is not slippery and wear non slip shoes.
Keep children, pets and unauthorised persons away from the working area.
7
DO NOT use the stand for for any purpose other than for which it is designed.
7
DO NOT get the stand wet or use in damp or wet locations or areas where there is condensation.
When not in use store the stand in a safe, dry, child proof area.
DO NOT exceed maximum load of 30kg.
1. SAFETY INSTRUCTIONS
2. INTRODUCTION
Durable steel construction and ideal for home and workshop use. Fitted with two plastic jaws that locate under the crank and frame with plastic
coated hook to hold in position. Features large rubber feet for added stability and tool tray to ensure tools are always close to hand. Folds flat for
ease of storage. Adjustable cycle locking strap to prevent wheel movement is available separately- order Model No. BS102S,
(see fig.4).
3. SPECIFICATION
4. ASSEMBLY / OPERATION
Model No: ........................................................................................ BS104
Working Height: ..............................................................................940mm
Weight ............................................................................................... 6.5kg
4.1
Unpack the contents, should there be any damaged or missing contact your supplier.
4.1.1. Lay base on its side on the floor to assemble. Open it out and remove nuts and washers only from screws J, K and L, (see fig.2).
4.1.2. Temporarily remove the top portion of bar A, (see fig.2). This is the part with the tool tray bracket on it.
4.1.3. Fit holding bar C, this pivots on screw J.
4.1.4. Replace the top portion of bar A, and tighten the three screws, J, K and L.
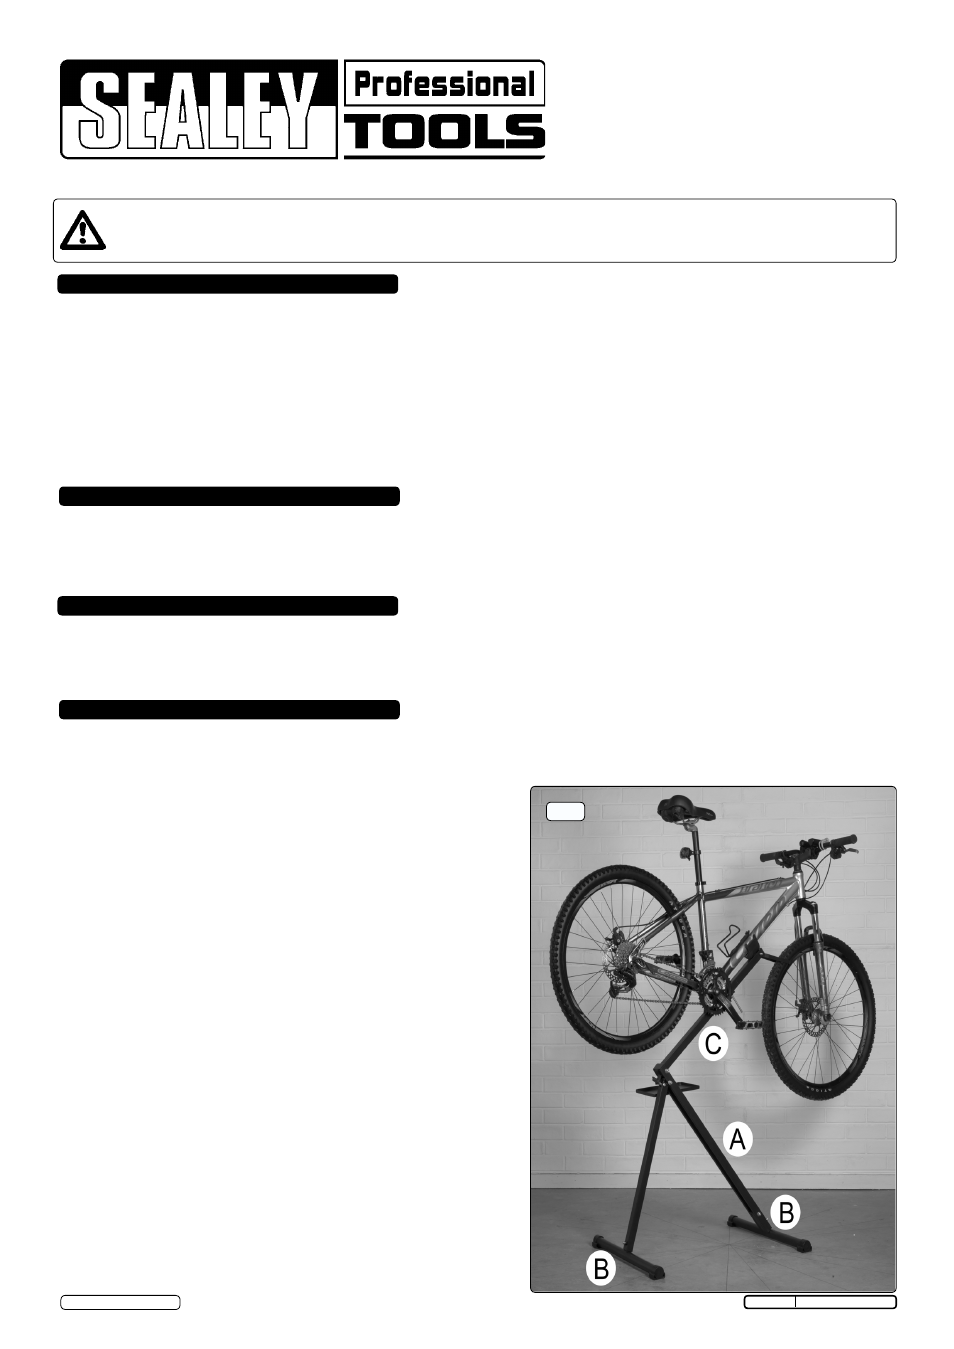
4.1.5. Fit the two stand tubes, B (see fig.1).
4.1.6. Carefully lift the bike stand onto its feet.
4.1.7. Attach the four plastic feet onto the end of the stand tubes B, (see fig.1).
4.1.8. Attach the bike clamp E, (see fig.3) through the hole in the holding bar (C).
Push the spring from below onto the clamp and hold on with wing screw N,
(see fig.3).
4.1.9. Attach the tool storage tray.
4.1.10. Check all screws and nuts for stability and re-tighten them if necessary.
4.1.11. Lift bicycle onto the stand making sure the bike’s bottom bracket securely
locates into the lower stand bracket, and the down tube locates into the
upper one.
4.1.12. Secure bike on stand using the bike clamp, by lifting it over the down tube
and tightening using the wing screw N, (see fig.3).
4.1.13. Use the two levers, (see fig.5). to hold the front wheel pointing forward,
alternatively use BS102S, (see fig.4).
BS104 Issue: 1 - 19/02/13
© Jack Sealey Ltd
Original Language Version
Fig.1