Powerfix POAS 2 A1 User Manual
Organising- and storage set poas 2 a1, Intended use, Safety instructions
ORGANISING- AND STORAGE SET
POAS 2 A1
Read these usage instructions attentively before using the item for the fi rst time
and retain this information sheet for later reference. Pass these usage instructions
on with the item to any subsequent owners.
Intended use
The storage set is intended exclusively for the storage of tools and small parts
such as nails, wallplugs, screws or similar items, in private households. This storage
set is not intended for the storage of fl ammable, toxic or corrosive liquids. Do
not use this storage set in or for commercial applications, or for purposes for
which it was not intended. A diff erent or additional usage is considered to be
improper use and can lead to damage. The manufacturer assumes no responsi-
bility for damage caused by failure to comply with these instructions, improper
use, incompetent repairs, making unauthorised modifi cations or for using unap-
proved replacement parts.
Safety instructions
For safe interaction with the item pay heed to the following safety information:
When drilling, ensure that damage is not caused to any electrical cables or
■
other installations, such as water pipes, in the wall. Drilling into electrical
wires can be fatal!
Damaged parts could have sharp edges. There is also a risk of physical injury!
■
Replace broken or damaged parts forthwith.
Do not burden the wall panels and the boxes too heavily (see chapter “Techni-
■
cal Data”). This could lead to irreparable damage.
The supplied wallplugs are only suitable for insertion into a concrete or stone
■
wall. It is absolutely important that you check the suitability of your masonry
before inserting the wallplugs. If you do not, the wallplugs may not hold and
the wall panels could fall off . If in doubt, consult a professional.
Technical data
Maximum load per wall panel
32 kg
Maximum load - small box
1 kg
Maximum load - medium box
1.5 kg
Maximum load - large box
2 kg
Items supplied
Before taking the item into use, check that all of the parts are complete/available
and free of visible damage. If the items supplied are not complete, or damaged
due to defective packaging or through transportation, contact Customer Services
(see chapter “Importer/Service”).
2 x Wall panels (42 x 59 cm)
▯
14 x Boxes small (red) (11.5 x 10 x 7.3 cm)
▯
2 x Boxes small (blue)
▯
(11.5 x 10 x 7.3 cm)
8 x Boxes medium (blue) (16.5 x 10 x 7.3 cm)
▯
4 x Boxes large (yellow) (21.5 x 10 x 7.3 cm)
▯
10 x Hooks (5 cm)
▯
1 x Drill and bit holder (16.5 x 5 cm)
▯
1 x Tool holder (21 x 9.5 cm)
▯
1 x Ring and open-ended spanner holder (22 x 6.8 cm)
▯
40 x Screws M5x30
▯
40 x Wallplugs S6
▯
This information sheet
▯
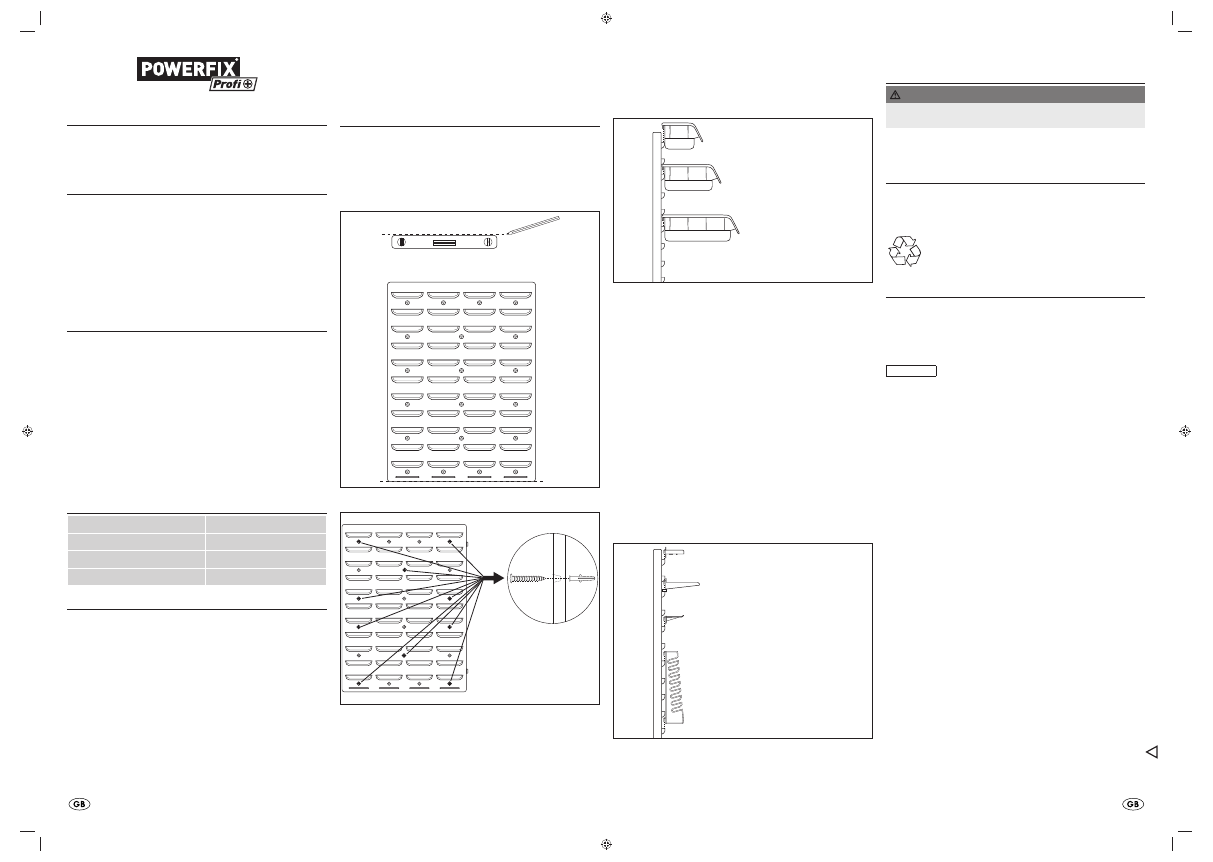
Assembly
Installing the wall panels
Draw a straight line on the wall so as to align the wall panels with it (see Fig.1).
▯
Hold the wall panels against the wall and, using a pointed object, mark the
▯
boreholes through the screw positions.
Drill the holes and insert the supplied plugs into them.
▯
Screw the wall panels to the wall with at least 10 screws each (see Fig. 2).
▯
Fig.
1
Fig.
2
Mounting the boxes
For one box, you need one free slot in the wall panels.
Insert the box from above into the open slot such that both hooks engage in
▯
the wall panels (see Fig. 3).
Fig.
3
Securing the hooks
For 10 hooks you need at least two slots. Up to fi ve hooks can be attached to
one slot.
Insert the hook from above into the slot (see Fig. 4).
▯
Securing the drill and bit holder
For the drill and bit holder you need two adjacent slots.
Insert the drill and bit holder from above into the slots such that both hooks
▯
engage in the wall panel (see Fig. 4).
Securing the tool holder
For the tool holder you need two adjacent slots.
Insert the tool holder from above into the slots such that both hooks engage
▯
in the wall panel (see Fig. 4).
Securing the ring and open-ended spanner holder
For the ring and open-ended spanner holder you need two slots lying adjacent
to each other and fi ve slots one above the other.
Insert the two ring and open-ended spanner holders from above into the
▯
slots such that both hooks engage in the wall panel (see Fig. 4).
Fig.
4
Cleaning
IMPORTANT
Do not use abrasive or aggressive cleaning agents, these could damage
►
the plastic parts.
Clean the wall panels and the boxes with a lightly moistened cloth. For stubborn
▯
soiling use a mild detergent on the cloth.
Disposal
Dispose of the appliance via a registered waste disposal fi rm or at your local
community waste disposal facility. Pay heed to the currently applicable regula-
tions. In case of doubt, please contact your waste disposal centre.
Dispose of all packaging materials in an environmentally friendly
manner.
Importer / Service
KOMPERNASS GMBH
BURGSTRASSE 21
D-44867 BOCHUM
Tel.: +49 (0) 2327 3018-0
www.kompernass.com
IAN 70647
ID no.: POAS 2 A1-10/11-V3
- 1 -
- 2 -
- 3 -
- 4 -
4
IB_70647_POAS2A1_LB4.indd 1
IB_70647_POAS2A1_LB4.indd 1
23.11.2011 14:25:49 Uhr
23.11.2011 14:25:49 Uhr