Canon PIXMA E474 User Manual
Guía de inicio 2, Getting started 2
XXXXXXXX
© CANON INC. 2016
2
(A)
(C)
(B)
2
(A)
(C)
(B)
FRANÇAIS
PORTUGUÊS
ESPAÑOL
Guía de inicio 2
Preparativos
• Active Wi-Fi en su teléfono inteligente/tableta.
• Si dispone de un router inalámbrico, conecte su teléfono inteligente/tableta a este.
• Por cuestiones del funcionamiento, consulte los manuales de su teléfono inteligente/tableta y
del router inalámbrico o póngase en contacto con los fabricantes.
3. Puntee en PRINT que se instaló.
4. Si aparece la pantalla siguiente, la configuración se habrá completado.
1. Instale Canon PRINT Inkjet/SELPHY en su teléfono inteligente/tableta.
: Busque "Canon PRINT" en App Store.
: Busque "Canon PRINT" en Google Play.
Siga las instrucciones en pantalla para continuar con la configuración.
Solución de problemas
a
Pulse el botón
Wi-Fi (A) durante 2 segundos.
La luz de
Wi-Fi (B) parpadea lentamente.
b
Pulse el botón
Color (C) dos veces.
c
Vuelva a - 3 para continuar con la
configuración.
• Si la conexión de su teléfono inteligente/tableta se completa en en el paso
Guía de inicio 1,
no será necesario configurar con este manual.
• Necesitará configurar la conexión de cada teléfono inteligente/tableta. Repita la configuración
del paso 1 para otro teléfono inteligente/tableta, si procede.
3. Puntee Ajustes (Settings) en la
pantalla principal de su teléfono
inteligente/tableta y, a continuación,
en
Canon_ij_XXXX en la
configuración de Wi-Fi.
4. Puntee en PRINT que se instaló.
Siga las instrucciones en pantalla para
continuar con la configuración.
Si no aparece
Canon_ij_XXXX en la lista,
consulte la sección "Solución de problemas"
que aparece a continuación sobre el
funcionamiento de la impresora y espere
hasta que
Canon_ij_XXXX aparezca.
XXXX varía en función de su impresora.
Si no aparece el mensaje "Impresora
no registrada. ¿Realizar preparación
de impresora? (Printer is not registered.
Perform printer setup?)" durante un
tiempo, consulte la sección "Solución de
problemas" que aparece a continuación
sobre el funcionamiento de la impresora y
espere a que el mensaje aparezca.
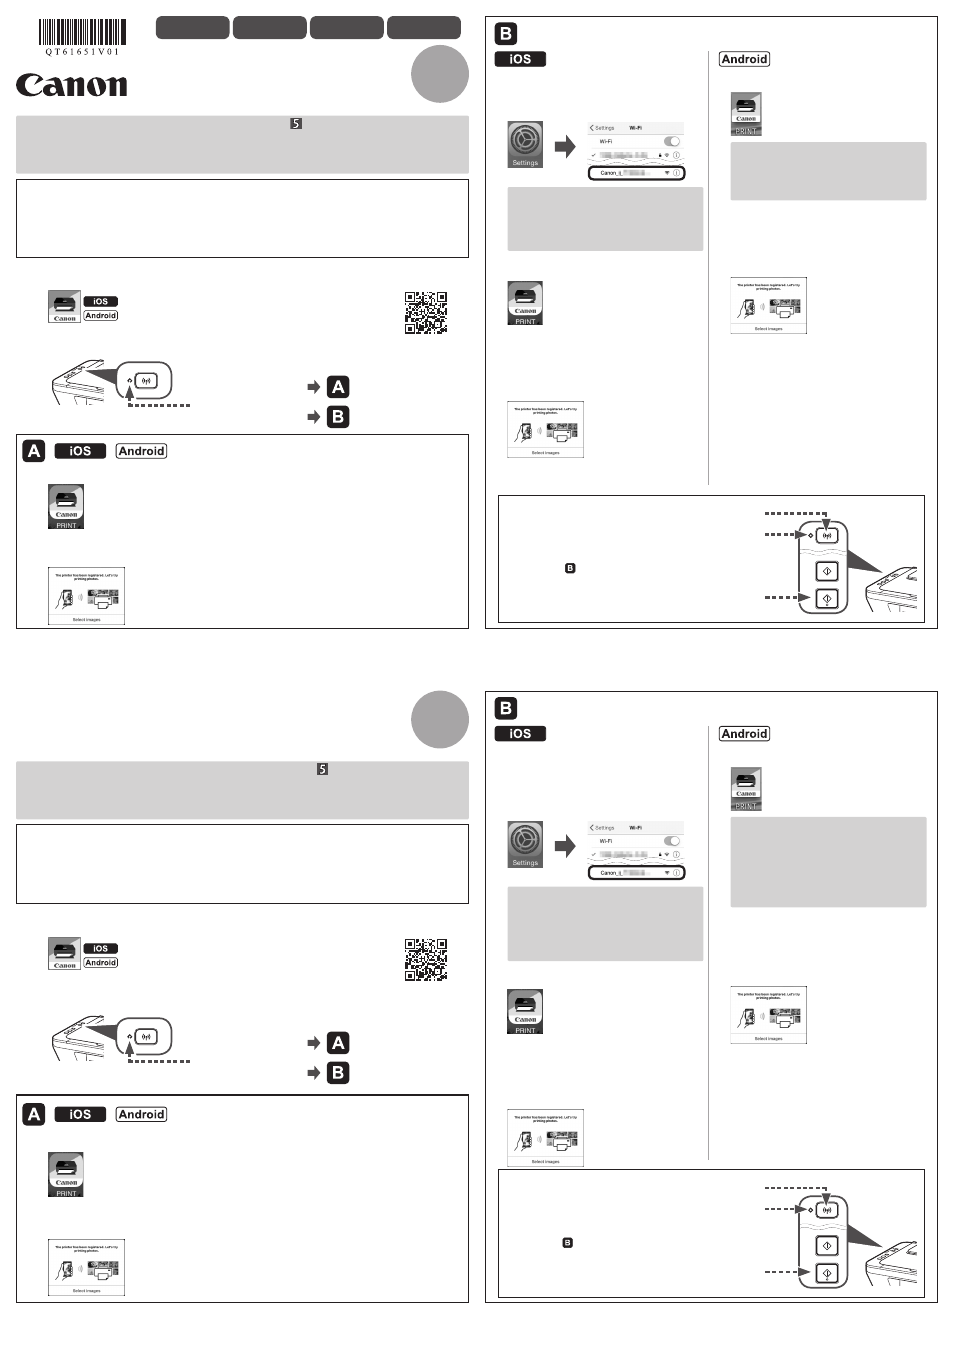
2. Compruebe el estado de la luz de Wi-Fi en la impresora.
5. Si aparece la pantalla siguiente,
la configuración se habrá completado.
3. Puntee en PRINT que se instaló.
Siga las instrucciones en pantalla para
continuar con la configuración.
4. Si aparece la pantalla siguiente,
la configuración se habrá completado.
La luz está parpadeando
o se encuentra apagada:
La luz de está encendida:
Getting Started 2
Preparation
• Turn on Wi-Fi on your smartphone/tablet.
• If you have a wireless router, connect your smartphone/tablet to the wireless router.
• For operations, refer to manuals of your smartphone/tablet and the wireless router or contact
those manufacturers.
3. Tap PRINT which was installed.
4. If the following screen appears, the setup is complete.
1. Install Canon PRINT Inkjet/SELPHY to your smartphone/tablet.
: Search "Canon PRINT" in App Store.
: Search "Canon PRINT" in Google Play.
Follow the on-screen instructions to proceed to the setting.
Troubleshooting
a
Press the
Wi-Fi button (A) for 2 seconds.
The
Wi-Fi lamp (B) flashes slowly.
b
Press the
Color button (C) twice.
c
Return to - 3 to proceed with the setup.
ENGLISH
• If the connection of your smartphone/tablet is complete in in the
Getting Started 1, there is
no need for the setup using this manual.
• You need connection setup for each smartphone/tablet. Repeat the setting from step 1 for
another smartphone/tablet as necessary.
3. Tap Settings on the home screen of
your smartphone/tablet, and then tap
Canon_ij_XXXX on the Wi-Fi setting.
4. Tap PRINT which was installed.
Follow the on-screen instructions to
proceed to the setting.
If
Canon_ij_XXXX does not appear on
the list, see "Troubleshooting" below to
operate the printer and wait until
Canon_
ij_XXXX appears.
XXXX varies depending on your printer.
If the message "Printer is not registered.
Perform printer setup?" does not appear
for a while, see "Troubleshooting" below
to operate the printer and wait until the
message appears.
2. Check the status of the Wi-Fi lamp on the printer.
5. If the following screen appears, the
setup is complete.
3. Tap PRINT which was installed.
Follow the on-screen instructions to
proceed to the setting.
4. If the following screen appears, the
setup is complete.
The lamp is flashing or
turned off:
The lamp is lit:
QT6-1651-V01
PRINTED IN XXXXXXXX
IMPRIMÉ XX XXXXXXXX