Whelen SA350MH User Manual
Page 2
Page 2
3.25" ± .060
4.625"
6.50"
.281" DIA. HOLE
(2) PLACES
90° APART
4.00"
BLACK PVC CONDUIT
WIRE LENGTH
10.00"
11.25"
FIG. 1
Crimp Tall Cradle
Over Wire Insulation.
Crimp Short Cradle
Over Bare Wire.
Strip Wire to
Approximately 1/8"
AMP 2-POSITION PIN CONNECTOR
1
SPACER SEAL (FIBER)
SUPPLIED WITH TIP
PAPER GASKET
SUPPLIED W/TIP
RUBBER SEAL
SUPPLIED W/TIP
2
3
5
6
7
8
8
9
11
14
9
10
12
18
13
17
4
15
16
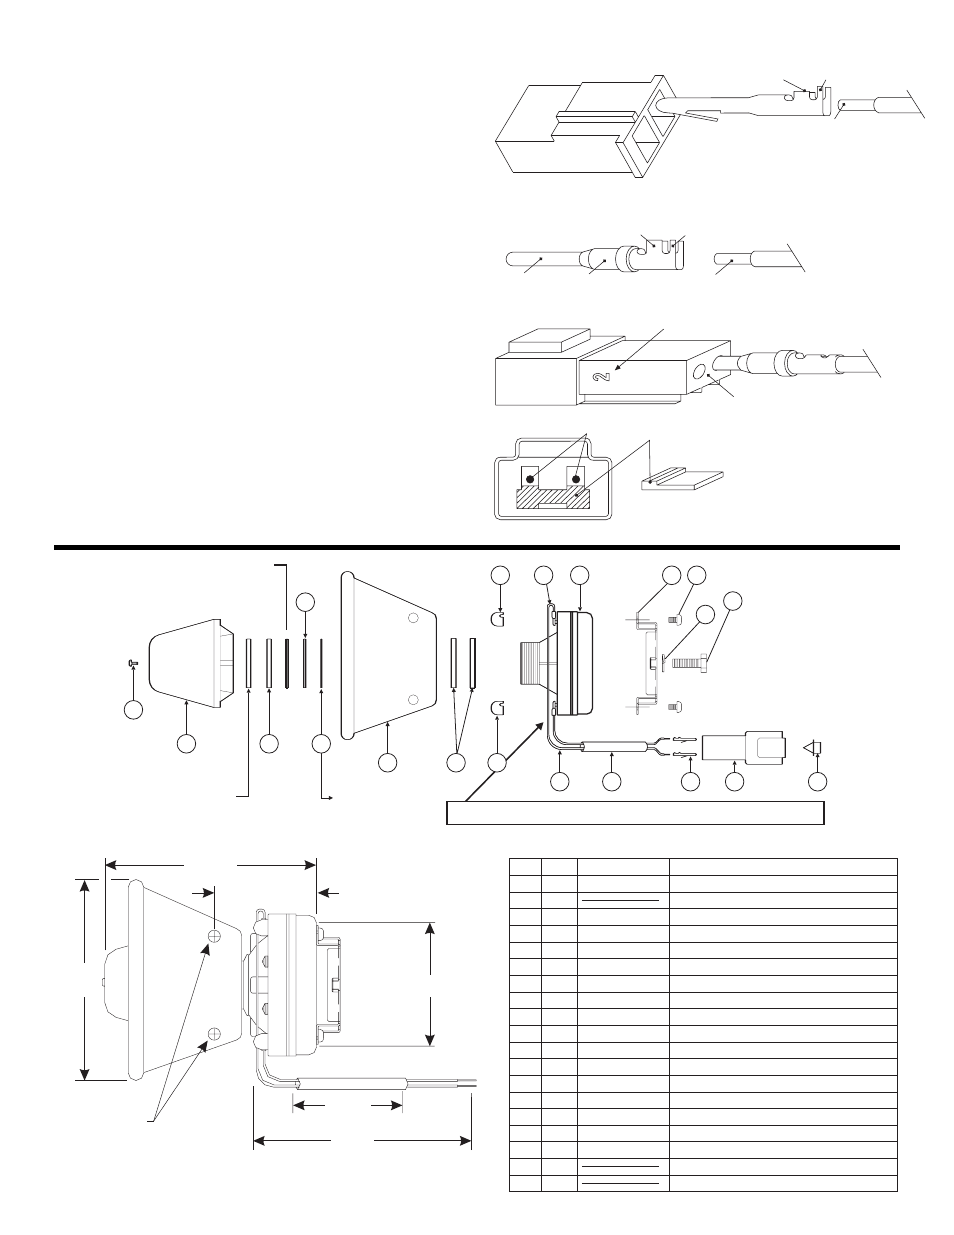
IMPORTANT NOTE: When installing the speaker driver, make sure to keep the drainage hole
to the bottom. The drainage hole is located under the model identification tag.
Strip Wire to Approx. 3/8" and
Slip Bare Wire Inside Pin Barrel
Crimp Large Cradle
over Bare Wire
Crimp Small Cradle
over Wire Insulation
Pin Barrel
Deutsch Pin
Terminal
FIG. 2
DEUTSCH 2-POSITION PIN CONNECTOR
The model SA-350MH siren speaker is shipped without a
connector attached to the speaker wires. The reason for this is
that the wiring harness on the vehicle may be equipped with
either an AMP socket connector, or a Deutsch® socket
connector. A connector kit is included with the siren speaker
and contains all the parts necessary for use with either
connector
.
1. Locate the speaker wire on the vehicle wiring harness and
determine the kind of wiring harness used.
2. In the supplied connector kit, choose matching connector
and pins, and install onto speaker wires.
NOTE: Speaker wires can be inserted into the choosen
connector in either position since polarity is not important.
FIGURE 2. Crimp Deutsch pin to wire using Deutsch crimping
tool DTT-16-00.
FIGURE 3. Grasp wire with crimped on pin approximately one
inch behind the pin. Push pin all the way inside rear seal of
connector until a click is felt. A slight tug on the wire will confirm
that the pin is properly locked in place.
FIGURE 4. Once the two pins are in place inside the connector
housing, use a needle nose pliers to insert the orange wedge
inside the connector housing from the other end. The wedge will
have to be fitted inside the cavity below the 2 pins.
FIG. 3
Pin Position Numbers are on Side of Connector Housing
Rear Seal
FIG. 4
Pins
End View of Connector
Orange Pin Wedge
PART NUMBER
01-0860541-00
72-4010291-00
38-0220049-00
38-0220048-00
38-0220405-00
72-2160158-65
38-0220047-00
22-0410510-00
67-1361600150
43-0263146-00
26-0610158-00
07-263152-007
14-130219-06
39-1H00316-35
39-1H02014-35
39-0015982-00
DESCRIPTION
SPEAKER MODEL SA-350MH
SA 510-M1 TIP
RUBBER SEAL
SPACER SEAL / FIBER
PAPER GASKET
150 M SPEAKER BELL
METAL GASKET
TERMINAL CAPS
#16 BLACK 15“ W/RECEPTICLE
SIREN DRIVER
PVC TUBING #6 BLACK #P-105
ADAPTER BRACKET
1/4 - 20x3/8” PPH SWEDGE SCREW
PIN TERMINAL DEUTSCH®
2 POS DEUTSCH PIN HSG
SECONDARY LOCK DEUTSCH
#8 X ½” PHILLIPS PHSMS
ITEM
1
2
3
4
5
6
7
8
9
10
11
14
12
15
13
16
QTY
REF
1
1
REF
1
2
2
2
1
1
1
2
2
1
1
1
5/16 - 18 X 1/2" HEX HEAD CAP SCREW
5/16 SPLIT LOCKWASHER
17
18
1
1