Sony SEL50F18F 50mm f/1.8 FE User Manual
Fe 50mm f1.8
–1
(1)
(2)
–2
2
1
3
4
電気製品は、安全のための注意事項を守ら
ないと、人身への危害や火災などの財産へ
の損害を与えることがあります。
この取扱説明書には、事故を防ぐための重要な注意事項と製品
の取り扱いかたを示しています。この取扱説明書をよくお読
みの上、製品を安全にお使いください。お読みになったあとは、
いつでも見られる所に必ず保管してください。
この「取扱説明書」ではレンズの使いかたを説明
しています。使用上のご注意など、レンズに共
通したご注意や説明については別冊の「使用前
のご注意」でご覧頂けます。
必ずご使用の前に、本書と合わせてよくお読み
のうえでご使用ください。
本機はソニー製αカメラシステムEマウントカメラ
専用のレンズです。Aマウントカメラにはお使いに
なれません。
本機は35mm判相当の撮像素子範囲に対応してい
ます。
35mm判相当の撮像素子搭載機種ではカメラ設定
によってAPS-Cサイズで撮影が可能です。
カメラの設定方法については、カメラの取扱説明書
をご覧ください。
カメラ本体との互換情報については専用サポート
サイトでご確認ください。
http://www.sony.jp/support/ichigan/
使用上のご注意
ˎ
ˎ レンズを取り付けてカメラを持ち運ぶときは、カメラと
レンズの両方をしっかり持ってください。
フラッシュ使用時のご注意
ˎ
ˎ フラッシュ使用時には、レンズフードをはずして1m以上
離れて撮影してください。レンズとフラッシュの組み合
わせによっては、レンズがフラッシュ光を妨げ、写真の下
部に影ができることがあります。
周辺光量について
ˎ
ˎ レンズは原理的に画面周辺部の光量が中心部に比べ低下
します。周辺光量の低下が気になる場合は、開放絞りか
ら1~ 2段絞り込んでご使用ください。
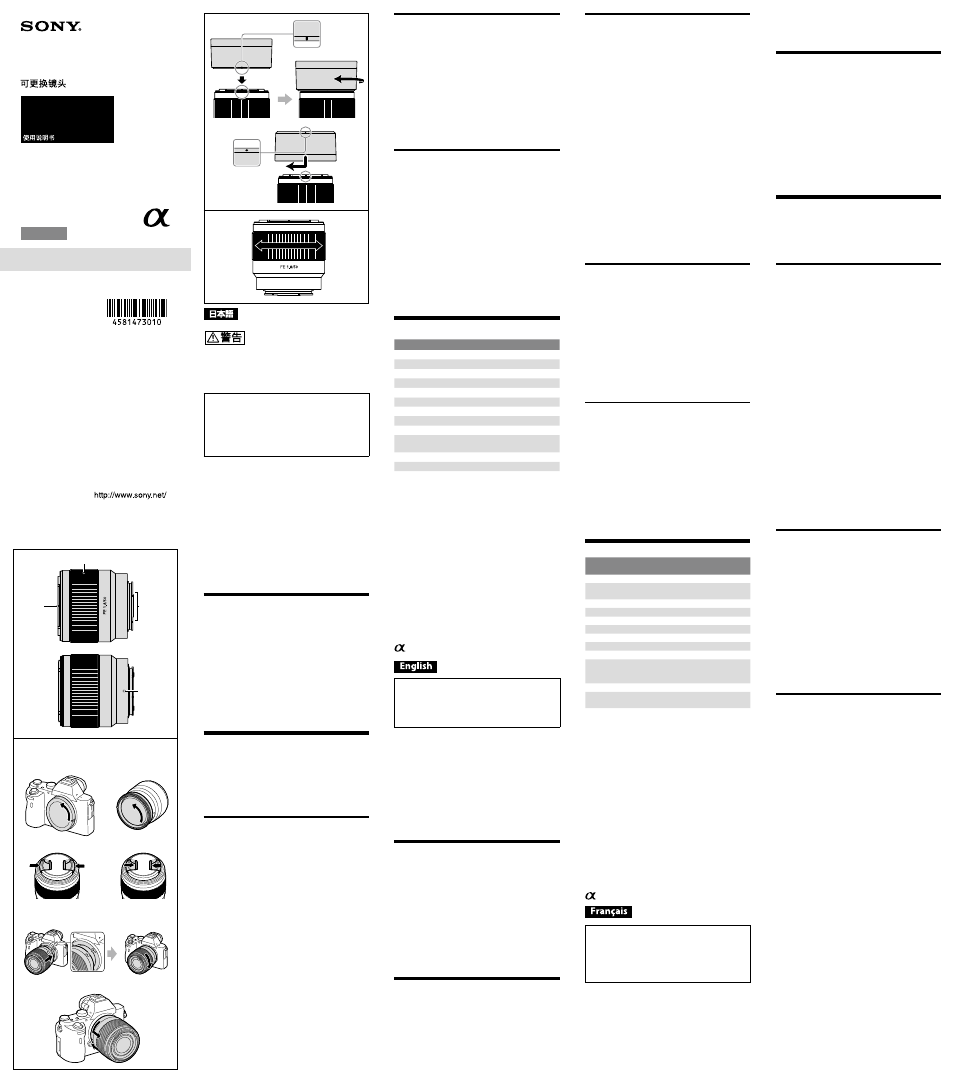
各部のなまえ
1 レンズフード指標
2 フォーカスリング
3 レンズ信号接点*
4 マウント標点
* 直接手で触れないでください。
レンズの取り付けかた/取りはず
しかた
取り付けかた(イラスト–参照)
1
前後のレンズキャップとカメラのボディ
キャップをはずす。
•
レンズフロントキャップは図の(1)、
(2)の2通りの方
法で取り付け/取りはずしができます。
(2)は、レン
ズフードを付けた状態でのレンズキャップの取り付
け/取りはずしに便利です。
2
レンズとカメラの白の点(マウント標点)を
合わせてはめ込み、レンズを軽くカメラに押
し当てながら、時計方向に「カチッ」とロック
がかかるまでゆっくり回す。
•
レンズを取り付けるときは、カメラのレンズ取りは
ずしボタンを押さないでください。
•
レンズを斜めに差し込まないでください。
取りはずしかた(イラスト–参照)
カメラのレンズ取りはずしボタンを押したま
ま、レンズを反時計方向に回してはずす。
レンズフードを取り付ける
画面外にある光が描写に影響するのを防ぐために、
レンズフードの使用をおすすめします。
レンズフードの赤線をレンズの赤点(レンズ
フード指標)に合わせてはめ込み、レンズフード
の赤点とレンズの赤点が合って「カチッ」という
まで時計方向に回す。
ˎ
ˎ カメラ内蔵、もしくは外付けフラッシュを使って撮影す
るときは、フラッシュ光が遮られることがありますので、
レンズフードをはずしてください。
ˎ
ˎ 撮影後レンズフードを収納するときは、逆向きにレンズ
に取り付けてください。
ピントを合わせる
ピント合わせは、以下3つの設定方法があります。
・オートフォーカス
ピント合わせを自動で行う。
ˎ
–
動画撮影時に、作動音が記録されてしまうことがあり
ます。
・DMF(ダイレクトマニュアルフォーカス)
オートフォーカスでピントを合わせた後に、マ
ニュアルでピントを微調整する。
・マニュアルフォーカス
ピント合わせを手動で行う。
各モードの設定方法は、カメラの取扱説明書をご覧
ください。
主な仕様
商品名(型名)
FE 50mm F1.8 (SEL50F18F)
焦点距離(mm)
50
焦点距離イメージ*
1
(mm) 75
レンズ群一枚
5-6
画角1*
2
47°
画角2*
2
32°
最短撮影距離*
3
(m)
0.45
最大撮影倍率(倍)
0.14
最小絞り
F22
フィルター径(mm)
49
外形寸法(最大径×長さ)
(約:mm)
68.6×59.5
質量(約:g)
186
手ブレ補正機能
なし
*
1
撮像素子がAPS-Cサイズ相当のレンズ交換式デジタル
カメラ装着時の35mm判換算値を表します。
*
2
画角1は35mm判カメラ、画角2はAPS-Cサイズ相当の撮
像素子を搭載したレンズ交換式デジタルカメラでの値
を表します。
*
3
最短撮影距離とは、撮像素子面から被写体までの距離を
表します。
ˎ
ˎ レンズの機構によっては、撮影距離の変化に伴って焦点
距離が変化する場合があります。記載の焦点距離は撮影
距離が無限遠での定義です。
同梱物(( )内の数字は個数)
レンズ(1)、レンズフロントキャップ(1)、
レンズリヤキャップ(1)、レンズフード(1)、
印刷物一式
仕様および外観は、改良のため予告なく変更するこ
とがありますが、ご了承ください。
はソニー株式会社の商標です。
This instruction manual explains how to use
lenses. Precautions common to all lenses such
as notes on use are found in the separate
“Precautions before using”. Be sure to read both
documents before using your lens.
This lens is designed for Sony α camera system
E-mount cameras. You cannot use it on A-mount
cameras.
The FE 50mm F1.8 is compatible with the range of a
35mm format image sensor.
A camera equipped with a 35mm format image
sensor can be set to shoot at APS-C size.
For details on how to set your camera, refer to its
instruction manual.
For further information on compatibility, visit the
web site of Sony in your area, or consult your dealer
of Sony or local authorized service facility of Sony.
Notes on Use
ˎ
When carrying a camera with the lens attached,
always firmly hold both the camera and the lens.
Precautions on using a flash
ˎ
When using a flash, always remove the lens hood and
shoot at least 1 m (3.3 feet) away from your subject.
With certain combinations of lens and flash, the lens
may partially block the light of the flash, resulting in a
shadow at the bottom of the picture.
Vignetting
ˎ
When using the lens, the corners of the screen
become darker than the center. To reduce this
phenomena (called vignetting), close the aperture by
1 to 2 stops.
Identifying the Parts
1 Lens hood index
2 Focusing ring
3 Lens contacts
*
4 Mounting index
* Do not touch the lens contacts.
Attaching and Detaching the
Lens
To attach the lens
(See illustration –.)
1
Remove the rear and front lens caps and
the camera body cap.
ˎ
You can attach/detach the front lens cap in two
ways, (1) and (2). When you attach/detach the
lens cap with the lens hood attached, use method
(2).
2
Align the white index on the lens barrel
with the white index on the camera
(mounting index), then insert the lens
into the camera mount and rotate it
clockwise until it locks.
ˎ
Do not press the lens release button on the
camera when mounting the lens.
ˎ
Do not mount the lens at an angle.
To remove the lens
(See illustration –.)
While holding down the lens release
button on the camera, rotate the lens
counterclockwise until it stops, then detach
the lens.
Attaching the Lens Hood
It is recommended that you use a lens hood to
reduce flare and ensure maximum image quality.
Align the red line on the lens hood with the
red dot on the lens (lens hood index), then
insert the lens hood into the lens mount and
rotate it clockwise until it clicks into place
and the red dot on the lens hood is aligned
with the red dot on the lens.
ˎ
When using a built-in camera flash or an external
flash attached to the camera, remove the lens hood to
avoid blocking the flash light.
ˎ
When storing, fit the lens hood onto the lens
backwards.
Focusing
There are three ways to focus.
ˎ
Auto focus
The camera focuses automatically.
– Operating sounds may also be recorded during
movie recording.
ˎ
DMF (Direct manual focus)
After the camera focuses in auto focus, you can
make a fine adjustment manually.
ˎ
Manual focus
You focus manually.
For details on mode settings, refer to the instruction
manual supplied with the camera.
Specifications
Product name
(Model name)
FE 50mm F1.8
(SEL50F18F)
Focal length (mm)
50
35mm equivalent focal
length*
1
(mm)
75
Lens groups-elements
5-6
Angle of view 1*
2
47°
Angle of view 2*
2
32°
Minimum focus*
3
(m (feet)) 0.45 (1.48)
Maximum magnification (X) 0.14
Minimum aperture
f/22
Filter diameter (mm)
49
Dimensions (maximum
diameter × height)
(approx., mm (in.))
68.6Ч59.5
(2 3/4 Ч 2 3/8)
Mass (approx., g (oz))
186 (6.6)
Shake compensation
function
No
*
1
This is the equivalent focal length in 35mm format
when mounted on an Interchangeable Lens Digital
Camera equipped with an APS-C sized image sensor.
*
2
Angle of view 1 is the value for 35mm cameras, and
angle of view 2 is the value for Interchangeable Lens
Digital Cameras equipped with an APS-C sized image
sensor.
*
3
Minimum focus is the distance from the image sensor
to the subject.
ˎ
Depending on the lens mechanism, the focal length
may change with any change in shooting distance.
The focal lengths given above assume the lens is
focused at infinity.
Included items
(The number in parentheses indicates the number
of pieces.)
Lens (1), Front lens cap (1), Rear lens cap (1),
Lens hood (1), Set of printed documentation
Design and specifications are subject to change
without notice.
is a trademark of Sony Corporation.
Cette notice explique comment se servir des
objectifs. Les précautions communes à tous
les objectifs, par exemple les remarques sur
l’emploi, se trouvent sur la feuille « Précautions
avant toute utilisation ». Veuillez lire les deux
documents avant d’utiliser votre objectif.
Votre objectif est conçu pour les appareils photo à
monture E de type Sony α. Il ne peut pas être utilisé
pour les appareils photo à monture A.
Le FE 50mm F1.8 est compatible avec la plage d’un
capteur d’image de format 35 mm.
Un appareil photo équipé d’un capteur d’image de
format 35 mm peut être réglé pour la prise de vue
en APS-C.
Pour les détails sur la manière de régler l’appareil
photo, reportez-vous à son mode d’emploi.
Pour plus d’informations sur la compatibilité,
consultez le site de Sony de votre pays, ou adressez-
vous à un revendeur Sony ou à un service après-
vente agréé Sony.
Remarques sur l’emploi
ˎ
Lorsque vous portez un appareil photo avec l’objectif
dessus, tenez toujours fermement l’appareil photo et
l’objectif.
Précautions concernant l’emploi d’un flash
ˎ
Lorsque vous utilisez un flash, retirez toujours le
parasoleil et prenez vos photos à au moins 1 m
(3,3 pieds) du sujet. Associé à certains types de flash,
l’objectif peut bloquer partiellement la lumière du
flash et produire un ombre au bas de l’image.
Vignetage
ˎ
Lorsque l’objectif est utilisé, les coins de l’écran
deviennent plus sombres que le centre. Pour réduire
ce phénomène (appelé vignetage), fermez l’ouverture
de 1 ou 2 crans.
Identification des éléments
1 Repère de parasoleil
2 Bague de mise au point
3 Contacts d’objectif
*
4 Repère de montage
* Ne touchez pas les contacts d’objectif.
Pose et dépose de l’objectif
Pour poser l’objectif
(Voir l’illustration
–.)
1
Déposez les capuchons d’objectif avant
et arrière et le capuchon de l’appareil
photo.
ˎ
Vous pouvez poser et déposer les capuchons
d’objectif avant de deux façons, (1) et (2). Si vous
posez/déposez le capuchon d’objectif avec le
parasoleil, utilisez la méthode (2).
2
Alignez le repère blanc du barillet
d’objectif sur le repère blanc de l’appareil
photo (repère de montage), puis posez
l’objectif sur la monture de l’appareil
photo et tournez-le dans le sens horaire
de sorte qu’il s’encliquette.
ˎ
N’appuyez pas sur le bouton de libération de
l’objectif sur l’appareil photo lorsque vous posez
l’objectif.
ˎ
Ne posez pas l’objectif de biais.
Pour déposer l’objectif
(Voir l’illustration
–.)
Tout en appuyant sur le bouton de libération
de l’objectif sur l’appareil photo, tournez
l’objectif dans le sens antihoraire jusqu’à
l’arrêt, puis déposez l’objectif.
Fixation du parasoleil
Il est conseillé d’utiliser un parasoleil pour réduire
la lumière parasite et obtenir la meilleure image
possible.
Alignez la ligne rouge du parasoleil sur
le point rouge de l’objectif (repère de
parasoleil), puis insérez le parasoleil sur la
monture d’objectif et tournez-le dans le sens
horaire jusqu’à ce qu’il s’encliquette et le
point rouge du parasoleil s’aligne sur le point
rouge de l’objectif.
ˎ
Lorsque vous utilisez le flash intégré d’un appareil
photo ou un flash externe fixé à l’appareil photo,
retirez le parasoleil pour éviter de bloquer la lumière
du flash.
ˎ
Pour ranger le parasoleil, insérez-le à l’arrière de
l’objectif.
Mise au point
La mise au point peut être faite de trois façons.
ˎ
Autofocus
L’appareil photo fait automatiquement la mise au
point.
– Les bruits de fonctionnement risquent également
d’être enregistrés pendant l’enregistrement de film.
ˎ
DMF (Mise au point manuelle directe)
Après la mise au point en autofocus, vous pouvez
effectuer un réglage plus fin manuellement.
ˎ
Mise au point manuelle
Vous faites vous-même la mise au point.
Pour le détail sur les réglages de mode, reportez-
vous au mode d’emploi fourni avec l’appareil photo.
(Suite à la page arrière)
4-581-473-
01(1)
SEL50F18F
交換レンズ
Interchangeable Lens
Objectif interchangeable
取扱説明書
Operating Instructions
Mode d’emploi
Manual de instrucciones
FE 50mm
F1.8
E-mount
©2016 Sony Corporation
Printed in China