G-Shock MRG-200-7 User Manual
Operation chart: qw-1673
— 2 —
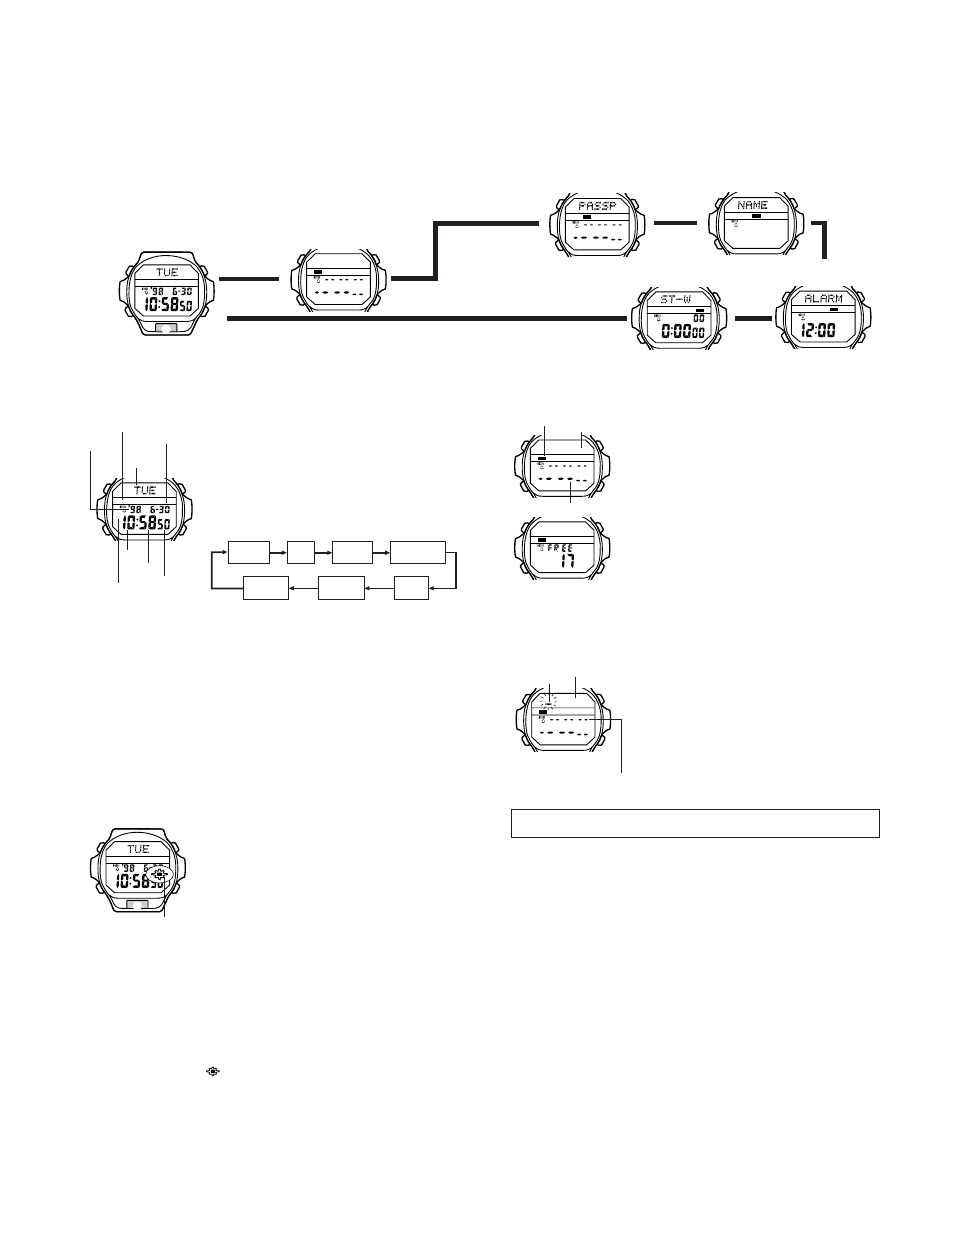
2. OPERATION CHART: QW-1673
GENERAL GUIDE
•
Press
C
to change from mode to mode. Each mode is explained in detail on the
following pages.
•
In any mode, press
E
to illuminate the display for about three seconds.
P
A
B
D
C
E
Contact Code Mode
▲
▲
▲
▲
Identification (ID) Mode
Vital Statistics Mode
▲
▲
Timekeeping Mode
Alarm Mode
Stopwatch Mode
TIMEKEEPING MODE
In addition to normal timekeeping, the Timekeeping Mode
is also used to set the current time and date, and to turn the
EL alarm on and off.
•
In the Timekeeping Mode, graphic area indicates counting
of seconds.
To set the time and date
1. Press
A
while in the Timekeeping Mode. The seconds
digits flash on the display because they are
selected.
2. Press
C
to change the selection in the following
sequence.
Seconds
Hour
Minutes
12/24-hour
format
Year
Month
Day
3. While the seconds digits are selected (flashing), press
D
to reset the seconds to
00
.
If you press
D
while the seconds count is in the range of 30 to 59, the seconds are
reset to
00
and 1 is added to the minutes. If the seconds count is in the range of 00
to 29, the minutes count is unchanged.
4. While any other digits (besides seconds) are selected (flashing), press
D
to increase
the number. While the 12/24-hour setting is selected, press
D
to switch between the
two formats.
•
Holding down
D
changes the current selection at high speed.
•
When the 12-hour format is selected, the
12H
indicator appears on the display. With
the 12-hour format, the P (PM) indicator appears on the display to indicate “p.m.”
times. There is no indicator for “a.m.” times.
•
Selecting the 24-hour format causes the
24H
and the 24 indicators to appear on the
display.
5. After you set the time and date, press
A
to return to the Timekeeping Mode.
•
The day of the week is automatically set in accordance with the date.
•
The date can be set within the range of January 1, 1995 to December 31, 2039.
•
If you do not operate any button for a few minutes while a selection is flashing, the
flashing stops and the watch goes back to the Timekeeping Mode automatically.
About the backlight
In any mode, press
E
to illuminate the display for about
three seconds. If the EL alarm is turned on, the backlight
flashes whenever a daily alarm or hourly time signal sounds.
Note
•
For details on using the alarm function, see “ALARM
MODE”.
•
The backlight of the watch employs an electro-luminescent
(EL) light, which loses illuminating power after very long
use.
•
The backlight remains lit for about three seconds from the point you press
E
, even if
it already lit when you press
E
. If you keep
E
depressed for one or two minutes, the
backlight will automatically turn off.
•
The illumination provided by the backlight may be hard to see when viewed under
direct sunlight.
•
The backlight automatically stops illuminating whenever an alarm sounds.
•
The watch will emit an audible sound whenever the display is illuminated. This is caused
by a transistor that vibrates when the EL panel lights up. It does not indicate malfunction
of the watch.
To turn the EL alarm on and off
In the Timekeeping Mode, hold down
D
for one or two seconds to turn the EL alarm on
and off.
•
An EL alarm on indicator (
) appears on the display to indicate that the EL alarm is
turned on. The indicator disappears when you turn the EL alarm off.
•
When an alarm is reached while the EL alarm is turned on, the flashing of the backlight
and the timing of the alarm tones may not be exactly matched. This is normal and does
not indicate malfunction.
P
A
B
D
C
Month – Day
Year
Minutes
Seconds
PM indicator
Hour
Day of
week
Graphic area
CONTACT CODE MODE
The Contact Code Mode lets you store up to 20
*
sets of
contact data (such as telephone numbers). Stored data is
sorted automatically into alphabetic sequence based on the
text area text.
*
The Contact Code Mode shares memory with the
Identification (ID) Mode. This means that the maximum
number of Contact Code Mode entries you can store is
reduced by one each time you store Identification Mode.
To check remaining memory
In the Contact Code Mode, hold down
B
and
D
to display
how much memory remains for input of data. The value that
appears shows how many more data items (Contact Code
Mode and ID Mode) you can input.
•
This watch has three built-in ID Mode titles, which are programmed in memory when
you first purchase the watch and which are automatically set whenever the watch’s
battery is replaced. Because of this, the remaining memory display shows a value of
17
(20 – 3) whenever it is performed immediately after you purchase the watch or
have the battery changed.
To input new Contact Code data
1. In the Contact Code Mode, press
B
or
D
until the new
data screen appears.
•
If there is no Contact Code data stored in memory yet, the
new data screen appears as soon as you enter the Contact
Code Mode.
•
If the message
FULL
appears in the text area, it means
that memory is full. To store more data, you will first have
to delete some of the data stored in memory.
2. Press
A
and a cursor appears in the text area.
3. Input a name in the text area and a contact number in the
number area.
•
You can input up to eight characters in the text area, and 12 digits in the number area.
Use
B
and
D
to input characters, and
C
to move the cursor around the display.
For details, see “How to input characters”.
•
Make sure that you distinguish between the letter
O
and the number
0
(zero). Inputting
a zero for the letter
O
will affect automatic sorting.
4. After inputting your data, press
A
to store it and return to the Contact Code Mode.
•
The text area can show only five characters at a time, so longer messages scroll
continuously right to left.
To recall Contact Code data
In the Contact Code Mode, press
D
to scroll forward through stored data items or
B
to
scroll in reverse.
•
Holding down either button scrolls through the data at high speed.
•
The data item that is displayed when you exit the Contact Code Mode is still displayed
the next time you enter the Contact Code Mode.
To edit Contact Code data items
1. In the Contact Code Mode, scroll through the data items and display the one you want
to edit.
2. Press
A
and a cursor appears in the text area.
3. Use
C
to move the cursor to the character you want to change.
4. Change the character.
•
See “How to input characters” for details.
5. After making the changes that you want, press
A
to store them and return to the
Contact Code Mode.
To delete Contact Code data
1. In the Contact Code Mode, scroll through the data items and display the one you want
to delete.
2. Press
A
and a cursor appears in the text area.
3. Press
B
and
D
at the same time to delete the Contact Code data item.
•
At this time the cursor appears in the text area, ready for input.
4. Input data or press
A
to return to the Contact Code Mode.
A
B
D
C
A
B
D
C
Number area
Text area
Mode indicator
A
B
D
C
Cursor
Text area
Number area
[New Data Screen]
EL alarm on indicator
P
A
B
D
C
E