G-Shock DW-9800NKJ-3JR User Manual
Module no. 1869, Getting acquainted general guide backlight, Timekeeping mode
1869-1
Module No. 1869
•
The measurement functions built into this watch are not intended for
taking measurements that require professional or industrial precision.
Values produced by this watch should be considered as reasonable
representations only.
•
When engaging in mountain climbing or other activities in which losing
your way can create a dangerous or life-threatening situation, always
be sure to use a second compass to confirm direction readings.
•
CASIO COMPUTER CO., LTD. assumes no responsibility for any
loss, or any claims by third parties that may arise through the use of
this watch.
Congratulations upon your selection of this CASIO watch. To get the most
out of your purchase, be sure to carefully read this User’s Guide and keep
it on hand for later reference when necessary.
About this User’s Guide
•
Button operations are indicated using the
letters shown in the illustration.
•
Each section of this User’s Guide provides you
with the information you need to perform
operations in each mode. Further details and
technical information can be found in the
“REFERENCE” section.
D
A
N
N
E
E
SE
S
S
W
W
NW
B
C
P
Sensor
Bearing bezel
Graphic area
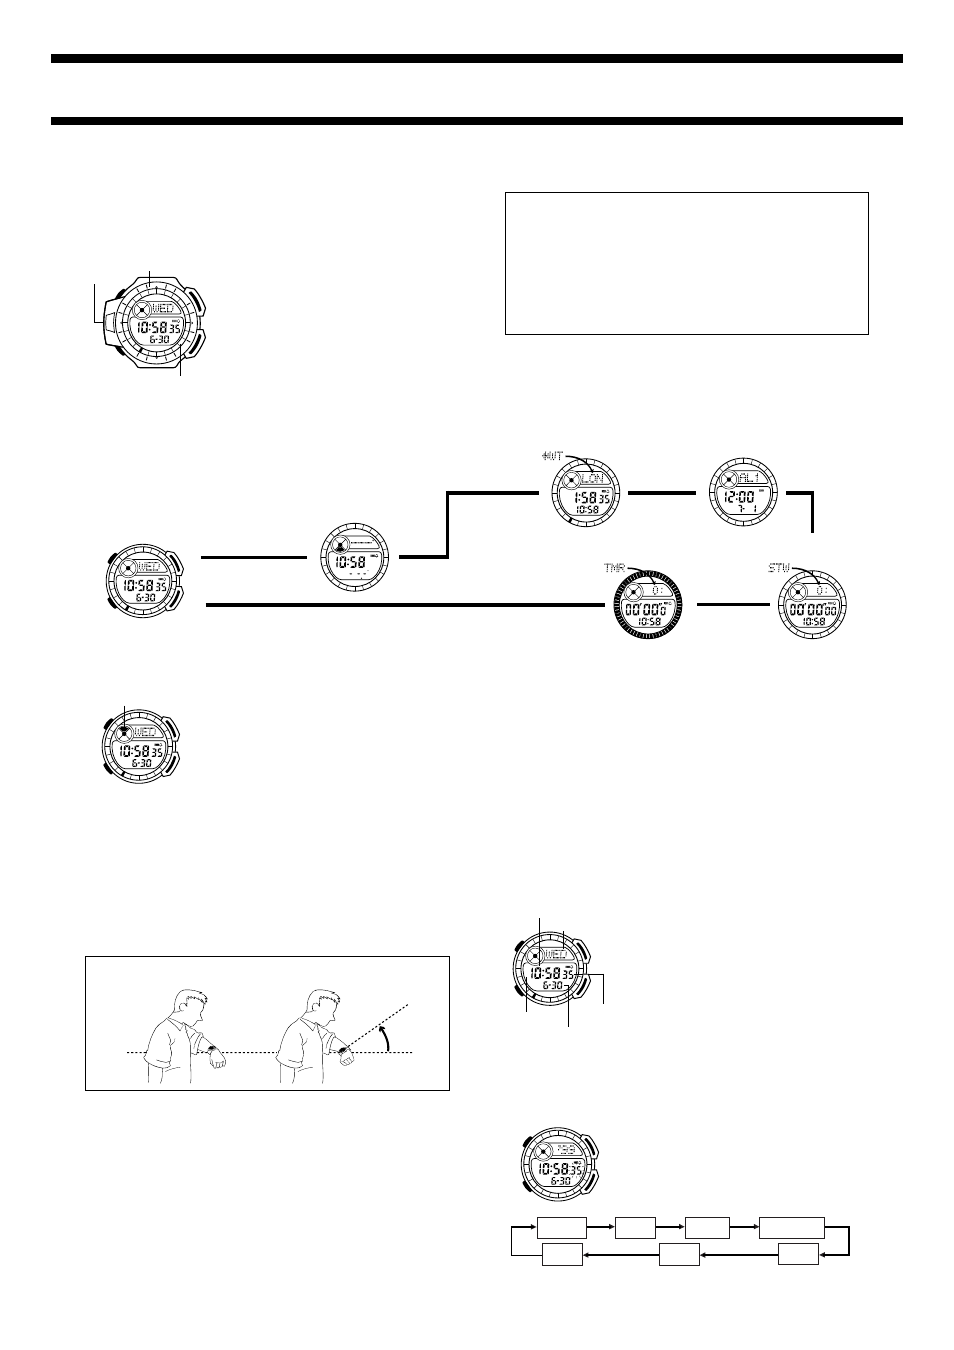
Press
D
to change from mode to mode. Each mode is explained on the
following pages.
Timekeeping Mode
D
A
B
C
P
Navigation Mode
P
C
▲
▲
P
P
C
P
A
C
▲
World Time Mode
Alarm Mode
Countdown Alarm Mode
Stopwatch Mode
▲
▲
▲
P
P
C
P
A
P
C
Press
D
.
GETTING ACQUAINTED
GENERAL GUIDE
BACKLIGHT
The backlight uses an EL (electro-luminescent)
panel that causes the entire display to glow for
easy reading in the dark. The watch’s auto light
switch automatically turns on the backlight when
you angle the watch towards your face.
•
The auto light switch must be turned on
(indicated by the auto light switch on indicator)
for it to operate.
Turning on the Backlight manually
In any mode (except for the World Time Mode), press
B
to illuminate the
display for about two seconds.
•
The above operation turns on the backlight regardless of the current
auto light switch setting.
D
A
B
C
P
Auto light switch
on indicator
About the Auto Light Switch
Turning on the auto light switch causes the backlight to turn on for about
two seconds, whenever you position your wrist as described below in any
mode.
•
See “Backlight Precautions” for other important information about using
the backlight.
Moving the watch to a position that is parallel to the ground and then
tilting it towards you more than 40 degrees causes the backlight to light.
Parallel to
ground
More
than
40
°
Warning!
•
Never try to read your watch when mountain climbing or hiking in
areas that are dark or in areas with poor footing. Doing so is
dangerous and can result in serious personal injury.
•
Never try to read your watch when running where there is danger of
accidents, especially in locations where there might be vehicular
or pedestrian traffic. Doing so is dangerous and can result in serious
personal injury.
•
Never try to read your watch when riding on a bicycle or when operating
a motorcycle or any other motor vehicle. Doing so is dangerous and
can result in a traffic accident and serious personal injury.
•
When you are wearing the watch, make sure that its auto light switch
is turned off before riding on a bicycle or operating a motorcycle or
any other motor vehicle. Sudden and unintended operation of the
auto light switch can create a distraction, which can result in a traffic
accident and serious personal injury.
To turn the auto light switch on and off
In the Timekeeping Mode, hold down
B
for two seconds to turn the auto
light switch on (Auto light switch on indicator displayed) and off (Auto light
switch on indicator not displayed).
•
In order to protect against running down the batteries, the auto light switch
is automatically turned off approximately six hours after you turn it on.
Repeat the above procedure to turn the auto light switch back on if you
want.
•
The auto light switch on indicator is on the display in all modes while the
auto light switch is turned on.
TIMEKEEPING MODE
Use the Timekeeping Mode to set the current time and date, to take direction
and temperature readings, and to calibrate the temperature sensor.
Calibrating the Seconds Count
Use the following procedure to calibrate the
seconds count on a time signal from a radio,
TV, or other source.
1. In the Timekeeping Mode, hold down
A
until
the seconds digits start to flash on the display.
2. Press
C
to set the seconds count to
00
when the time signal you are calibrating to
sounds.
•
Pressing
C
while the seconds count is in
the range of 30 to 59 resets the seconds to
00
and adds 1 to the minutes. If the
seconds count is in the range of 00 to 29,
the minutes count is unchanged.
3. Press
A
to return to the current time display.
Setting the Current Time
1. In the Timekeeping Mode, hold down
A
until
the seconds digits start to flash on the display.
•
The seconds digits are flashing because
they are
selected.
2. Press
D
to move the flashing in the
sequence shown below to select other digits
and settings.
Day of week
Seconds
Hour : Minutes
PM indicator
Month – Day
D
A
B
C
P
D
A
B
C
P
Hour
Seconds
Day
Minutes
12/24-Hour
Format
Year
Month