Ryobi EMTP006 User Manual
Calculation - addition, Working with different materials, Specification of product
1-1/2 in.
Stud Sensor:
• Up to 1-1/2 in. deep stud detection.
Sonic Tape:
• Instant measurement.
• Dynamic measurement capability.
• Select measurement unit - ft. in./m
• Computation of area and volume.
• Addition of distances.
The Ryobi Electronic
MeasureTech Plus™
is
intended for fast convenient distance measurement
and for locating wood and metal studs behind walls,
floors and ceilings.
For damage caused by usage other than intended,
the user is responsible.
• Press “Read” or side yellow “On/Off” button on
the unit, if LCD screen lights up the power is on.
• Position the unit against the wall.
• Press and hold the “ON/OFF” button on side of
unit. Hold the unit in still position until calibration is
complete (approximately 3 seconds). A single beep
will be generated and “ON” will be shown on the
LCD after calibration is completed.
• Slowly slide the unit horizontally across the wall,
right or left. As you begin to approach the stud, the
bars on the LCD will light up.
• When the word “EDGE” flashes and a continuous
beep is heard, mark location as the first edge.
• Continue scanning beyond the marked spot until
the word “EDGE” disappears on screen. Slide unit in
reverse direction to locate the other stud edge.
• Mark this second spot. The middle of the 2 spots is
the stud center.
NOTE: Because of the powerful scanning capability
of this tool, be sure to mark the two edges of the
stud. The two marks may indicate wider than actual
stud width, but center of stud will be between the
two marks.
TURNING ON THE UNIT
CALIBRATION AND SCANNING IN
MeasureTech Plus™
Situations
Possible Causes
Solutions
1). Take the first reading.
2). Press the “ + “ button.
3). Take the second reading.
4). Press the “ + “ to get the result of length
addition
5). Repeat step one and two for further additions.
6). The result of the addition is shown at the upper
row of the LCD.
7). The 1-digit counter records the number of
readings added. It’s maximum value is 9 and
larger number will be displayed as “-”.
• Slide the door off the back of the unit. Attach
a 9V battery to the connector. Place battery in
compartment and reinstall door.
• Alkaline Battery life is approximately 20 hours.
• The battery should be replaced when battery
indicator reads low charge.
No indications.
LCD display
“CAL FAILS”
Indications in too
many places.
Inaccurate
readings of
distance
LCD displays
“Err”
• No studs in that area.
• You accidently calibrated over a stud.
• Calibration on wall of high density such
as a wet painted wall, concrete, etc.
• Unit not flat against wall.
• Unit was rocked or lifted during
calibration.
• Detect other objects besides studs.
• Electrical wiring and metal/plastic
pipes may be near or touching back
surface of wall
• Battery runs out of power
• Measured distance is <2’ (0.6m)
or
> 50’ (15m)
• Another ultrasonic source is nearby.
• Measured distance is<2’ (0.6m)
or
> 50’ (15m)
• The target is not a good ultrasonic
reflector. (e.g. thick carpet, irregular
wall paper, etc.)
• The unit points to the target obliquely.
• Computation is out of the specified
range.
CALCULATION - ADDITION
• Move several inches to the left or right and start again.
• Move several inches to the left or tight and start again.
• On rough surfaces, place a piece of cardboard on the
wall, so that the unit will slide smoothly when scaning.
• Always hold
MeasureTech Plus™ parallel to stud or
joist and move across it.
• Studs are normally spaced 16 in. (406mm) or 24 in.
(610mm) apart and are 1-1/2 in. (38mm) wide, beware
of anything closer together or of a different width.
• On rough surfaces, place a piece of cardboard on the
wall, so that the unit will slide smoothly when scaning.
• Replace with new battery
• Make sure measured distance is within range.
• Remove the ultrasonic source and try again.
• Make sure measured distance is within range.
• Place a piece of cardboard in front of target.
• Make sure computation is within range.
• Hold unit perpendicular to target and start again.
CALCULATION - MULTIPLICATION
INSTALLING THE BATTERY
FEATURES
The
MeasureTech Plus™ is designed for use on dry
interior walls only. Three factors can affect sensing
depth: Thickness, density and moisture content.
The
MeasureTech Plus™ is not designed to
penetrate materials with inconsistent density such as:
• Ceramic floor tile
• Carpeting and padding
• Wallpaper with metallic fibers
• Freshly painted walls , not completely dry.
• Lath and plaster
WORKING WITH DIFFERENT MATERIALS
Operating Temperature: 32°F to 104°F
Storage Temperature: -4°F to 150°F
Distance Range: from 2 ft. to 50 ft.
Stud Sensor: ± 1/2” accuracy of center
location behind drywall up to 1-1/2” thick.
Sonic Tape: Distance range from 2ft. to 50ft.
Accuracy: D ± (D x 0.5% + 1 least significant
digit) where D is the actual physical distance.
e.g. D = 20 ft., reading = 20 ft. ± 3 in.
Computation range of addition: 9999’11”
(999m)
SPECIFICATION OF PRODUCT
� ����
Stud Sensor - Depending on the proximity of
electrical wiring or pipes to the wall surface, the
MeasureTech Plus™ may detect them in the same
manner as studs. Caution should always be used
when nailing, cutting of drilling in walls, floors and
ceilings that may contain these items.
To avoid electrical, plumbing, etc., remember that
studs or joists are normally spaced 16 in. (406 mm)
or 24 in. (610 mm) apart and are 1-1/2 in. (38 mm) in
width. Anything closer together or a different width
may not be a stud, joist or firebreak. Always turn off
the power when working near electrical wires.
This product is a consumable item. Therefore it is
warranted against defective parts and labor only and
not misuse or deterioration of the product through
normal wear and tear for a period of 2 years from date of
purchase.
WARRANTY
983000-347
12-03
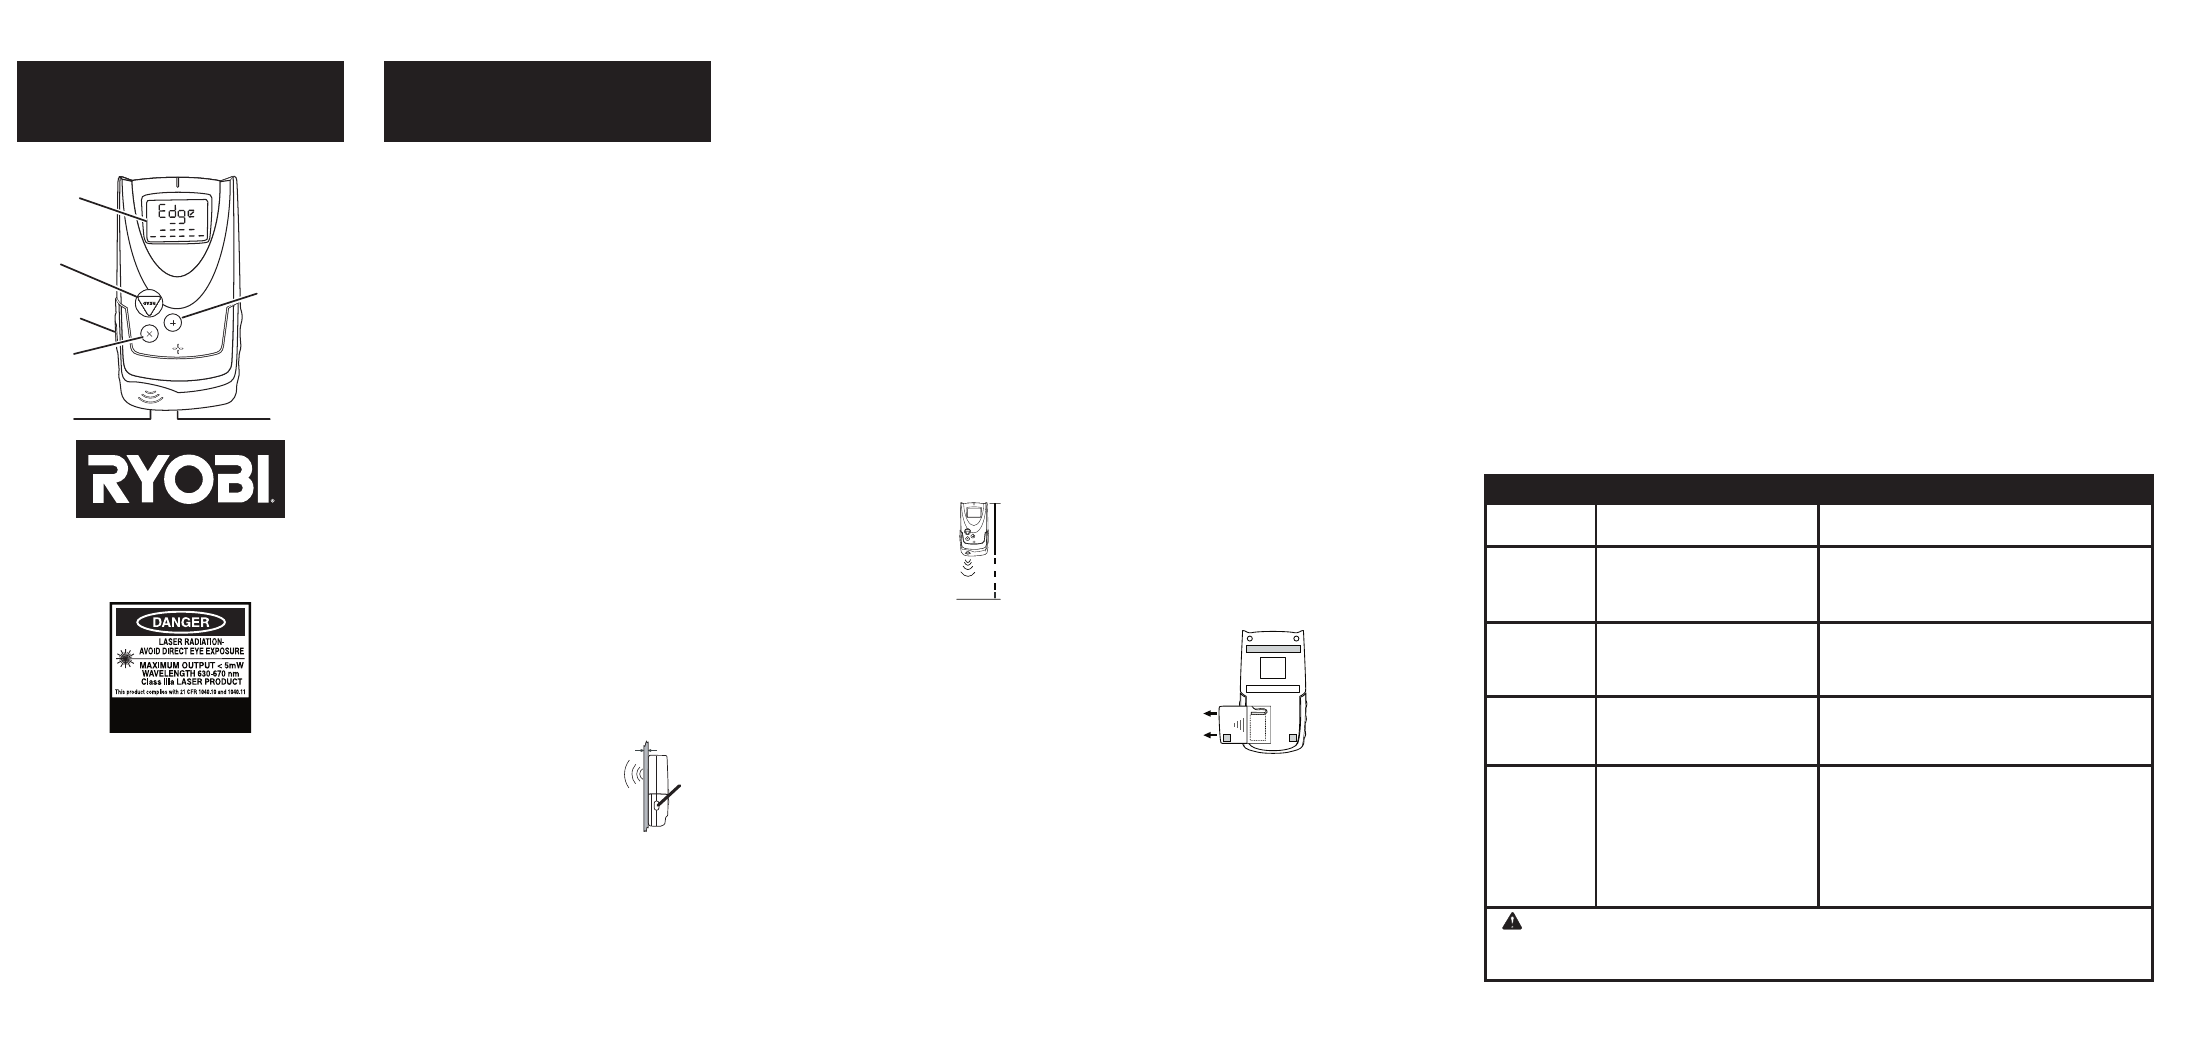
LCD
READ
KEY
ON/OFF
KEY
MULTIPLYING
KEY
SONIC
APERTURE
LASER
APERTURE
ADDITION KEY
MEASUREMENT PROCEDURES
• The unit functions as a distance
measurer with the top edge as
the measurement base, and is
to be held upside down.
The LCD will automatically
adapt to this orientation
and show reading accordingly.
• Select the measurement unit.
• Point the bottom of the unit perpendicular to the
target. The laser will show where the unit is pointing
and is “ON” only while reading is being taken.
• Caution: Do not stare directly at the laser beam.
Hold the unit above or below eye level.
• Press the “READ” button to take the measurement.
• Hold
the
“READ”
button
for
continuous
measurement.
1). Take the first reading.
2). Press the “ x “ button.
3). Take the second reading.
4). Press the “ x “ to get the result of square
measurement (sq. ft / sq. m)
5). Take the third readings.
6). Press the “ x “ to get the result of cubic
measurement (cu. ft / cu. m)
CHANGING MEASUREMENT
Press the “ + “ and the “ x “ buttons simultaneously
to change measurement unit from ft. to m or vise
versa.
HINTS
• Any large obstacle found within ± 5 degrees of
the viewing angle of the unit might be regarded
as the target.
• Hard surfaces usually give more accurate
results.
• To measure small, irregular or soft objects, place
a piece of cardboard on front of the object.
• The unit cannot measure through glass.
OPERATING NOTES
Sonic Tape - The use of this tool other than specified
may cause hazardous radiation exposure. The
emission power of the laser beam is less than 5mW
Class IIIA (US version) . User must follow the below
warnings to avoid injury:
When the laser beam is on, do not stare directly at
it. The laser is used for locating a target only. Please
do not point the laser into the eyes of others.
The unit should not be positioned at eye level or
operated near a reflective surface so as to avoid
beaming into the eyes of others accidentally.
WARNING: To avoid risk of eye injury, do not stare directly into beam. Never point the beam into anyone’s
eyes. Do not permit children to use this device. It is not a toy. To avoid risk of electric shock,
ALWAYS turn power
off when working near electric wires. Avoid nailing, cutting or drilling in walls where electrical or plumbing may be
present.
RYOBI TECHNOLOGIES INC.
1428 Pearman Dairy Road, Anderson, SC 29625
www.ryobitools.com
Telephone: 1-800-525-2579
Measurement
Base
Target
CAUTION
Avoid direct
ex posure to the beam
. Read
instructions in manual
ON/OFF
EMTP006
ELECTRONIC
MeasureTech Plus™
EMTP006
ELECTRONIC
MeasureTech Plus™
NOTE: This equipment has been tested and found to
comply with the limits for an ultrasonic equipment,
pursuant to Part 18 of the FCC Rules. These limits
are designed to provide reasonable protection against
harmful interference in a residential installation. This
equipment generates, uses and can radiate radio
frequency energy and, if not installed and used in
accordance with the instructions, may cause harmful
interference to radio communications.
However, there is no guarantee that interference will
not occur in a particular installation. If this equipment
does cause harmful interference to radio or television
reception, which can be determined by turning the
equipment off and on, the user is encouraged to
try to correct the interference by one or more of the
following measures:
•
Reorient or relocate the receiving antenna.
•
Increase the separation between the equipment and
receiver.
•
Connect the equipment into an outlet on a
circuit different from that to which the receiver is
connected.
•
Consult the dealer or an experienced radio/TV
technician for help.