TAMKO 12-1/4" x 12" HIP & RIDGE User Manual
1/4" x 12" hip & ridge, Application instructions for, Fiberglass shingles frederick, md • joplin, mo
Central District
220 West 4th St., Joplin, MO 64801
800-641-4691
01/13
Northeast District
4500 Tamko Dr., Frederick, MD 21701
800-368-2055
Southeast District
2300 35th St., Tuscaloosa, AL 35401
800-228-2656
Southwest District
7910 S. Central Exp., Dallas, TX 75216
800-443-1834
Western District
5300 East 43rd Ave., Denver, CO 80216
800-530-8868
Information included in these application instructions was current at time of printing. To obtain a copy of the most current version of these application instructions,
visit us online at tamko.com or call us at 800-641-4691.
Visit Our Web Site at
tamko.com
12-1/4" x 12" HIP & RIDGE
FIBERGLASS SHINGLES
Frederick, MD • Joplin, MO
Apply shingles up to a hip or ridge from both sides of the roof before finishing the intersection. To facilitate finishing, adjust the last few courses
so that the ridge capping will adequately cover the top courses of shingles equally on both sides of the ridge.
To apply the capping, bend each shingle along the centerline so that it will extend an equal distance on each side of the hip or ridge. Chalk
lines may assist in proper alignment. In cold weather, warm the shingle until it is pliable before bending.
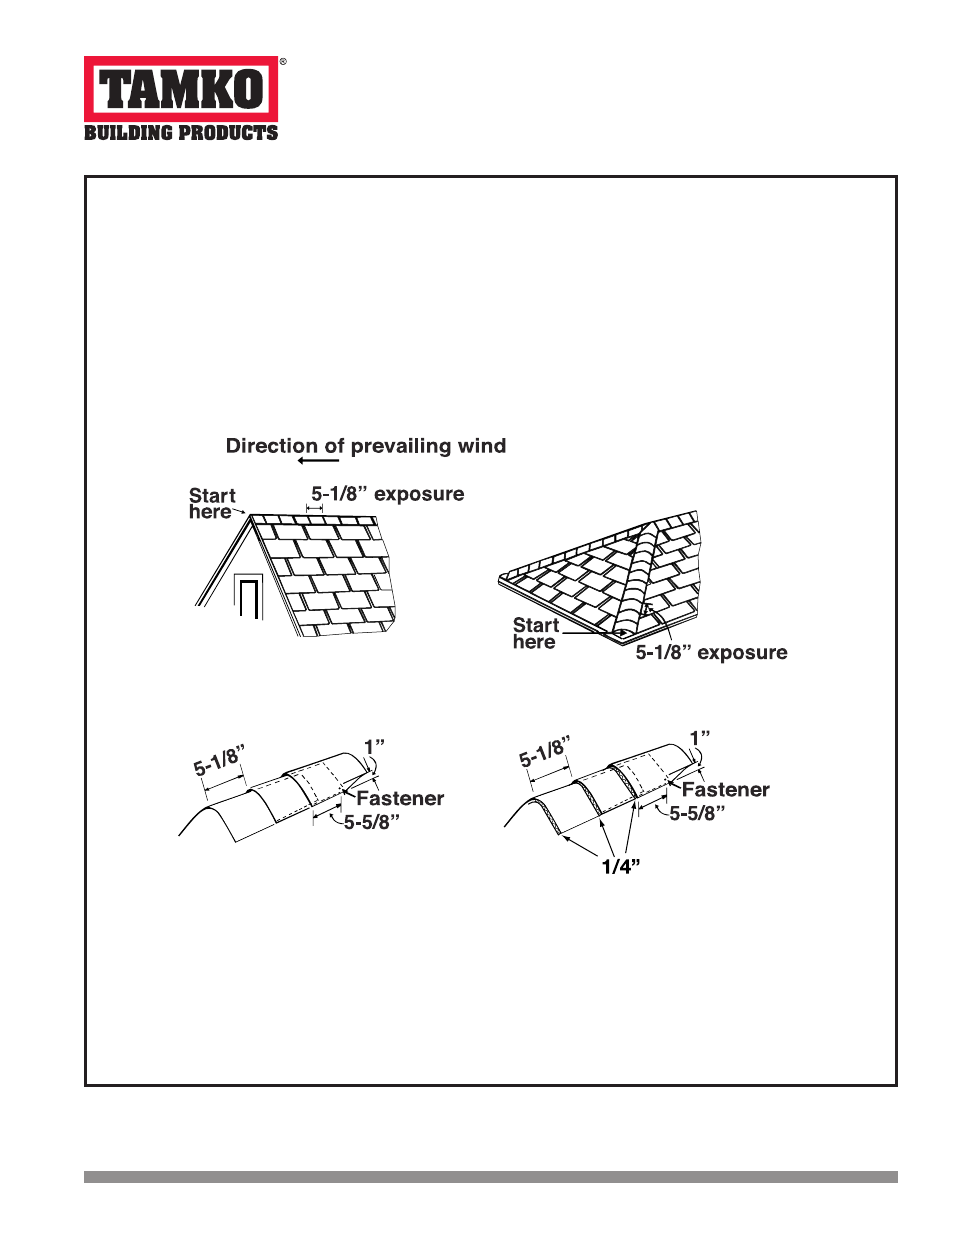
Apply the shingles with a 5-1/8 in. exposure, beginning at the bottom of the hip or from the end of the ridge opposite the direction of the pre-
vailing winds. See Figure 1. Secure each shingle as illustrated in Figure 2. with one fastener on each side, 5-5/8 in. back from the exposed end
and 1 in. up from the edge. Length of fastener for hip and ridge shingles should be 1/4 in. longer than recommended for shingles.
In high wind areas, it may be advisable, at the discretion of the roofing contractor, to use a spot of sealant to minimize blow off problems.
It is recommended that a 2-layer application of 12-1/4" x 12" Hip and Ridge be applied to all Heritage roofs to enhance the overall
appearance.
When the second layer is applied, offset this layer by 1/4 in. to create a “shadow” effect. See Figure 3.
The length of the fastener should be long enough to penetrate through the roofing material and 3/4 in. into the wood decking or
completely through approved plywood.
IMPORTANT - READ CAREFULLY BEFORE OPENING BUNDLE
In this paragraph “You” and Your” refer to the installer of the shingles and the owner of the building on which these shingles will be installed.
This is a legally binding agreement between You and TAMKO Building Products, Inc. (“TAMKO”). By opening this bundle You agree: (a) to
install the shingles strictly in accordance with the instructions printed on this wrapper; and (b) leaks and other roofing defects resulting from
failure to follow the manufacturers installation instructions printed on this wrapper are not covered by the limited warranty that is also printed
on this wrapper, or any other warranty, including, but not limited to (except where prohibited by law) implied warranties of MERCHANTABILITY
and FITNESS FOR USE.
©2013 TAMKO Building Products, Inc.
TAMKO Logo, Heritage
®
and TAMKO
®
are registered trademarks of TAMKO Building Products, Inc.
Figure 1
Figure 2
Figure 3
Application Instructions for