User operation guide – ABtUS AB2123108 User Manual
Page 3
User Operation Guide
- Other items you will need:
The BaseCoat, the TopCoat, stir sticks and a piece of sandpaper are included in the package.
Before you can begin, you will need the following additional items: a roll of masking tape that
is at least 25 mm wide and 25 meters long, a paint roller pan, a paint roller and 2 good quality
roller covers at least 15 cm wide.
**Specification are subjected to changes without notice...for detail and updated information please visit www.abtussinagpore.com
05
04
STEP 1: DETERMINING THE LOCATION, SIZE AND
DIMENSIONS OF THE SCREEN
The big advantage of ABtUS compared to a traditional projection screen is that you can now
determine exactly the right format for your projection screen. The measurements of the dark
magnetic border around your screen are determined by the length of the dark magnetic border
that comes with the paint system. This so-called MagneBorder is 10 meters long. This means
the following for the maximum size of your screen:
Screen dimensions:
Maximum screen size in cm (inch):
1 : 1
2.17 x 2.17 m / 86" x 86"
4 : 3 (= 1.33 : 1 + PAL / NTSC Video)
2.50 x 1.87 m / 98" x 74"
16 : 9 (= 1.78:1 = and Widescreen HDTV)
2.88 x 1.62 m / 113" x 64"
1.85 : 1 (Letterbox Video)
2.59 x 1.59 m / 116" x 63"
2.35 : 1 (Anamorphic)
3.32 x 1.41 m / 131" x 56"
1: Install the projector in its set location, according to the
instructions provided with the projector
2: Turn the projector on and project an image on the wall
(see illustration)
3: Select the desired dimensions on the projector
(1:1, 4:3, 16:9, etc) (see illustration)
6: To check the format of your screen, project an image from
a TV channel and from a DVD player onto the wall. While
it is playing, make sure that the screen format remains the
same. Adjust the screen format as needed to fit the actual
playing format.
4: Use the zoom function to determine the exact size of the
screen that you prefer. Check that the image does not
extend past the maximum dimensions given above.
5: Adjust the image until it is sharply in focus. Make the
screen exactly level using the keystone function of your
projector. Now you have determined the correct format
of your screen. The next important step is the final check.
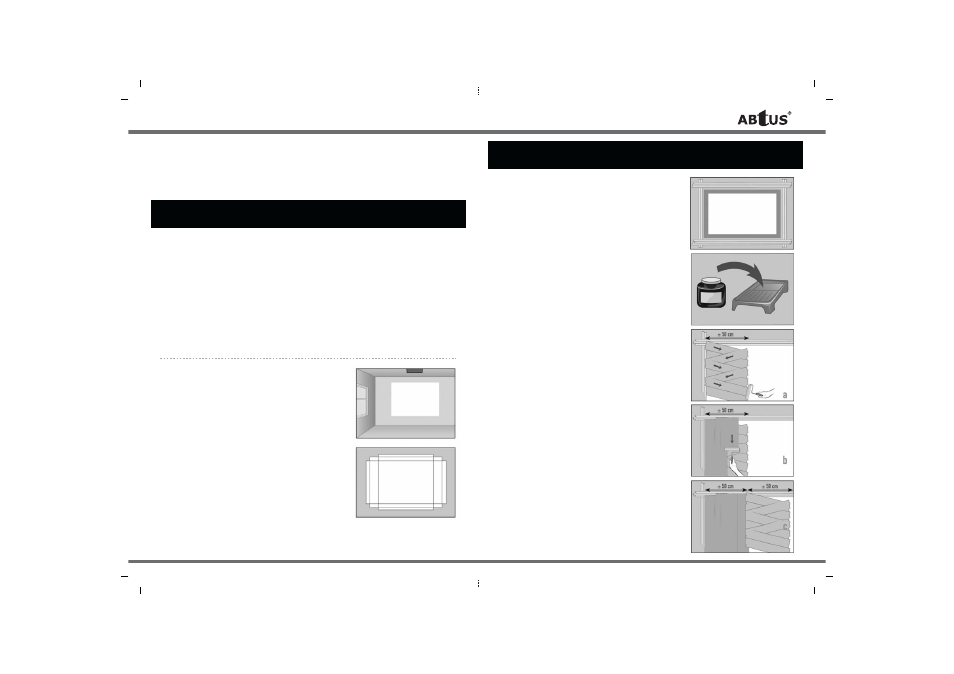
STEP 2: APPLYING THE BASIC LAYER OF PAINT
(BaseCoat)
1: The projector is on so you can see the exact edge of the
projection format. Stick the yellow colored tape on the
wall around the outside of the illuminated area. Stick a
second strip of tape next to the first strip to make the
band wider. If you have enough tape, stick a third strip
above the other strips. If you still have tape over, stick
a third strip below the others as well (see illustration).
Turn the projector off.
2: Stir the BaseCoat using the stirs deck for at least
3 minutes until it is well mixed. Afterwards close the bottle
tightly and shake it well. Pour the paint into the completely
clean roller pan (see illustration).
3: Attach one of the two roller covers onto the paint roller.
Make sure the roller is completely covered with BaseCoat
and roll it over the surface of the roller pan to distribute
the paint evenly. Use this to apply an even layer of
BaseCoat over the complete screen area, that means
the entire area between the taped strips. Apply the layer
as follows: Start in the upper lefthand corner. Paint a strip
that is about 50 cm wide. Apply the paint evenly. Always
start with horizontal strokes (see illustration a) and then
roll the paint on in vertical strokes without stopping in
the middle of a strip (see illustration b). Always roll the
paint on with even and smooth movements.
Then continue by painting a second strip of about
50 cm. Make sure that there is a slight overlap with the
first strip (see illustration c). Always apply the paint fully
wet on wet.
For larger areas (for example, an entire wall), make sure
you have a long enough handle on your roller.
Repeat this until the screen area is completely painted.
4: Let this layer dry for at least 60 minutes. During drying,
place the roller in the roller pan and make sure that it is
covered with sufficient paint to prevent it from drying out.