Mounting the drive, Mounting the optional mmi – Applied Motion Si3540 User Manual
Page 16
-15-
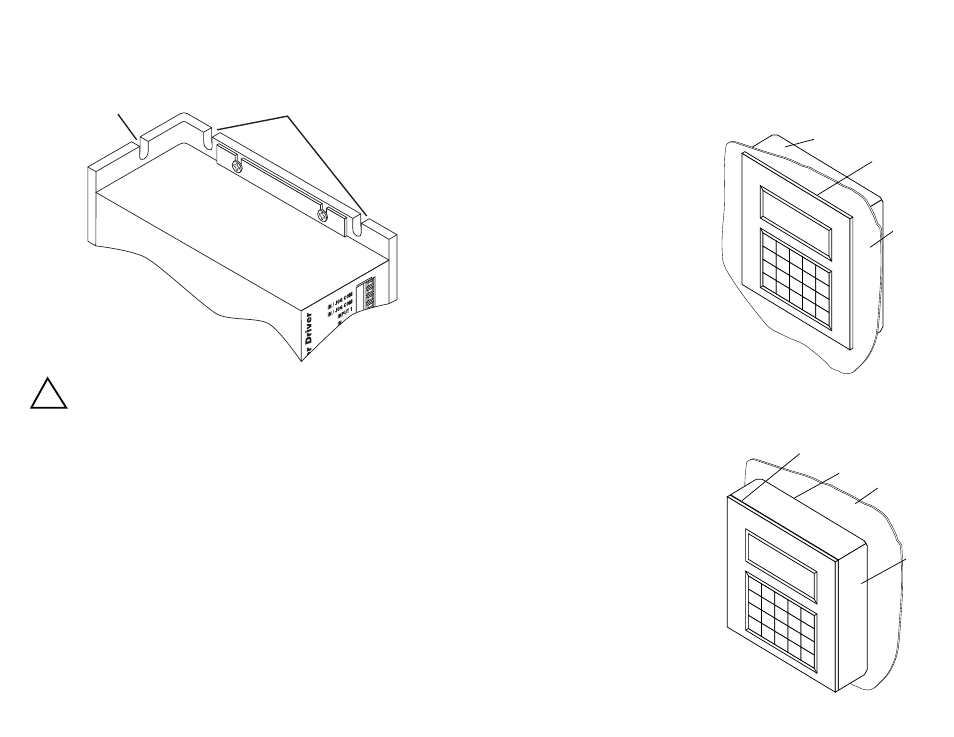
Mounting the Drive.
You can mount your drive on the wide or the narrow side of the chassis.
Mounting the Optional MMI
There are two ways to mount the MMI in your application. No matter which method
you choose, you’ll need to connect the MMI to your Si3540 with the programming
cable. You will not, however, need the adapter plug. The MMI has the same
telephone style connector as the Si3540.
Depending on how you mount the MMI and cable in your application, you may find
that it is difficult to remove the cable from the back of the MMI. If this is the case,
and you need to reprogram the Si3540, you can use any telephone line cord as a
programming cable. They are available at most supermarkets and discount stores.
Pleae be careful not to lose the adapter plug that connects the telephone cord to the
COM port of your PC. The adapter is a custom made part and is only available
from Applied Motion.
Use for NARROW-SIDE
mounting.
Use for WIDE-SIDE
mounting.
Never use your drive in a space where there is no air flow or
where the ambient temperature exceeds 50C (120F).
Never put the drive where it can get wet.
Never allow metal particles near the drive.
!
-16-
Flush Mounting
When you remove the MMI from the shipping carton, you will notice that it has two
parts. The first is a fairly thin section that contains the keypad, display and some
circuit boards. The other part is thicker and contains the telephone jack and a cable
that connects to the keypad assembly.
When you flush mount the MMI in a
panel, only the thin section will stick out
from your panel - the large portion mounts
behind your panel. You’ll need to cut a
precise section from your panel. There is
a cardboard template in the MMI’s
shipping box for this purpose.
If you want the MMI to be dust proof and
watertight, you must place the black
rubber gasket between the thin part of the
MMI and your panel. Assemble the two
halves using the eight small screws
provided.
Surface Mounting
An easier way to mount the MMI is to bolt the two halves together ahead of time,
using the eight small screws. If you want the MMI to be dust proof and watertight,
put the black rubber gasket between the two halves before screwing them together.
Then cut a hole in your panel for the cable
that runs between the MMI and the
Si3540. The hole must be at least 5/8” in
diameter for the connector to fit thorugh.
You will also need two holes that line up
with the big mounting holes in the MMI.
The mechanical outline on page 19 shows
the location of the big mounting holes.
When you mount the MMI to your panel,
you will need to use some kind of sealant
to keep dust and liquid out. Silicone or
latex caulking is okay, or you can make
your own gasket from a sheet of compliant
material like rubber or RTV.
1
2
3
➝ ➝
4
5
6
➝
➝
7
8
9
YES
NO
.
0
SPACE
BKSP
ENTER
panel
MMI
(front section
and gasket)
MMI
(rear section)
1
2
3
➝
➝
4
5
6
➝
➝
7
8
9
YES
NO
.
0
SPACE
BKSP
ENTER
panel
sealant (not included)
MMI
gasket
(included)