Casella CEL Microdust Pro real time dust monitor User Manual
Ø.ø26
Preparation
DO NOT attempt to power from an external source
without first consulting the handbook.
Install 4 x AA size batteries in the compartment in the
underside of the unit.
Connect the probe by inserting the cable connector into
the socket in the top of the instrument case with the red
dot facing the front to ensure correct pin location.
Configuring the Instrument
Press
to switch on and obtain the Measurement
screen.
Press
to see the Main menu.
Press
to move to Status.
Press
to see the Status menu and check instrument
and battery status.
Press
to return to the Main menu.
Press
to move to Configuration.
Press
to see the Configuration menu and make
choices as appropriate, confirming each one by pressing
.
Press
(several times) to return to the Main menu.
Basic Calibration
Press
to move to Calibration.
Press
to see the Calibration menu.
Move to Set Zero and press
to select it.
Slide the collar to cover the chamber leaving just room
for purge air to escape.
Purge with clean air via the purge inlet.
Once the reading is stable, press
to set zero
(±1 digit). Repeat if necessary.
Move to Set Span and press
to select it.
Esc
Enter
Esc
Enter
Enter
Esc
Enter
Enter
Enter
Enter
Insert the Calibration Filter into the chamber, with the
arrow pointing towards the handle.
The display should read within ±1 digit of the value
shown on the Filter.
If it does not, consult the User Manual.
Selecting User Dust Type
Select User Dust Types from the Calibration menu.
Select the required Dust Name and press
to step
to
√, which loads the required dust type calibration for
use.
Press
(several times) to return to the Measurement
screen.
To calibrate a pre-set dust type, consult the User
Manual.
Measurement
The measurement screen shows the current real time
dust concentration plus the
maximum and average
concentrations that
occurred in any one second
period since switch-on or
reset.
Press
to show a
profile graph.
Press
to return to the measurement screen.
Configuring the Logger
Press
to see the Main menu.
Move to Logger and press
to see the Logger menu.
Move to Config Logger and press
to see the Config
Logger menu.
Log Time shows the period available, which depends
on the intervals set and the amount of free memory space.
Esc
Esc
Enter
Enter
Move to Intervals and use
and
to select the time
between each recorded data point, confirming the choice
by pressing
.
Move to Mode and use
and
to select what to do
when the memory is full.
Choose between over write the oldest records or stop
when full and confirm the choice by pressing
.
DO NOT attempt to clear the memory without first
consulting the handbook.
Logging
From the Logger menu, press
to move to Start
Logger.
Press
to start logging.
The measurement screen will show levels from the
current interval.
Press
to show a profile graph.
The data stored during the current (or other) runs can
be reviewed on the display while more data is being
collected.
From the Logger menu, press
to move to View
Runs.
Press
to see the Header for the most recently
stored run.
Press
to see other Headers and
to see run data.
When sufficient data has been collected, return to the
Logger menu.
Press
to move to Stop Logger.
Press
to stop logging.
Press
to switch off after use.
Purge any accumulations of dust from the probe
chamber after use.
Enter
Enter
Enter
Enter
Enter
Preparation
DO NOT attempt to power from an external source
without first consulting the handbook.
Install 4 x AA size batteries in the compartment in the
underside of the unit.
Connect the probe by inserting the cable connector into
the socket in the top of the instrument case with the red
dot facing the front to ensure correct pin location.
Configuring the Instrument
Press
to switch on and obtain the Measurement
screen.
Press
to see the Main menu.
Press
to move to Status.
Press
to see the Status menu and check instrument
and battery status.
Press
to return to the Main menu.
Press
to move to Configuration.
Press
to see the Configuration menu and make
choices as appropriate, confirming each one by pressing
.
Press
(several times) to return to the Main menu.
Basic Calibration
Press
to move to Calibration.
Press
to see the Calibration menu.
Move to Set Zero and press
to select it.
Slide the collar to cover the chamber leaving just room
for purge air to escape.
Purge with clean air via the purge inlet.
Once the reading is stable, press
to set zero (±1
digit). Repeat if necessary.
Move to Set Span and press
to select it.
Esc
Enter
Esc
Enter
Enter
Esc
Enter
Enter
Enter
Enter
Insert the Calibration Filter into the chamber, with the
arrow pointing towards the handle.
The display should read within ±1 digit of the value
shown on the Filter.
If it does not, consult the User Manual.
Selecting User Dust Type
Select User Dust Types from the Calibration menu.
Select the required Dust Name and press
to step
to
√, which loads the required dust type calibration for
use.
Press
(several times) to return to the Measurement
screen.
To calibrate a pre-set dust type, consult the User
Manual.
Measurement
The measurement screen shows the current real time
dust concentration plus the
maximum and average
concentrations that
occurred in any one second
period since switch-on or
reset.
Press
to show a
profile graph.
Press
to return to the measurement screen.
Configuring the Logger
Press
to see the Main menu.
Move to Logger and press
to see the Logger menu.
Move to Config Logger and press
to see the Config
Logger menu.
Log Time shows the period available, which depends
on the intervals set and the amount of free memory space.
Esc
Esc
Enter
Enter
Move to Intervals and use
and
to select the time
between each recorded data point, confirming the choice
by pressing
.
Move to Mode and use
and
to select what to do
when the memory is full.
Choose between over write the oldest records or stop
when full and confirm the choice by pressing
.
DO NOT attempt to clear the memory without first
consulting the handbook.
Logging
From the Logger menu, press
to move to Start
Logger.
Press
to start logging.
The measurement screen will show levels from the
current interval.
Press
to show a profile graph.
The data stored during the current (or other) runs can
be reviewed on the display while more data is being
collected.
From the Logger menu, press
to move to View
Runs.
Press
to see the Header for the most recently
stored run.
Press
to see other Headers and
to see run data.
When sufficient data has been collected, return to the
Logger menu.
Press
to move to Stop Logger.
Press
to stop logging.
Press
to switch off after use.
Purge any accumulations of dust from the probe
chamber after use.
Enter
Enter
Enter
Enter
Enter
Ø.Ø26
A v e
M a x
m g / m
3
Ø . Ø Ø 6
1 . 8 Ø 6
C a l : - D E F A U LT
01007
Ø.Ø26
A v e
M a x
m g / m
3
Ø . Ø Ø 6
1 . 8 Ø 6
C a l : - D E F A U LT
01007
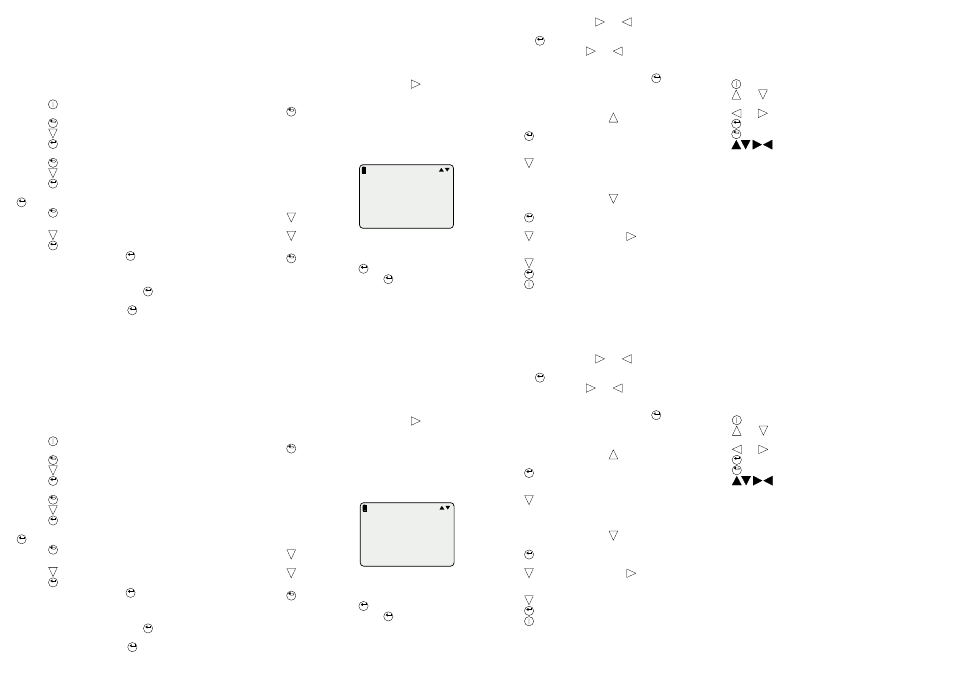
Menus & Control
All operations are based upon a series of menu
options arranged as shown in the figure.
A combination of function keys and navigator keys on
the front panel are used to move around the menu
system and implement commands.
The functions are as follows.
Power on/off.
and
Navigator keys move the highlight around the
options.
and
Navigator keys change the contents of a field.
Accepts current option.
Steps back to previous menu.
On screen show active keys.
Casella CEL
Regent House, Wolseley Road,
Kempston,
Bedford,
MK42 7JY, United Kingdom,
Phone: +44 (0) 1234 844 100,
Fax: +44 (0) 1234 841 490,
E-mail: [email protected]
Web: www.casellagroup.com
Casella USA
17 Old Nashua Road #15,
Amherst,
NH 03031,
U.S.A.
Toll Free: +1 800 366 2966
Fax: +1 603 672 8053
e-mail: [email protected].
Web: www casellaUSA.com
Enter
Esc