CRU DataPort 25 SL Slim-Line User Manual
Dataport 25 sl with 6g install guide, Rugged, reliable, mobile, secure
Rugged, Reliable, Mobile, Secure
TM
1-800-260-9800
www.CRU-DataPort.com
DataPort 25 SL with 6G Install Guide
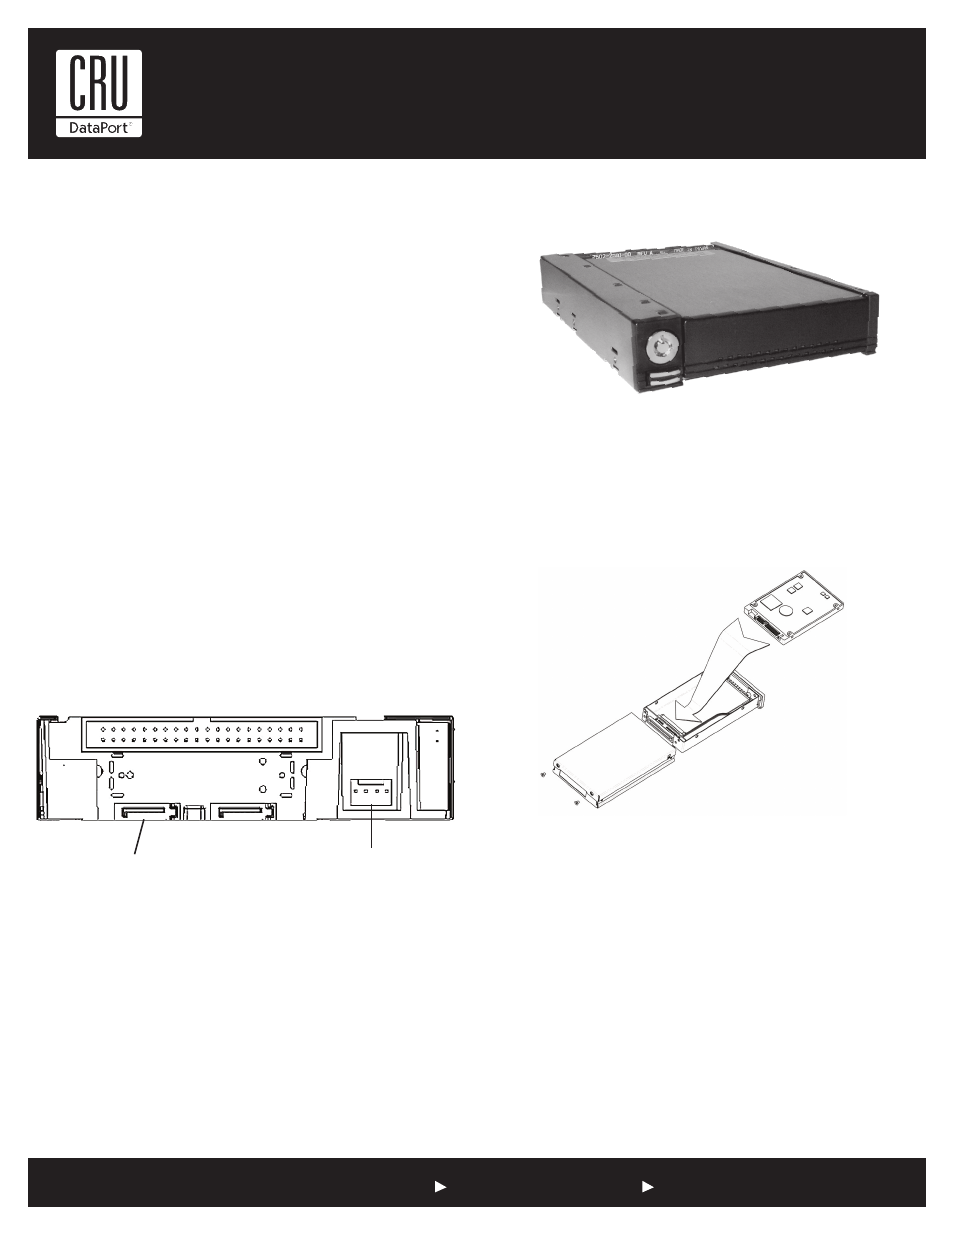
The DataPort 25 SL is a low profi le DataPort designed to fi t into
small form factor 3.5” drive bays. The DataPort 25 SL holds one
SATA 2.5” hard drive.
Installing the frame into your computer
1. Locate an available 3.5” drive bay and remove the front bezel.
e
h
t
n
o
s
li
a
r
e
h
t
ll
a
t
s
n
i
,
s
li
a
r
g
n
it
n
u
o
m
s
e
ri
u
q
e
r
r
e
t
u
p
m
o
c
r
u
o
y
f
I
.
2
DataPort 25 SL frame and slide it into the computer and ensure
it is properly secured.
e
h
t
e
d
il
s
s
li
a
r
g
n
it
n
u
o
m
e
ri
u
q
e
r
t
o
n
s
e
o
d
r
e
t
u
p
m
o
c
r
u
o
y
f
I
.
3
DataPort 25 SL frame into the computer drive bay and
secure it with the provided mounting screws.
d
e
s
u
(
r
o
t
c
e
n
n
o
c
r
e
w
o
p
n
i
p
-
4
e
l
b
a
li
a
v
a
n
a
t
c
e
n
n
o
c
d
n
a
e
t
a
c
o
L
.
4
for fl oppy drives) to the back of the DataPort 25 SL frame.
k
c
a
b
e
h
t
o
t
ti
t
c
e
n
n
o
c
d
n
a
e
l
b
a
c
a
t
a
d
A
T
A
S
e
l
b
a
li
a
v
a
n
a
e
t
a
c
o
L
.
5
of the DataPort 25 SL frame to the left most SATA connector
(see picture for details).
Your frame installation is complete.
Installing a hard drive in your DataPort 25 SL Carrier
e
d
il
S
.r
e
ir
r
a
C
L
S
e
h
t
f
o
k
c
a
b
e
h
t
m
o
rf
s
w
e
r
c
s
o
w
t
e
h
t
e
v
o
m
e
R
.
1
the metal cover off. Note: Do NOT use screws longer than
those supplied as the circuit board will be damaged.
Use this SATA data connector
Power connector
e
v
ir
d
d
r
a
h
e
h
t
t
c
e
n
n
o
C
.
n
w
o
d
-
e
d
i
s
p
u
e
v
ir
d
d
r
a
h
e
h
t
ll
a
t
s
n
I
.
2
(upside-down) to the connector on the circuit board with the
bottom of the hard drive facing upwards. Then use the pro-
vided screws to secure the hard drive.
e
h
t
h
ti
w
t
i
e
r
u
c
e
s
d
n
a
r
e
ir
r
a
c
e
h
t
o
t
n
o
k
c
a
b
r
e
v
o
c
e
h
t
e
d
il
S
.
3
cover screws.
Operation
Warning! Please do not touch the connector on the back
of the carrier. Internal damage could result from electro-
static discharge.
Warning! The DataPort 25 SL is not interchangeable with
any other DataPort 25 products. Due to size limitations
the DataPort 25 SL carrier will not fi t properly into other
DataPort 25 frames. Any attempt to do so could result in
the loss of data. The DataPort 25 SL frame will only sup-
port the DataPort 25 SL carrier. Any other carrier will not fi t
properly into the DataPort 25 SL and could damage it.