CRU Mouse Jiggler User Manual
Page 2
PMS 711
2 cyan
85 magenta
76 yellow
10.25.12
CRU Mark
1. Operation
Plug Mouse Jiggler into a USB port on any computer.
That’s it! Sit back and watch Mouse Jiggler go to work. If you remove Mouse Jiggler
from the USB port, everything will immediately go back to normal.
NOTE: You can easily tell how long Mouse Jiggler has been working
by watching its LED. The repeating blink pattern represents a four digit
number indicating how many minutes have passed. Each digit is shown as
a succession of 1 to 10 blinks, indicating the digits 0-9. Simply subtract one
from the number of blinks to get the correct digit. For example, the pattern [1
blink, 1 blink, 3 blinks, 8 blinks] represents [0, 0, 2, 7], or 27 minutes.
2. Finding Mouse Jiggler’s Serial Number in Windows
To find the vendor ID, product ID, and serial number of the Mouse Jiggler you have
plugged into your computer, follow the instructions below. The text displayed on
the final window contains all three pieces of information. You will have to use the
keyboard to navigate.
a. Connect the Mouse Jiggler to the computer.
b. Open the Control Panel. For Windows Vista and Windows 7, press
WINKEY (the Windows Key) to open the Start Menu and then use the
arrow keys on your keyboard to highlight “Control Panel”. Press Enter.
For Windows 8 and 8.1, press
WINKEY + X and use the up and
down arrow keys to highlight “Control
Panel” and press Enter.
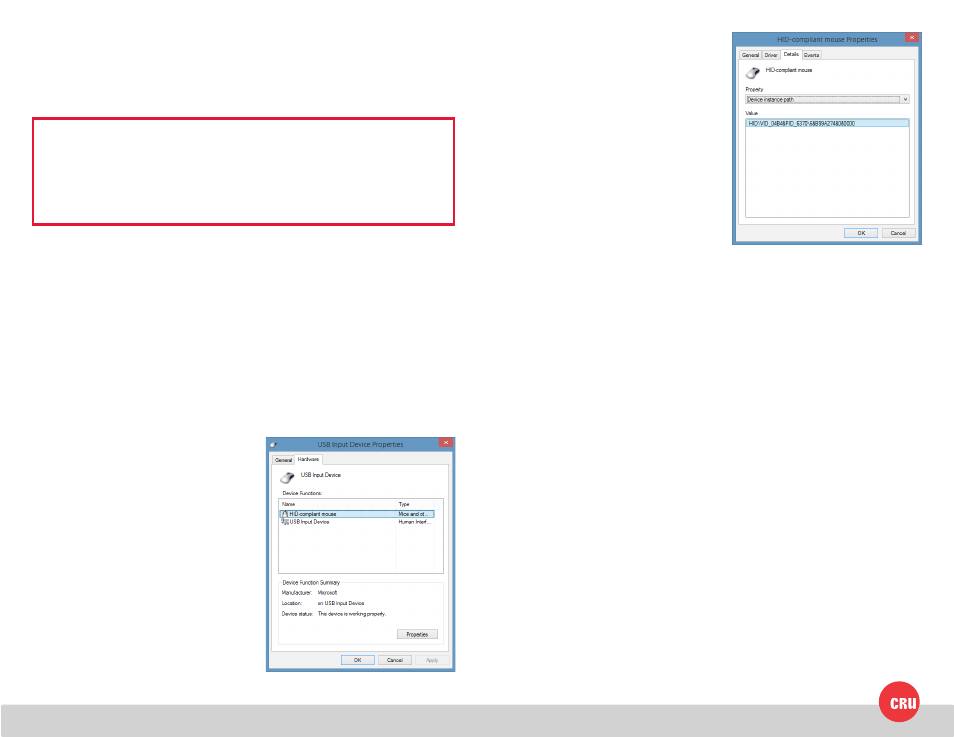
c. Under the Hardware and Sound
category, highlight “View devices and
printers” and press Enter.
d. Highlight “USB Input Device” and
press ALT + Enter to open the
Properties window for that device.
e. Select the “Hardware tab”. Press Tab
until the “General” tab is highlighted,
and then use the arrow keys to
highlight the “Hardware” tab.
f. Press Tab until “HID-compliant
mouse” in the Device Functions
section is highlighted. Then press Tab
to highlight “Properties” and press
Enter to open the HID-compliant
mouse Properties window.
g. Press Tab until the “General” tab is
highlighted, then use the arrow keys
to highlight the “Details” tab.
h. Press Tab until the drop-down box
is highlighted and press the down
arrow key until you have selected
Device instance path.
The last set of numbers listed in the Value string under the “Device instance path”
property represents the serial number of the Mouse Jiggler MJ-2.