Dorcy 41-4310 User Manual
Dorcy Lighting
Status 1
Status 2
Status 3
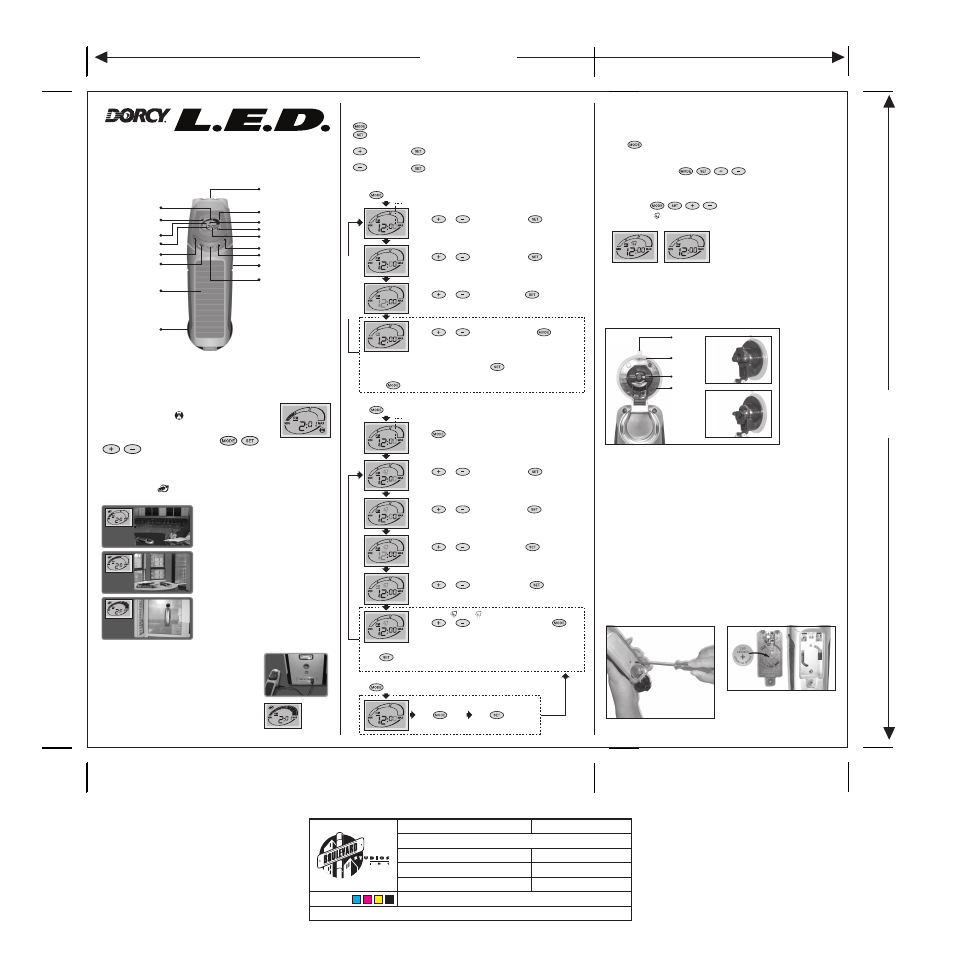
Attention:
1. The Clock and Alarm Setting could only be operated when Flashlight is off.
2. The already set Alarm function would not be activated while in the operation
of Clock and Alarm Setting.
3. Press twice to return to the regular Time Display if you wish to stop setting
while in the operation of Clock and Alarm Setting.
Operation of Clock and Alarm
1. Press any button of the , , , for time checking. The Back
Light would be on and would last for 10 seconds.
2. While the alarm is on and the time’s reached to the time set for alarm, a
warning sound would be heard and would last for 1 minute until you press any
button of the , , , to inactivate it immediately.
3. The symbol of would be shown or not shown on regular Time Display Panel
while Alarm is being set or cancelled as shown below.
To Operate Suction Cup
Pull the suction cup upward from the flashlight.
Cling to the window so the solar panel is facing outwards towards the light.
Pull the clasp upwards to clink closely to the window.
Pull the clasp down to remove from the window.
Note: The suction cup will not cling to rough or unpolished surfaces.
Attentions
Do not store the product in places without any light source while the battery is in.
Auto switch-off device may inactivate the time display automatically when
product is not exposed to light to save remaining battery power.
Switch flashlight off when not in use.
Avoid solar panel contact with rigid or hard objects.
The back light is designed to only operate when the functions are being adjusted
to save power.
Performance Index
Built-in Lithium battery/LIR2450, 3.6V, 110mAh.
Hanging weight/10KG
Clock Warning Sound/85dB/1 Min.
Run Time (fully charged);
a) 3 LEDs in full brightness mode could last for up to 60 Min.
b) 3 LEDs in half brightness mode could last for up to 130 Min.
c) 3 LEDs in blinking mode could last for up to 130 Min.
Battery Replacement
1. Unscrew and take off the Lid.
2. Place the battery with the “+” side up into the compartment
3. Put the Lid back and screw tightly to complete replacement.
Alarm/ON
Attention:
Press once to return to the Time Setting status for re-setting if it’s
necessary.
Alarm ON /OFF (Blinking)
Press or to set Alarm ON/OFF. Press again
to confirm setting and return to the regular Time Display.
AM/PM
Press or to set AM or PM. Press twice to
finish setting and return to the regular Time Display.
Hour
Press or to set Hours. Press again to
confirm the hour and go to the AM/PM Setting.
Clock Setting: (Skip)
Press once to skip Clock Setting and enter to
the Alarm Setting.
Flashlight Operation:
Press the Power Switch once to turn on full power.
Press the Power Switch twice to turn on in half power (power saving mode).
Press the Power Switch three times to turn on blinking mode.
Press again to switch off.
The allowance of power remaining is displayed on the LCD
panel with the symbol of (see diagram), shown once
power switch is activated.
The power switch stops functioning once the alarm is
activated and sounded, press any of the, , ,
, , buttons to turn alarm off once activated.
Charging:
Solar Charging
Position product so solar panel is directed towards light source.
The battery symbol appears and product begins to charge.
Capability of power charging is divided into three:
Clock and Alarm Function
:
Button Instructions
Switches functions between Clock – Alarm - End.
Sets time – switches functions between Minute – Hour – AM/PM – Alarm
On/Off
Used after the function is activated to adjust the number from 0-9,
0-5, 1-12, AM/PM and Clock On/Off.
Used after the function is activated to adjust the numbers from 9-0,
5-0, 12-1.
Setting Clock and Modifying
Press and hold for 3 seconds.
USB Charging
Plug both ends of the USB connector to the product
and computer. All portions of the power indicator
would be filled up completely once power contact is
connected. USB charging is recommended for 10 to
15 hours.
Attention: The intensity of the power indicator
is a reference while power is charging. To find
out exact power remaining turn flashlight on
and refer to the LCD panel display.
Status 1: Lower portion of power indicator is
filled when charging under fluorescent lights.
Clock Setting: Min. in single figure
Press or to set minute. Press once to
confirm and go on to the next step.
BLINKING
Min. in two figures
Press or to set minute. Press once to
confirm and go on to the Hour Setting.
Hour
Press or to set Hours. Press once to
confirm and go on to the AM/PM Setting.
Attention:
1. Under the AM/PM setting you could Press once to return to the
beginning of Minute Setting it it’s necessary.
2. Press once to go on to the Alarm Setting.
R
e
-Setting or Modifying
Status 2: Lower and middle portions of
power indicator is filled when charging
indirectly through natural light.
Status 3: All portions of power indicator are
filled when charged directly through natural
light.
Setting Alarm and Modifying
Press and hold for 3 seconds.
BLINKING
Alarm Setting : Min. in single figure
Press or to set minute. Press once to
confirm setting and move to the next step.
Min. in two figures
Press or to set minute. Press again to
confirm the time and go on to the Hour Setting.
Press once.
Alarm ON/OFF Quick Setting
Press and hold for 3 seconds.
Press four times.
Alarm/OFF
AM/PM
Press or to set AM/PM. Press to the next
ON/OFF Setting.
Pulling Tab
Tighten
Loosen
Disc
Clasp
Lid
SOLAR CLOCK AND FLASHLIGHT
Remove the insulator before use.
The light would flash once to indicate the power contact has been
correctly connected while the insulator removed.
Flashlight
Status 1
Power Charging
Under Fluorescent
Lamp
Status 2
Power Charging
Expose to the
daylight
Status 3
Power Charging
Expose to the sun
light directly
Alarm
Flashlight Symbol
LCD Panel
Minutes
Power Indicator
AM/PM
Hours
Mode
Set
“
–”
“
+”
DC Jack
Power Switch
Solar Panel
Suction Cup
Power Charging
Symbol
12.75”
11”
CLIENT : DORCY
FILE NAME : Solar Flashlight Eng Manual
RE-ORDER # : 41-4310
DESCRIPTION : ARTWORK
ACTUAL SIZE : 12.75” x 11”
DATE : JUNE 4, 2007
ARTIST : ALAN
A/W SIZE (%) : 100%
DOCKET # : 4177
COLOURS :
NOTES :
SP. COLOURS :