Assembly instructions – United States Stove Company 1261 User Manual
Page 4
-4-
ASSEMBLY INSTRUCTIONS
NOTICE: United States Stove Company grants no warranty, stated or implied, for the installation or maintenance of your wood stove and
assumes no responsibility of any incidental or consequential damages.
REQUIRED TOOLS
Safety Glasses
Hearth Gloves
Pencil
6' Folding Ruler or Tape Measure
Tin Snips
Drill
1/8" dia. Drill Bit
Adjustable Wrench
(Sheet Metal Screws)
CAUTION: STOVE IS HEAVY. MAKE SURE
YOU HAVE ADEQUATE HELP AND USE
PROPER LIFTING TECHNIQUES WHENEVER
MOVING STOVE.
Refer to diagram and parts list at back of this manual.
1.
Uncrate the stove and remove packing materials and protective
poly bag. (save cardboard box for further assembly.)
2.
Remove parts from inside of stove. Parts include: one swing
top (#10), two lids (#12), one lid support (#11), one damper
collar (#15), one feed door (#9), one lid lift er (#15), one slide
damper (#7), four legs (#1,2), hardware pack , and S-hook from
inside fi rebox.
3. Place
fl attened carton on fl oor and carefully turn stove over
onto carton.
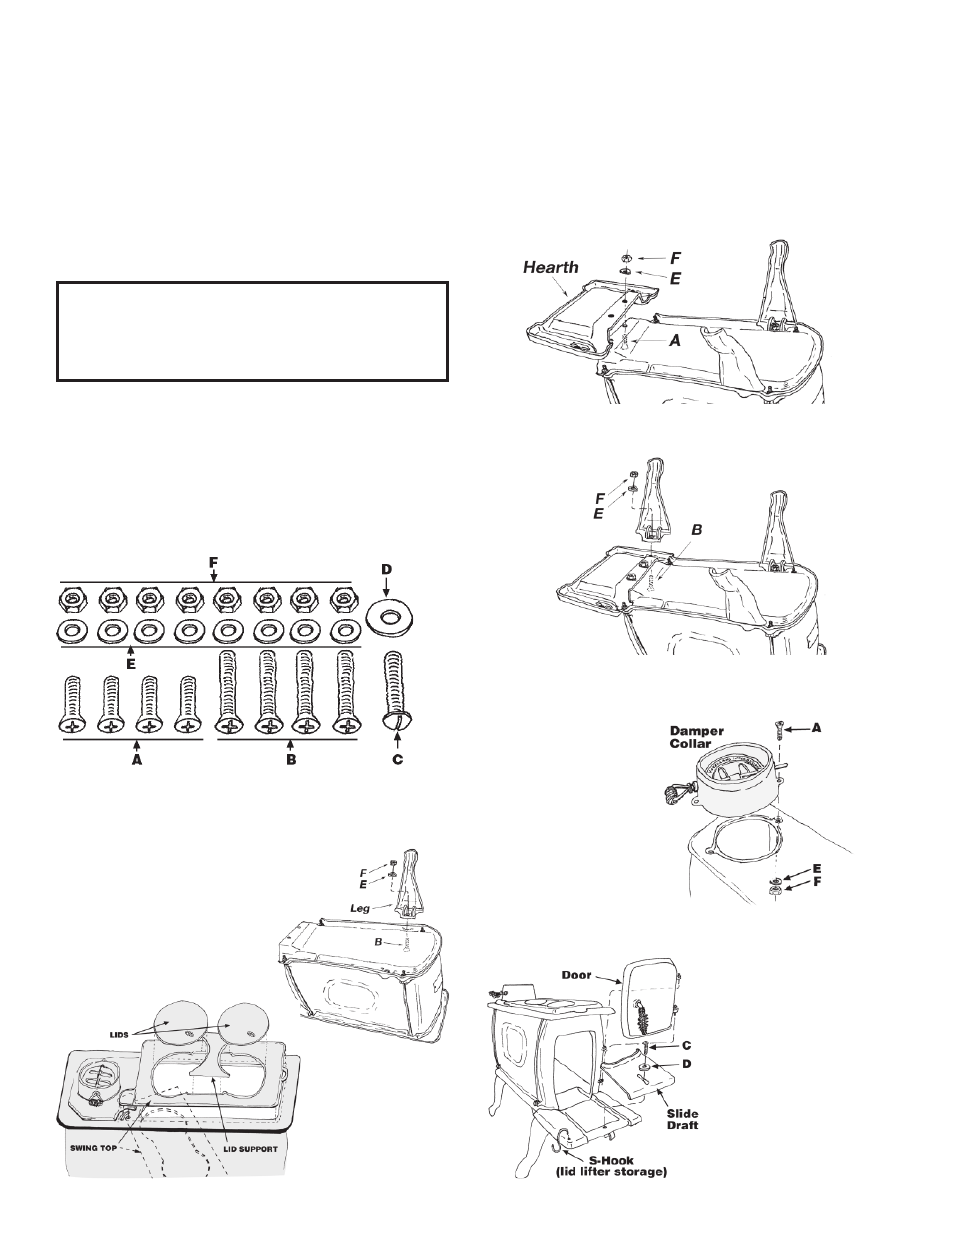
4.
Attach the rear legs to base of stove with long stove bolts (B),
fl at washer (E) and hex nut (F).
5.
Attach hearth to bottom of stove with two short stove bolts
(A), washers (E) and hex nuts (F).
6.
Attach the front legs to hearth
with long stove bolts (B), fl at
washers (E) and hex nuts (F).
REQUIRED MATERIALS
Note: the following items are not included with your stove
Flooring protector as specifi ed
Chimney Connector
1/2" Sheet Metal Screws
Chimney
Furnace Cement
7. Carefully
lift stove upright and place in desired location (see fol-
lowing instructions for properly locating stove.)
8.
Attach damper collar to rear top surface of stove using
short stove bolts (A) fl at washers (E) and hex nuts (F).
9.
Place swing top in position on top of stove. To install, posi-
tion at approximately
45 degree angle to
stove. (Dashed lines
in ill. F) until pins
drop into locator
holes then swing into
position.
10. Place lid support and
two lids in position
on swing top (ill. F.)
11. Place the slide draft
into position on the
hearth. Hold in position with round head stove bolt (C)
and large fl at washer (D).
12. Lower feed door into
position while aligning
hinge pins.
13. Place S-Hook in hole at
left front corner of hearth.
Note: S-Hook is used to
hang lid lift er while not in
use.