ZVOX Audio 415 User Manual
Page 2
1. Unpack 415 cabinet, external power supply and AC cord,
remote control and audio connecting cord.
2. Place cabinet on sturdy surface, or mount to wall or desktop
mount using optional wall-mount-bracket hardware (see sepa-
rate wall-mount instruction sheet supplied with bracket).
Warning: Threaded inserts on back of 415 are 6mm
metric threads. Note: When wall-mounting the 415, the plastic
feet on the bottom can be removed by carefully prying them off
with a butter knife. Unit should face listening area. Try to align
the cabinet with the center of TV screen.
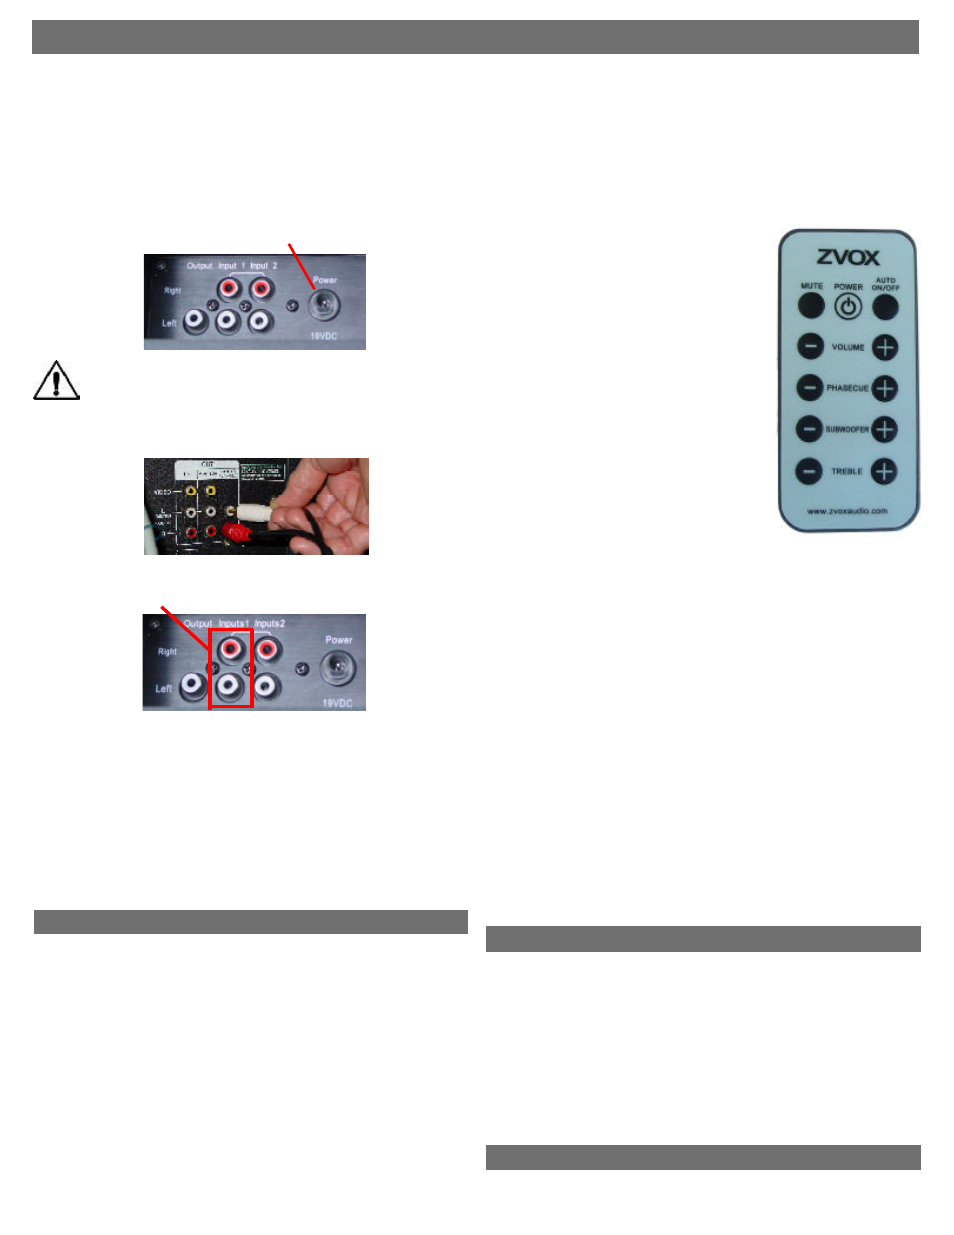
3. Connect AC power supply cord to 19V outlet on back panel.
Warning: Don’t plug AC cord into outlet before it is
connected to the power connector on the rear of the unit.
4. Plug the supplied audio connecting cord into the “Audio Out”
jacks of your TV, DVD player, cable box or satellite receiver.
5. Plug other end of audio connecting cable into the red and
white RCA jacks labeled “Input 1” on the back of the ZVOX 415.
6. Push the “MENU” button on your TV remote control, then
choose “AUDIO” -- and navigate through the menu options to
choose “SPEAKER: OFF” and “AUDIO OUT: VARIABLE”
(sometimes called “AOV” on a TV’s menu). This allows you to
control the volume of the ZVOX system using your TV’s remote
control. If your TV’s audio output can’t be switched to “VARI-
ABLE,” simply control the volume of the ZVOX 415 by using
the supplied remote control. Alternatively, you may be able to
program your TV remote, or a programmable/learning remote to
control audio levels with any of the following codes: Candle
1004, Hisense 1237 or Aiwa 1036.
7. Insert the battery in the ZVOX 415 remote control. To do so,
use a thumbnail to gently pinch in the two small vertical ribs on
the bottom of the back of the remote -- while at the same time
pulling out the battery tray, using the horizontal slot. Place the
battery in the battery tray (with the printed side facing up), and
gently push the tray back into the remote.
8. Turn on the ZVOX 415 by pushing the power button on the
remote control. A blue LED light should come on.
NOTE: In normal operation the unit will go into standby mode 5-
8 minutes after it stops receiving an
audio signal (for example, when you turn
off your TV). The front panel light will turn
from blue to green in standby mode.
When the signal returns (after you turn
your TV on), the light will turn blue
again. To defeat this “automatic standby”
mode, press the “AUTO ON/OFF” button
once (the light will blink). To restore the
setting, press the button again.
9. Adjust volume with the Volume “+”
and “–” buttons. Note that the blue LED
light under the grille will flash with every
push of a button. When you have
reached maximum (or minimum) volume,
the blue LED will stop blinking. The LED
reacts this way for all settings – VOL-
UME, PHASECUE, SUBWOOFER and
TREBLE.
10. When “MUTE” button is pushed, and
volume is muted, the blue LED will flash
until volume is un-muted with a second push of the button.
11. PHASECUE buttons control the ZVOX virtual surround
sound system. There are nine levels of PHASECUE adjust-
ment. When you turn up the PHASECUE control, the audio
should sound wider or “bigger.” In many cases you will hear
sounds from places where there are no speakers. This effect is
stronger with live music, live sporting events and well-recorded
movies and TV programs. With many programs -- especially
news shows and sitcoms -- PHASECUE will have little effect.
NOTE: If you find that crowd noises or movie special effects
are “drowning out” the dialog, try turning down the PHASECUE
control. This will put more focus on dialog clarity.
12. There are nine levels of SUBWOOFER control. You may
need to experiment with SUBWOOFER levels because speaker
position and program material have a big effect on bass. If the
audio sounds thin, try turning up the SUBWOOFER control. If
the bass sounds overly loud, “boomy” or distorted, turn down
the SUBWOOFER control.
13. There are nine levels of TREBLE control. The adjustment
this control makes is very subtle. Experiment until you think
the sound is not too “bright” and not too “dull.” Most people set
the treble control once and leave the setting in that position.
• If you hear a consistent “hiss” or hum, try turning UP the volume
of your TV or other audio source, and then set the ZVOX volume
level LOWER.
• Please keep in mind that your ZVOX 415 is a highly accurate
audio system that may reveal noise or distortion that other
speakers did not reproduce.
• The PhaseCue control adjusts the size of the perceived “sound
stage.” Feel free to adjust it when playing different kinds of audio.
Some people prefer slightly more, or less PhaseCue effect. Some
people prefer higher settings for movies, and slightly lower set-
tings for music. The “five” setting (of nine) is the default setting.
• “Input 1” jacks are for audio connecting cable from TV, PC or
other audio source.
• “Input 2” jacks are for a second, mixing input. They will work
correctly only if another device is already connected to the “Input
1” jacks. Note: If you have two devices connected and playing at
the same time (e.g. TV and MP3 player), you will hear both
devices. If you want to connect 3 or more devices – we suggest
you use an input switching device (available at Radio Shack).
• “Output” jack is for use with an optional external powered
subwoofer. This is a “full range” (all frequencies, not just bass)
monaural connection, and should only be used with a subwoofer
that has a variable crossover. We suggest you set the subwoofer’s
crossover at approximately 90 Hz – but you should experiment
with different settings near there.
Inputs & Controls
A few opportunities for fine-tuning.
Installation and Operating Instructions: ZVOX 415 Single-Cabinet Surround Sound System
Questions? Email us at [email protected]
Rear input
panel of 415
Rear jack
panel of TV
Rear input
panel of 415