Aervoe Solar Strobe User Manual
Aervoe Safety
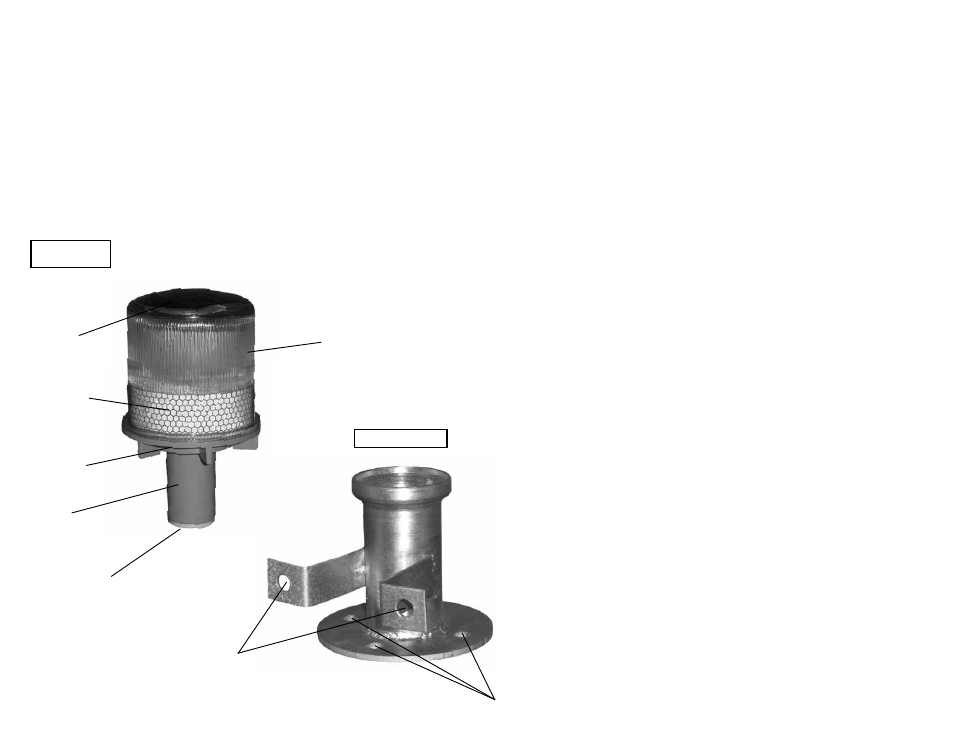
Vertical Mounting
(2-holes)
Horizontal Mounting
(4-holes)
MOUNTING BRACKET
Aervoe® Solar Strobe/Signal Light
#1197 Red, #1198 Yellow
IMPORTANT SAFEGUARDS
•
Read all instructions before operating
•
Do not operate at temperatures above 140°F or below -4°F
•
To reduce the risk of electric shock, do not submerge the unit in any liquid. Unit is weatherproof
but not submersible.
•
Do not use in flammable or explosive environments
•
For better light quality, protect the globe from scratching
•
For maximum battery efficiency, never completely deplete stored power. Recharge batteries at
regular intervals.
•
Use appropriate safeguards when mounting the light to any surface
PARTS IDENTIFICATION
The Solar Strobe/Signal Light features a built-in solar collector with rechargeable AA batteries. Allow
to charge all day for use all night.
INSTAllING OR REPlACING THE BATTERY
The rechargeable battery may be replaced when the battery life has been exceeded.
1.
Remove the screws that secure the SHAFT
2.
Pull out the battery from the SHAFT and replace with a similar AA battery (see back for specifications)
3.
Match up the positive (+) and negative (-) terminals
4.
Replace the SHAFT and screws
CHARGING
Place unit in a sunny location, with the solar panel facing the sun to charge. Unit will not charge as quickly
on a cloudy day and not at all in complete darkness (see back for charging specifications).
OPERATION
1.
The strobe will operate when the ON/OFF BUTTON is in the ON position and ambient light is low
enough to trigger the automatic photocell.
2.
To verify you are in the ON position, hold you hand on top of the SOLAR PANEL. If it starts to blink,
then it is in the ON position. If it does not blink, push the ON/OFF BUTTON ONCE. If it still does not
blink, then the battery needs to be charged.
3.
The batteries will continue to charge even if the STROBE is in the OFF position and stored battery
power will not be depleted.
4.
The strobe will continue to flash as long as there is battery power and darkness. Once daylight returns
the flashing will stop and if kept in a sunny location, it will recharge.
5.
If the STROBE is stored in a dark place, the ON/OFF button may be used to keep it from automatically
turning on in low light to preserve the battery.
BRACKET MOUNTING
Unit may be mounted vertically or horizontally to surfaces such as metal, concrete, wood, or asphalt; and to
plastic barricades and rubber safety cones. NOTE: Mounting screws are not included. User is responsible
for ensuring proper selection of screws.
1.
Remove unit from the MOUNTING BRACKET
2.
Place the bracket in the desired location and mark either the horizontal (4-holes) or vertical (2-holes)
mounting holes.
3.
Once bracket is securely mounted, slide unit into the bracket and operate as stated above.
SAFETY CONES
Unit may be used with rubber traffic safety cones that include a top inside hole diameter of at least 1 5/16”
to accommodate the shaft.
Solar Panel
4 LED
Light Globe
Reflective Stripe
On/Off Button
(not visible)
SOLAR STROBE/
SIGNAL LIGHT
Shaft
Battery Compartment