Aervoe SolaDyne Solar Lantern User Manual
Soladyne, Solar lantern #7451
SolaDyne
®
Solar Lantern #7451
IMPORTANT SAFEGUARDS
•
Read all instructions before operating
•
Do not operate at temperatures above 120°F or below 32°F
•
To reduce the risk of electric shock, do not submerge the unit or its accessories in any liquid. Unit is
water resistant but not waterproof.
•
Do not use in flammable or explosive environments
•
For better light quality, protect the lantern globe from scratching
•
Turn lights off before charging
•
Clean the solar panel with a damp cloth with mild detergent if necessary. Avoid scratching.
•
Place in the included storage bag and put in a clean dry place when not in use
•
Administer close supervision when using around children
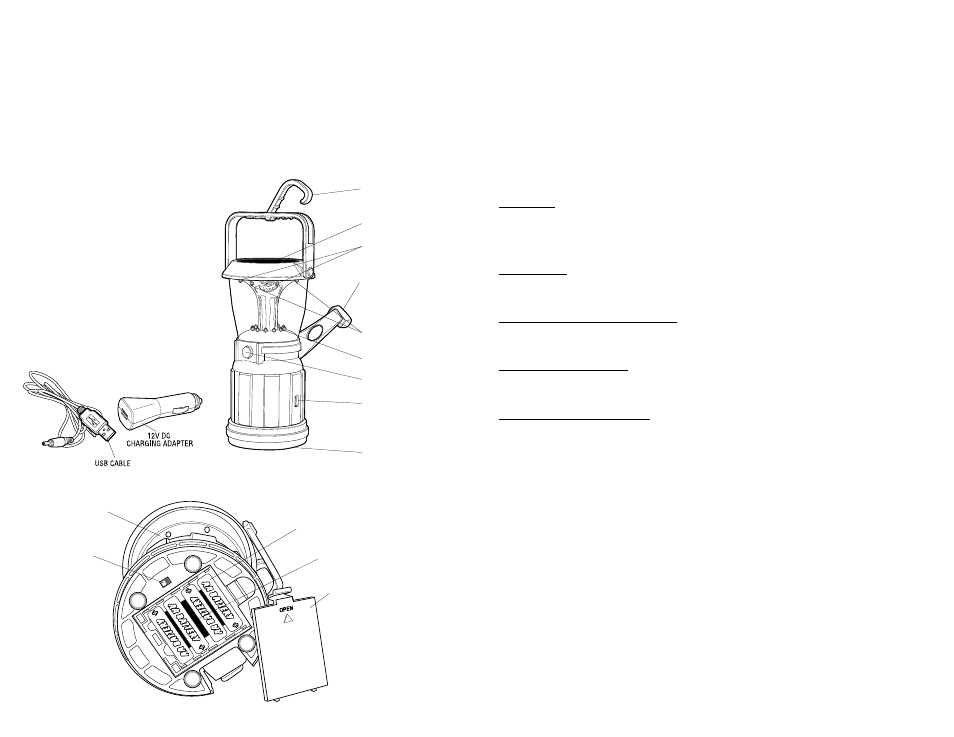
PARTS IDENTIFICATION
CHARGING INTERNAl lITHIUM-ION bATTERy
NOTE: optional AA batteries will not charge using any of the following methods, an external source is required. For
all methods of charging, make sure the lantern is off (lights are off). If the unit has not been used for more than
30 days it is recommended that you recharge using the included 12-volt DC or USB charger to recondition the
rechargeable battery.
During any of the following methods of charging the ChARgIng InDICAToR lIghT will illuminate red. once
charging has completed it will turn yellow (except for Dynamo & Solar charging). Reference the Charging Time
table on the back.
BEFORE FIRST USE: Remove the BATTeRy ComPARTmenT DooR and plug battery connector cable on the
internal rechargeable battery into the lantern, and replace the compartment door.
Solar Charging:
1.
Remove the clear plastic solar film protector. Place the lantern outside with the SolAR PAnel in direct
sunlight for maximum effectiveness.
2.
Charging in partial sunlight and cloudy weather will increase the charging time.
3.
Repositioning the lantern throughout the day will be required to make sure sunlight is effectively charging
the battery. This may require tilting the lantern to directly face the sun in the morning and afternoon.
Dynamo Charging: (Best for emergency power generation)
1.
open the DynAmo hAnD CRAnk and rotate steadily clockwise at approximately 130 cycles/minute for a
minimum of 3 minutes. longer wind-up times will yield a longer power duration.
2.
Close the arm.
12-volt DC Vehicle Charging (adapter included):
1.
Plug the USB plug on the USB CABle into the 12V DC Adapter and plug the pin connector into the DC In/
oUT PoRT of the lantern.
2.
Plug into your vehicle’s cigarette lighter, accessory power outlet, or other 12-volt power source.
5V USB Charging (cable included):
1.
Plug the USB CABle into the DC In/oUT PoRT of the lantern and into any USB power source such as a
computer. note: charging times will vary depending on the power source used. If your computer goes
into sleep mode it will not charge the battery.
other methods of charging (not included):
1.
120-volt AC/DC plugs are available with a USB input and will connect to the included USB CABle (see
purchasing specifications on the back).
2.
Ray ‘N Go
2
™ Solar Collector or Sierra Wave™ 5-Watt Solar Collector available at your SolaDyne retailer or www.
aervoe.com. no additional adapters are required.
3.
Sierra Wave™ 14-Watt Power Hub available at your SolaDyne retailer or www.aervoe.com. no additional
adapters are required.
OPERATION
This lantern is able to operate from either the internal rechargeable battery or user-added AA batteries. Use the
AA BATTeRy SeleCTIon SwITCh on the bottom to select the right battery operation. OFF position will operate
from the internal rechargeable battery and ON position will operate from the added AA batteries.
Press the moDe BUTTon to cycle through the following light options. To conserve battery life, choose the
lighting level to meet your needs. Using the highest light level will use the most power.
•
nightlight - 2 amber leDs
•
Downward reading light - 4 white leDs
•
Ambient light low, medium and high - 16 white leDs
NOTE: When operating on high, only the bottom 12 LEDs will operate
4 AA batteries may be installed in the battery compartment to provide many more hours of use. Any style of AA
battery may be used however rechargeable batteries are not charged using any of the features of this lantern. An
external recharging source is required. Visit www.aervoe.com for solar generation and storage options.
1.
Remove the battery cover on the base of the lantern
2.
Install 4 alkaline or rechargeable nimh AA batteries
To hang the lantern, extend the hook from the handle to an upright position (see drawing).
Hook
Solar Panel
Nightlights
Dynamo Hand Crank
Reading Lights
Ambient Lights
On/Off Button
DC In/Out Port &
Charging Indicator
Battery Compartment
Lantern Globe
Compartment Door
Internal Rechargeable Battery
(under the AA batteries)
AA Batteries
AA Battery
Selection
Switch
ON
OFF