Aervoe 4-Cup Coffee To Go User Manual
Aervoe Coffee machines
Max Burton® 4-Cup Coffee To Go™ #6973
IMPORTANT SAFEGUARDS
Read all instructions before operating
•
Do not
•
touch hot surfaces
Do not
•
immerse cord or unit in water or other liquids
Do not
•
microwave or clean using a dishwasher
Do not
•
use any accessory attachments with this product
Do not
•
let cord hang over edge of table or counter
Do not
•
clean with metal scouring pads
Do not
•
use if carafe is chipped or cracked
Do not
•
use while vehicle is moving
Unplug when not in use and before cleaning
•
Allow unit to cool before storing
•
Keep cord away from hot surfaces
•
Administer close supervision when running this appliance around children
•
This appliance
•
will not shut off automatically. Turn off immediately after use.
WARNING: This product is designed to get very hot very quickly and reach liquid temperatures of 150ºF.
Handle with care. It will remain hot for a significant period after it has been unplugged. Aervoe Industries,
Inc. is not responsible for any damage caused by use or misuse of this product either intentional or
accidental.
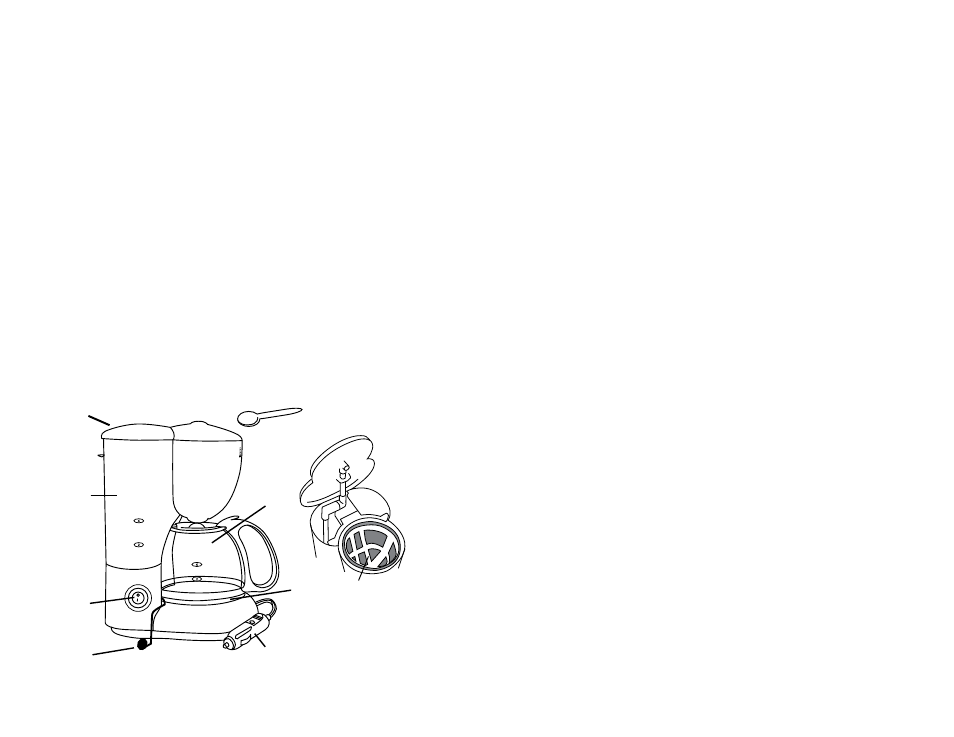
PARTS IDENTIFICATION
OPERATING INSTRUCTIONS
Mounting Bracket Installation
Place the Coffee To Go on a dry, level surface, next to the 12-volt receptacle. Attach the bracket over the
base of the appliance and secure with the screws provided.
Brewing
Make sure the ON/OFF switch is in the OFF position.
1.
Open the reservoir lid and add the desired amount of fresh, cold water to the water reservoir. Do not
2.
exceed the 4-cup capacity.
Place the reusable coffee filter into the basket. Using the scoop provided, place the desired amount of
3.
ground coffee into the filter. 1 scoop = 1 cup of coffee.
Close the reservoir lid.
4.
Place the empty carafe under the drip spout and ensure it sits properly on the hot plate.
5.
Plug into a 12-volt receptacle and switch to ON.
6.
Do not open the reservoir lid while the unit is operating.
7.
The carafe may be removed during brewing. The Brew-Stop™ feature allows you to pour a cup of
8.
coffee as soon as one is ready.
Do not allow the carafe to boil dry.
9.
Never reheat coffee by re-circulating it through the brewing system or use hot water to fill the
10.
reservoir. Allow the unit to cool before refilling with cold water.
OPERATION IN vEhIClES
Do not use while the vehicle is moving.
•
Only operate while the vehicle’s engine is running.
•
Make sure that your battery is strong and in good working condition before plugging into your
•
vehicle’s 12-volt receptacle.
Do not use the unit if your vehicle’s electrical system is weak or damaged.
•
Periodically check your vehicle’s charging system for continued successful use.
•
ClEANING
Switch the appliance to the OFF position and unplug. Wash the carafe and filter basket with warm, soapy
water and rinse. Dry with a clean cloth. The water reservoir, hot plate and reservoir lid should be wiped off
with a damp cloth and dried with a clean cloth. To clean the filter basket, rotate it 1/4” to the left so that the
tabs align with the slots. The basket is now removable from the housing. Do not use abrasives to clean.
Never clean with metal scouring pads.
Warning: Do not place in the dishwasher or immerse in water.
Do not clean WhIle It Is connecteD to a poWer source.
Due to the mineral content in water, it will be necessary to occasionally clean the reservoir. Excessive
steaming or extended brewing time indicates that cleaning is necessary. Fill the reservoir with 2 cups of
white vinegar and 2 cups of cold water. Operate the unit as if brewing coffee, except without the filter or
ground coffee. Allow the unit to complete the full cycle. Discard the liquid. To rinse, fill the reservoir with
cold water and repeat the brewing cycle. Wash and rinse as described above.
TROUblEShOOTING
If the 12-volt circuit fails to operate, try the following:
In the event that the unit does not appear to heat properly, unplug it from the power supply and make
1.
sure the receptacle is clean. Also check the vehicle’s fuse.
Be sure the contact points in the 12-volt receptacle are clean. Do not use metal tools. Use only
2.
insulators, such as wood, if cleaning is needed. The adapter plug should fit firmly in the receptacle.
Carefully unscrew the plug’s 12-volt top section. Remove and check the fuse with the proper
3.
electronic meter. If defective, replace the fuse with a 20 amp/250-volt rated fuse. This fuse is readily
available at your local auto parts or electronics store.
Check your vehicle’s fuse panel to be certain that the fuse controlling the 12-volt receptacle is not worn
4.
or weak. Replace a damaged fuse with a new, properly sized and rated fuse to ensure satisfactory
performance.
Some 12-volt receptacles have a separate circuit breaker located directly behind the cigarette lighter. If
5.
your outlet is not working, this circuit breaker may have blown and could require replacement. Consult
your vehicle owner’s manual.
CUPS
Mounting
bracket
On/off
switch
Water
reservoir
Water
reservoir lid
Glass carafe
Hot plate
Plug with internal fuse
Measuring scoop
Reusable Filter