Max burton, Deluxe induction cooktop #6200 – Aervoe Deluxe Induction Cooktop User Manual
Page 2
NOTE: This equipment has been tested and found to comply with the limits for consumer ISM
equipment, pursuant to Part 18 of the FCC Rules. These limits are designed to provide reasonable
protection against harmful interference. This equipment generates, uses, and can radiate radio
frequency energy and if not installed and used in accordance with the instruction manual, may
cause harmful interference to radio communications.
If this equipment does cause harmful interference to radio or television reception, which can be
determined by turning the equipment off and on, the user is encouraged to try to correct the
interference by one of more of the following measures:
• Reorient or relocate the receiving antenna
• Increase the separation between the equipment and receiver
• Connect to an outlet on a circuit different from the receiver
• Consult the dealer or an experienced radio/TV technician for help.
Section 3 ___________________________________________________
SELECTING THE PROPER COOKWARE
NOTE: Your induction cooktop will not operate without the proper cookware. The following
properties and configurations are essential to provide maximum efficiency for your unit. In
general if a magnet will stick to the bottom of the cookware, the cookware will work on your
induction cooktop.
1. The outside surface must be made of ferrous magnetic materials including cast iron, carbon
steel, and magnetic stainless steel (18/0)
2. Flat bottom surface. An uneven surface will not work.
3. Minimum bottom diameter of 4”; Maximum recommendend diameter of 13”
MAX BURTON
®
DELUXE INDUCTION COOKTOP #6200
Section 1 ___________________________________________________
Important Warnings & Safeguards
Read all instructions thoroughly before operating this unit to avoid injury to self or property
and avoid damage to the unit. Keep instructions handy for reference during use.
Electrical Hazards
• Do Not submerge unit or electrical cord in liquid, touch with wet hands, or use in a wet
outdoor environment
• Do Not use if cooktop is cracked
• Do Not operate if the cord has frayed and wires are exposed
• Do Not let cord hang over the edge of a table or counter
• Never move the unit by pulling on the power cord
Personal Safety
• Do Not touch the hot cooktop surface or cookware. It may remain hot for several
minutes after use.
• Do Not move the unit during cooking or with hot cookware on top
• Do Not place metal objects on the cooktop other than metal cookware or our Max Burton
Induction Interface Disk. Do Not place the cooktop on any metal surface. Metal surfaces
and other metal accessories may become very hot during cooking.
• Do Not heat unopened cans of food. The container could explode.
• Do Not use in or around flammable or explosive environments.
• Administer close supervision when operating around children
• Electric shock hazard. Only qualified experts may perform repair and maintenance work
on the unit. Never attempt to repair yourself.
Product & Property Damage
• Do Not heat any empty containers on the cooktop
• Do Not place objects heavier than 50 pounds on the glass plate
• Do Not block the air inlet or exhaust fan
• Do Not operate on flammable surfaces
• Do Not clean in a dishwasher
• Do Not use the unit for other than its intended use
• Do Not place objects with a magnetic strip near the unit while in operation.
• Use a dedicated 120V, 15 amp electrical outlet that is not shared with other appliances to
avoid overheating or shutdown
• Keep the rear and sides of the unit at least 4” from walls for proper ventilation
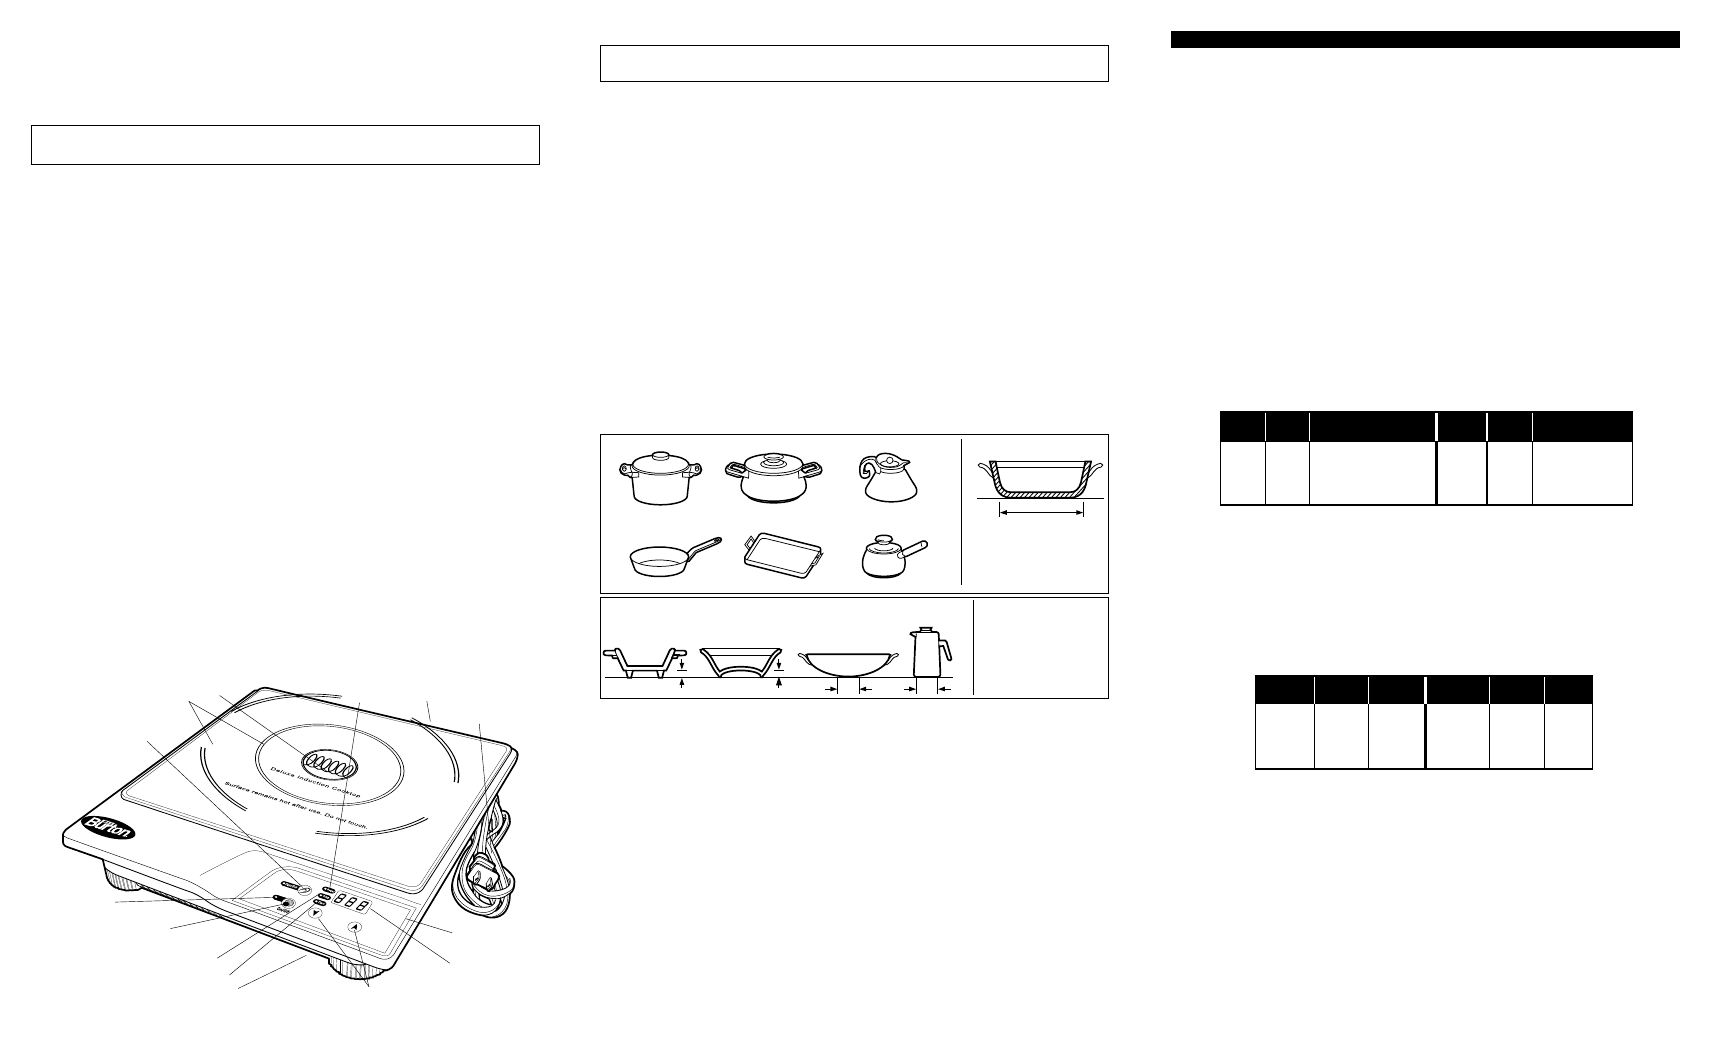
SUITABLE COOKWARE
Cast Iron Pot
Magnetic
Magnetic
Stainless Steel Pot Stainless Steel/Enamel
Iron/Steel Frying Pan
Iron Tray/Grille
Iron Enamelware
Size and Form
Diameter 4” minimum
Cookware should have
a flat surface.
Unsuitable Size and Form
Cookware of which the
height from
induction plate is
over 1.5” and the bottom
diameter is less than 4”.
Material: Glass, Ceramic, Copper, Aluminum, Non Magnetic S/S (18/10, 18/8)
UNSUITABLE COOKWARE
1.5”
1.5”
4”
4”
1
2
3
Warning: Changes or modifications to this unit not expressly approved by the party responsible for
compliance could void the user’s authority to operate the equipment
FCC REQUIREMENTS
Section 2 ___________________________________________________
PARTS IDENTIFICATION
This unit offers two methods of precise and efficient cooking using built-in computer
controls and an automatic timer.
10 Power Modes
10 Temperature Modes from 100° to 450°F (38° to 232°C).
180-minute Timer
POWER MODE OPERATION
The POWER MODE function works independently from the temperature mode function. The power
selected directly relates to the amount of wattage or the BTU/HR equivalent the cooktop uses. As
you increase the power level, the cooking speed is increased, and more wattage is used.
• To select the POWER MODE function, press the FUNCTION button until the Power Mode LED is
illuminated. The default power level setting is 5. Press the up or down buttons to adjust power
level from 1–10.
• In the Power Mode, the temperature of the food being cooked is not regulated; only the power
being used is set. For example, if you want to bring a pot of water to a boil quickly (higher power
level), or a specific cooking temprature is not required, use the power level setting.
• If a specific cooking temperature is required, it is recommended that you use the TEMPERATURE
MODE function.
• To avoid over-cooking or burning food, it is recommended that you start with a low power level
setting and increase to a higher setting if required, until you become familiar with the performance
of the cooktop.
POWER WATTS
COOKING
LEVEL
LEVEL
1
200
Simmer - keep warm
2
500
Simmer - keep warm
3 800 Low
4 1000 Medium-low
5 1200 Medium-low
POWER WATTS
COOKING
LEVEL
LEVEL
6 1300 Medium-high
7 1400 Medium-high
8 1500 High
9 1600 High
10 1800 High
TEMPERATURE MODE OPERATION
The TEMPERATURE MODE function works independently from the power mode function. The
Temperature Mode should be used when a specific cooking temperature is required. Once the
cookware has reached this temperature, the unit self-regulates by turning the internal cooling
fan on and off to maintain the desired cooking temperature.
• To select the TEMPERATURE MODE function, press the FUNCTION button until the Temperature
Mode LED is illuminated.
• The default temperature level setting is 250°F (115°C). Press the up or down buttons to adjust
temperature level from lowest to highest settings. Cooking in the Temperature Mode is recommended
when a desired temperature must be maintained. To keep warm put on setting #1.
TEMP
TEMP
TEMP
SETTING
°F
°C
1
100
38
2
150
66
3
210
99
4
250
124
5
280
137
TEMP TEMP TEMP
SETTING
°F
°C
6
320
160
7
360
182
8
390
199
9
430
221
10
450
232
COOKING WITH INDUCTION INTERFACE DISKS
The Induction Interface Disk (#6010) is an accessory that allows you to use cookware that is not
induction-rated (not ferrous or magnetic metal). It acts as an interface between your non-magnetic
cookware and the induction cooktop to transfer the heat to the non-magnetic cookware. When
cooking in this manner, you can expect efficiency to drop compared to using induction-rated
cookware. The benefit is that you don’t have to replace your current cookware. Item #6010 is sold
separately, and is available on our website at www.aervoe.com.
180-MINUTE AUTOMATIC TIMER
1. To use the automatic timer with either Temperature or Power Mode, press the FUNCTION
button until the TIMER light illuminates red and “0” will appear in the LED DISPLAY.
2. Use the INCREASE and DECREASE buttons to set the time. Time increases or decreases
by 1 minute each time the increase button is pressed. This allows for quick increase of
time and adjustment down if necessary.
3. The time may be adjusted up or down at any time during operation.
4. When the time has expired, the timer will beep and the cooktop will turn off.
CAUTION: The cooking surface will remain hot for several minutes after the pan has been removed.
NOTE: The power will completely shut off and beep within 1 second if either (a) the wrong type of cookware
is applied, or (b) no cookware is placed on the unit (see Selecting the Proper Cookware section left).
Section 4 ___________________________________________________
OPERATING INSTRUCTIONS
If the unit doesn’t operate as intended, please see the Troubleshooting Guide in section 6.
CAUTION: ALWAYS USE A DEDICATED OUTLET. This unit is designed to operate on
110/120V and will require 15 amps. For optimum performance of your unit, use only
one appliance per outlet. NEVER HEAT AN EMPTY PAN. This will immediately cause
overheating to occur, which can damage the cookware and cause the unit to shut off.
Setup
1. Place the unit on a dry, stable and level surface at least 4 inches away from walls to allow
proper ventilation from the COOL AIR INLET and WARM AIR EXHAUST FAN. Never place
on a flammable surface (table cloth or carpet).
2. Plug the POWER CORD into a 120V/15 amp electrical socket. The red POWER INDICATOR
light will illuminate.
3. Before turning the unit on, make sure the ingredients are in the proper cookware, it is on
the GLASS PLATE and centered over the COOKWARE PLACEMENT GUIDES. See Selecting
the Proper Cookware section above.
4. To turn the power on, press the ON/OFF button once. The fan will run and the default power
setting of 5 will appear in the LED DISPLAY.
5. After cooking is completed, press the ON/OFF button to turn off the unit. The LED DISPLAY
will turn off. The fan will continue running until the unit has cooled.
CAUTION: This unit emits an electromagnetic field. Persons with cardiac implanted pacemakers
or other implantable heart devices should consult with their physician before using.
110V ELECTRICAL
CORD AND PLUG
INCREASE & DECREASE BUTTONS
GLASS PLATE
COOKWARE PLACEMENT GUIDE
COOL AIR INLET & FAN
WARM AIR
EXHAUST FAN
CONTROL
PANEL
FUNCTION BUTTON
POWER FUNCTION
INDICATOR
TEMPERATURE FUNCTION INDICATOR
TIMER FUNCTION INDICATOR
ON/OFF
BUTTON
POWER
INDICATOR
LED DISPLAY