Prism 2 setup instructions, Usb-link 2 8 technical guide, Confi guring prism 2 for the usb-link 2 – Auto-Zone Control Systems USB-Link 2 Technical Guide, Installation Instructions for the USB-Link 2 (Version 01E) User Manual
Page 8
USB-Link 2
8
Technical Guide
Prism 2 Setup Instructions
Confi guring Prism 2 for the USB-Link 2
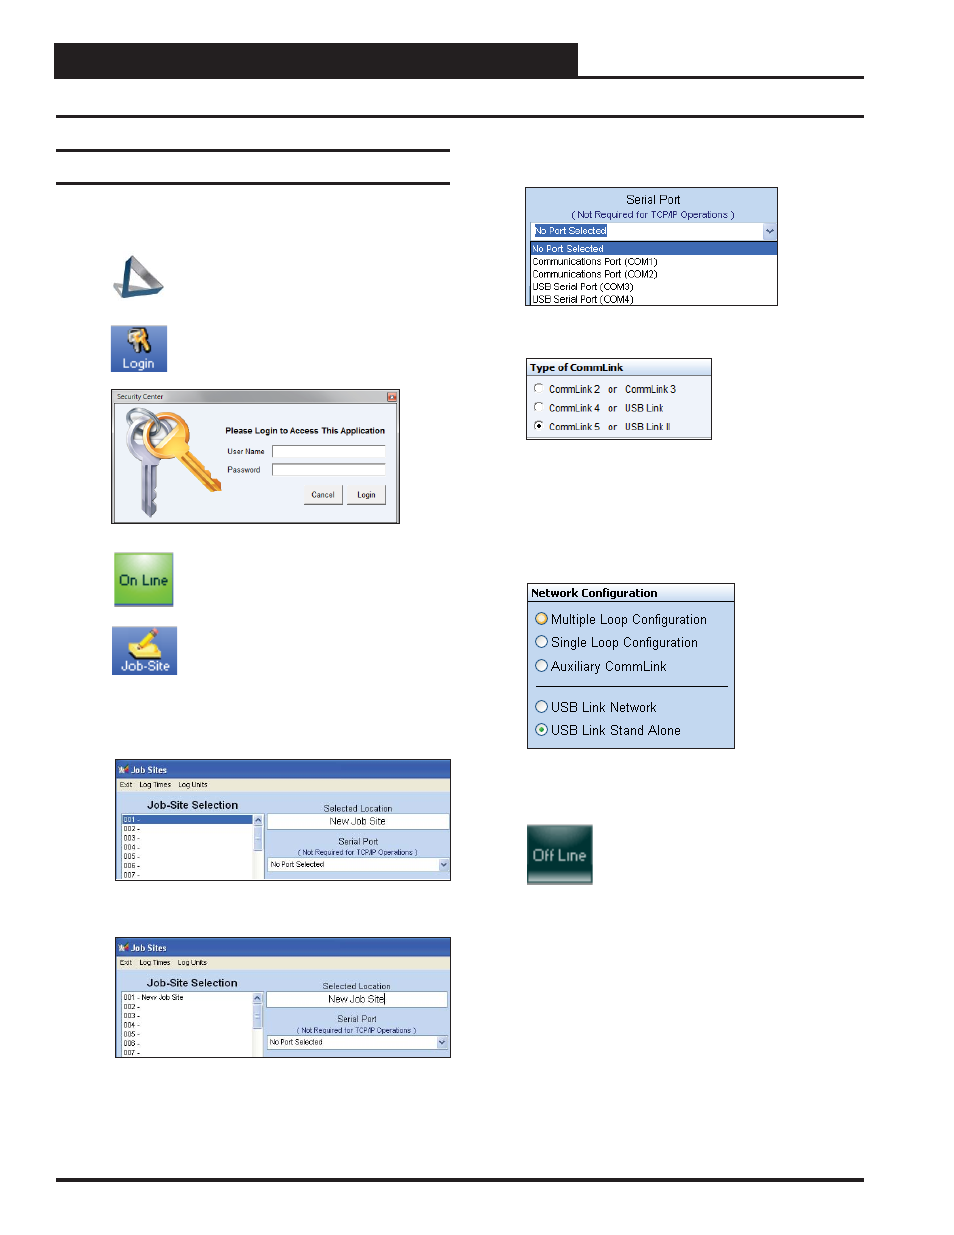
1. Insert your Prism 2 software CD and follow the steps in the
readme.txt fi le to install the software.
2.
The instructions will tell you to create a
Prism 2.exe shortcut on your desktop. Click
on this icon to open your Prism 2 software.
3.
Click the
<Login>
button and type in the level
3 User Name and password (default is “admin,
admin”). Click
<Login>
.
4.
If Prism 2 is online, click the
<ON LINE>
button to make it go
<OFFLINE>
.
5.
Click the
<Job-Site>
button to open the Job
Sites Window.
6. Click on any empty location in the Job-Sites Selection
Window and type in a job name in the Selected
Location fi eld. Press
<Enter>
.
Your job site name will now appear in the Job-Sites
Selection Window.
7. In the Serial Port fi eld, click on the pull down box and
select the COM port number that the USB-Link 2 is using.
8. In the Type of CommLink selection box, select the radio
button next to “CommLink 5 or USB Link II”.
9. In the Network Confi guration selection box, select the
mode for the USB-Link 2 you are using. If using stand
alone mode, select USB Link Stand Alone. If using network
mode, select USB Link Network. The position of the slide
switch on the USB-Link 2 must also be set to the mode you
are using (See Figure 3, page 10 for help in setting this
switch).
10. Click
<Exit>
to close out of the Job Sites Window.
11.
Click the
<OFFLINE>
button to go
<ON LINE>
.
Revised 10/24/14