Besa Lighting Scope (Spotlights 12V) User Manual
Installation guide
INSTALLATION GUIDE
Spotlight Elements using Model QF2 Series Hardware
(For use with Besa low voltage lighting systems only)
QF2, Rev.4 9-10
6695 Taylor Rd. Blacklick, OH 43004
www.besalighting.com
IMPORTANT: READ ALL INSTRUCTIONS BEFORE INSTALLING.
DISCONNECT POWER BEFORE INSTALLING OR RE-LAMPING.
INSTALLING THE QUICK CONNECT:
1. Insert the post of the quick connect into the
quick connect adapter.
2. Thread the top half of the conical section until it
seats with the adapter.
3. Adjust fixture position; use caution not to loosen
the conical section.
Quick Connect
Adapter
Top Conical
Section
Low voltage systems operate at higher amperage,
which requires secure connections. A loose or bad
connection can lead to overheating, so it is advised
to check the connections after the first 1/2 hour of
operation. If the connection is hot to the touch,
remove the spotlight then reinstall securely.
ADJUSTMENT OF THE SPOTLIGHT ANGLE:
1. Using the Allen wrench provided, loosen the side
set screws until the spotlight can move freely.
2. Orient the spotlight to the desired angle,
and then retighten the side set screws.
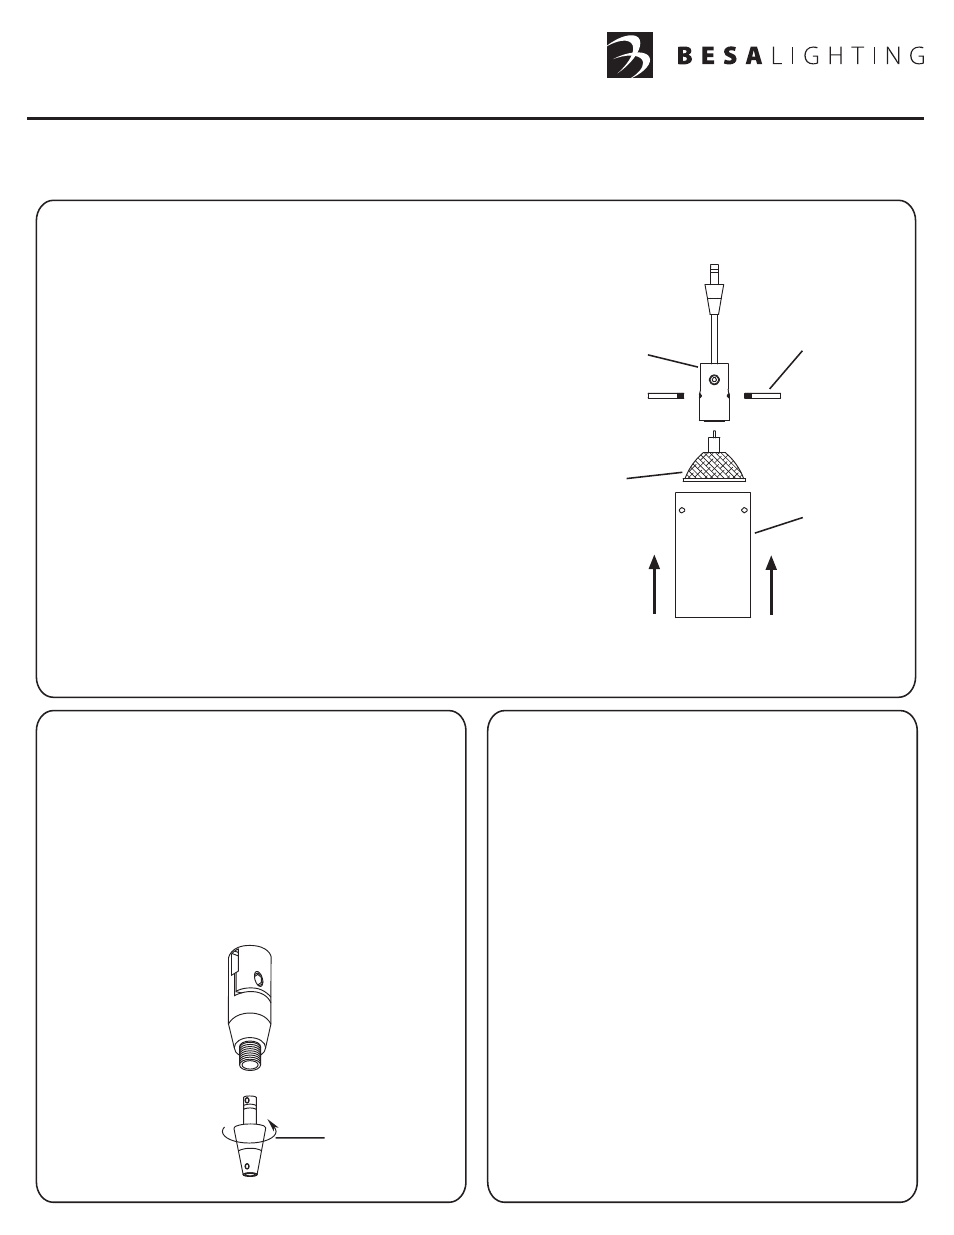
INSTALLING LAMP & SHADE:
QF2
1. Insert the lamp into the socket assembly by aligning the pins
with the socket holes, and gently pushing until the lamp seats.
Use a 12-volt MR16 Shielded (glass covered lamp)
50-watt max.
NOTE:
May be used with a 50W Xenon Bi-Pin lamp.
2. Slide the shade over the lamp and socket assembly
so that the holes in the shade align with the holes in
the socket assembly. Insert thethree (3) threaded
posts into the holes in the shade and thread the
posts into the socket assembly.
Shade
Threaded
Post
Socket
Assembly
MR16
Lamp
NOTE: Fixture shown is for instructional
purposes, stem length may vary.