Pneumatic operated shut off 3/2 valves, 10 filter modules, 9 pneumatic operated shut off 3/2 valves – Bronkhorst FLOW-SMS Series User Manual
Page 15
BRONKHORST HIGH-TECH B.V.
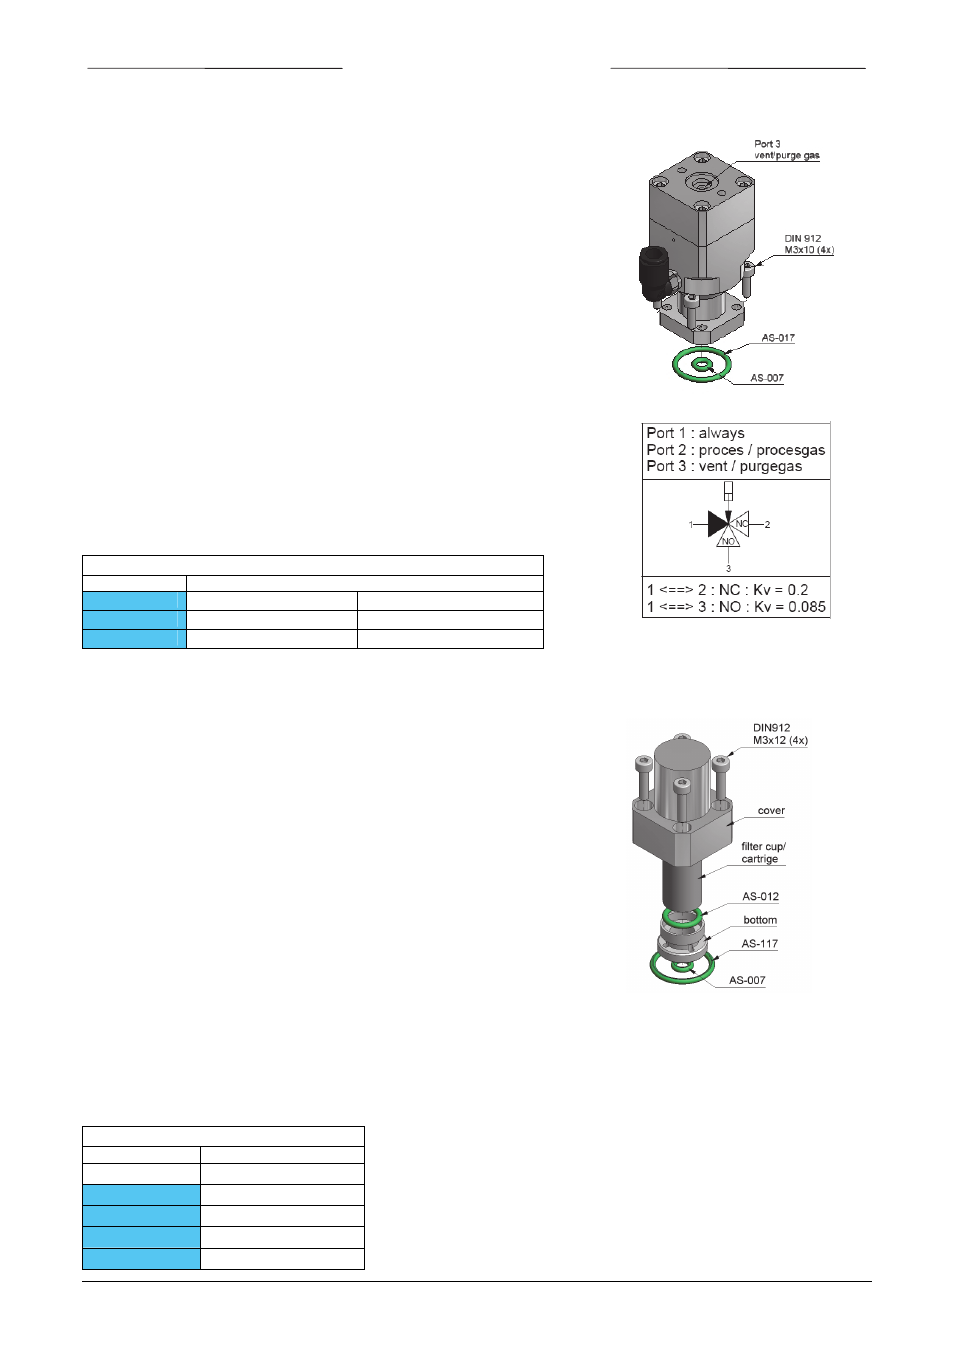
2.13.9 Pneumatic operated shut off 3/2 valves
The actuating pressure has to be supplied with a 3/2 way valve.
When the valve is not actuated the air actuation input has to vent.
Actuation pressure :
Minimal
: 4
bar(g).
Maximal
: 9
bar(g).
-
Removing
Ensure that the system is depressurised before taking the
pneumatic 3/2 valve apart.
Remove the actuating pressure tubing loosen the 4 bolts with
hexagon head counter clockwise to release the valve.
-
Replacing
Replace the gasket AS‐007 and AS‐017, Viton, EPDM
or Kalrez.
All wetted parts have to be absolutely clean, don’t use oil or
grease and avoid dust!
Replace the pneumatic 3/2 valve and tighten the bolts
with hexagon head by turning clockwise, tighten crosswise
with M3 0,9 Nm.
Replace the actuating pressure tubing.
Now the pneumatic 3/2 valve has to be tested for leakage
and function.
9.17.057
page 15
Available Pneumatic operated 3/2 valves
Model number
Description
PV‐32‐V
NC : Kv=0,2 / NO : Kv=0.085
3/2 way Valve with Viton seals
PV‐32‐E
NC : Kv=0,2 / NO : Kv=0.085
3/2 way Valve with EPDM seals
PV‐32‐K
NC : Kv=0,2 / NO : Kv=0.085
3/2 way Valve with Kalrez seals
2.13.10
Filter modules
-
Removal
Ensure that the system is depressurised before taking filter apart.
Remove the filter cup/cartrige assy by loosen the 4 bolts with
hexagon head counter clockwise to release the assy.
For disassembling the filter use a needle nose pliers place it
in the bottom part and turn the part counter clockwise for
release the filter.
-
Replacement
Replace the gaskets AS‐007, AS‐017 and when necessary
AS‐012, Viton, EPDM or Kalrez.
When necessary replace the filter cup/cartridge. These can
be ordered separately, because a dirty filter will cause
extra pressure loss over the system.
All wetted parts have to be absolutely clean, don’t use oil
or grease and avoid dust!
Replace the filter and when necessary the AS‐012 gasket.
Tighten the bottom part hand tight into the cover.
Place the gaskets and tighten the bolts with hexagon head
by turning clockwise, tighten crosswise with M3 0,9 Nm.
Now the filter has to be tested for leakage and function.
Available Filter modules
Model number
Description
Element Pore Size [μm]
FF‐01
0,5
FF‐02
2
FF‐03
7
FF‐04
15