Ò³ãæ 4 – Campomatic DH20M User Manual
Page 4
4
4
5
5
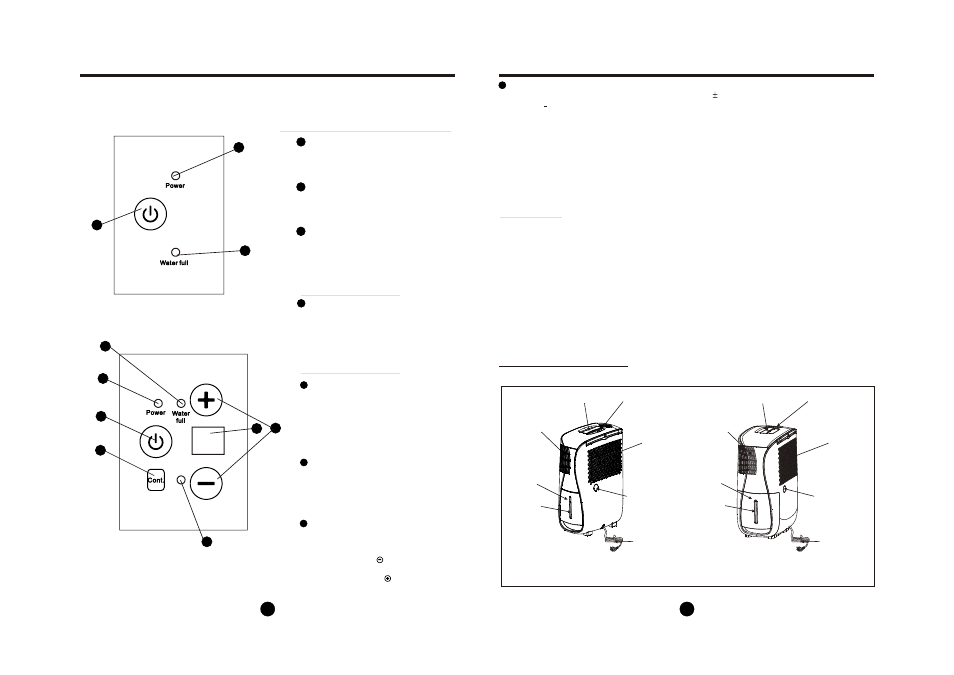
CONTROL PADS ON THE DEHUMIDIFIER
The control panel of the dehumidifier you
purchased may be look like one of the following:
MODEL A
MODEL B
Fig.2
1
1
2
2
Indicator lights(MODEL A and MODEL B)
Power on indicator light(green)
Water full indicator light(red)
4
4
POWER Pad
This indicator light remains on(green)
when the unit is switched on and turns
dark when the unit is switched off.
Glows when the bucket is ready to be
emptied, or when the bucket is removed
or not replaced in the proper position.
Press to turn the unit on and off. When
press this pad, the dehumidifier will
operate continuously for maximum
dehumidification until the bucket is full.
Control pads(MODEL A)
Control pads(MODEL B)
5
5
POWER Pad
Press to turn the dehumidifier on and off. I
t
illuminates(green) when the unit is switched on
and turns dark when the unit is switched off.
When Humidity/Temperature sensor malfunction
occurs, it blinks at 5 times per seconds.
6
6
7
7
Humidity Set Control Pads
The humidity level can be set within a range of
35%RH(Relative Humidity) to 80%RH(Relative
Humidity) in 5% increments.
For drier air, press the pad and set to a lower
percent value(%).
For damper air, press the pad and set a
higher percent value(%).
Continue Pad
Select for the dehumidifier to operate continuously
for maximum dehumidification until the bucket is
full. The Humdity set control pads cannot be used
when Continuous operation is on.Press this pad
again to cancel Continuous operation.
3
3
Continuous operation on indicator light
(green)-only for MODEL B
This indicator light illuminates when the
continuous operation is on.
1
1
4
4
2
2
1
1
2
2
3
3
5
5
6
6
7
7
8
8
IDENTIFICATION OF PARTS
Other features
Bucket Full Light
Glows when the bucket is ready to be emptied, or when
the bucket is removed or not replaced in the proper position.
Auto Shut Off
The water level control switch shuts off the dehumidifier when
the bucket is full, or when the bucket is removed or not replaced
in the proper position. When the setting humidity is reached, the
unit will be shut off automatically.
When frost builds up on the evaporator coils, the compressor will
cycle off and the fan will continue to run until the frost disappears.
Auto Defrost
Identification of parts
Wait 3 minutes before resuming operation
After the unit has stopped, it can not be restarted
opertation in the first 3 minutes. This is to protect the
unit. Operation will automatically start after 3 minutes.
Water bucket
Fig.3
Air outlet grille
8
8
Display
Shows the set % humidity level while setting, then shows the actual(
5% accuracy) room % humidity level.
Error Codes:
E1- Humidity sensor error--Unplug the unit and plug it back in. If error repeats, call for service.
E2- Temperature sensor error-- Unplug the unit and plug it back in. If error repeats, call for service.
Protection Codes:
P1- Unit is defrosting-- Allow the unit time to automatically defrost. The error will clear after the unit self defrosts.
P2- Bucket is full or bucket is not in the right position-- Empty the bucket and replace in the right position.
NOTE: When more than one codes occur, the priority of the code display order is:
P2--E2--E1--P1.
Auto-Restart(on some models)
If the unit breaks off unexpectedly due to the
power cut, it will restart with the previous function
setting automatically when the power resumes.
Water level
window
Control panel
Handel
Air filter
Drain hose outlet
(see page 7)
Power Cord
and plug
Water bucket
Air outlet grille
Water level
window
Control panel
Handel
Air filter
Drain hose outlet
(see page 7)
Power Cord
and plug
MODEL I
MODEL II
NOTE: For MODEL A,when the temperature sensor error occurs the power indicator light will blinks
at 5 times per second.