Cloud Electronics VTX-WM1 User Manual
Vtx-wm1 web monitor card, Installing the card in a vtx series amplifier, Basic configuration and checking operation
VTX-WM1 Quick Installation Guide v1.1
VTX-WM1
Web Monitor Card
Quick Installation Guide
IMPORTANT:
This Quick Installation Guide is intended
to help you install a VTX-WM1 card in one
VTX4000 Series amplifier. It describes the
connections to be made, which jumpers
need to be set and how to confirm that the
card is working correctly using a laptop (or
other) PC.
This guide does NOT cover the
following topics:
• How to connect multiple VTX-WM1s to
a building-wide network
• How to fully configure the cards for a
particular installation
• How to use the Graphical User
Interface and interpret the amplifier
data
For full information on these and other
related topics, please consult the full
VTX-WM1 Installation and User Manual,
which may be downloaded as a PDF
document from A short video giving an overview of the
installation of the VTX-WM1 is also available
on the Cloud website. If fitting a card for the
first time, you may find it helpful to view this
before commencing the installation.
Installing the card in a VTX
Series amplifier
1. With the amplifier disconnected from
AC mains, remove the top panel. Retain
the screws (eleven plus the transformer
bolt).
2. Remove the rear blanking plate. Retain
the screws.
CHANNEL 2
CHANNEL 1
CHANNEL 3
CHANNEL 4
CH3
CH4
CH2
SPEAKER OUTPUTS
0V
C
H1
0V
C
H2
0V
CH3
0V
CH4
ON
OFF
ON
OFF
ON
OFF
BRIDGE
1-2
ON
OFF
BRIDGE
3-4
4 OHMS - MIN
BRIDGE
3-4
BRIDGE
1-2
POWER ~ 40-60Hz
10%
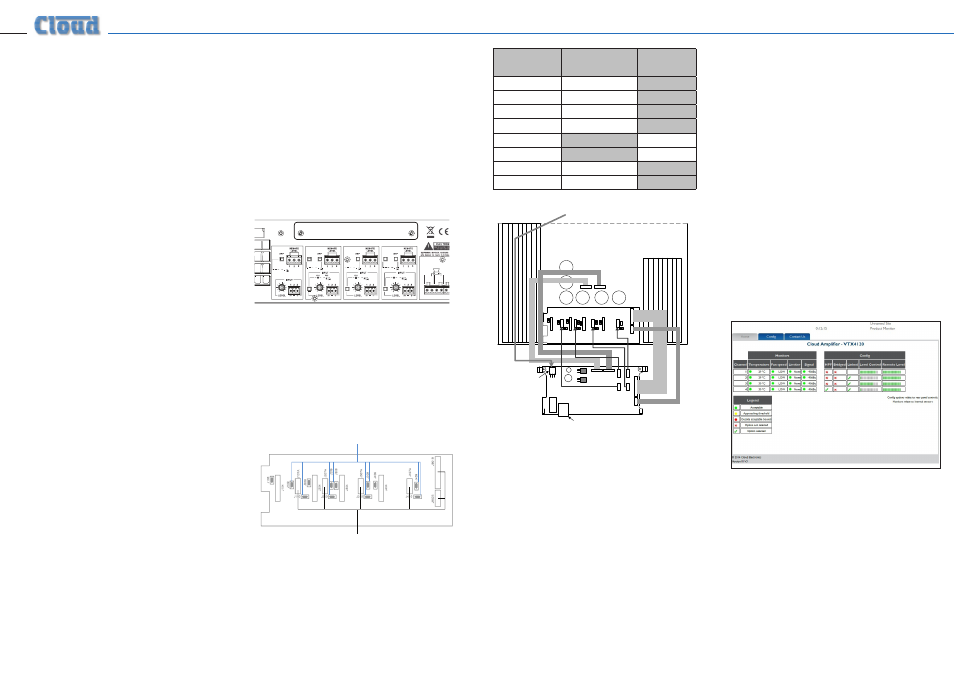
3. On the amplifier’s upper rear PCB
(Remote Vol PCB, PC331012), locate
the jumpers J109, J209, J309, J409, J110,
J210, J310 and J410. All of these (total
8) should be removed. (Refer to pages
12 &13 of the amplifier manual for full
details of amplifier jumper locations.)
Remove these jumpers
VTX-WM1 card connectors
VTX amplifier upper PCB
4. Note the connector idents on the
VTX-WM1 card. Connect each of
the flying leads as shown in the
following table:
VTX-WM1
CARD
UPPER
REAR PCB
LOWER
PCB
J107B
J107A
J207B
J207A
J307B
J307A
J407B
J407A
J805A
J805B
J806A
J806B
J801A
J801B
J802A
J802B
5. The VTX-WM1 card sits with the
two support brackets resting on the
heatsinks, and its RJ-45 connector
protruding through the rear panel slot;
secure the card using the two screws
supplied.
6. Plug the unused yellow-red-yellow cable
from the mains transformer into the
3-pin Molex header on the VTX-WM1.
7. Fix the new rear plate (supplied) over
the card slot using the screws removed
in Step 2. Replace the amplifier top
cover.
Basic configuration and
checking operation
1. Connect the card’s Ethernet port to the
network port on a laptop (or other)
computer using a standard network
cable. Either a “straight” or a “crossed”
cable may be used, as the VTX-WM1
auto-detects the data lines. Turn the
amplifier on. Turn the computer on
and set a static IP address of the form
192.168.0.xxx, where xxx can be any
value between 1 and 254 except 127.
Launch the Internet browser normally
used (e.g., Microsoft Internet Explorer,
Mozilla Firefox, Safari, etc.)
2. Enter the address
192.168.0.127 in
the browser’s URL field, and the screen
shown below should appear:
The amplifier type shown in the
title should be that of the amplifier
in use. This confirms that the data
communications section of the card
is operating correctly. The card’s IP
address can be changed subsequently,
and this procedure is covered in the full
Installation and User Manual.
3. Close the browser application.
Disconnect the amplifier from the
computer and turn it off.
POWER
CONNECTOR