Dexaplan WA 620 User Manual
Page 2
Functioning test
Battery warning
!
!
!
Turn the water alarm on.
Hold sensor [7] in water. The warning signal or the melody sounds until the sensor contacts [6]
have dried.
Make sure that the warning signal/ the melody can be heard well.
Should the appliance peep twice, one shortly after the other, approx. every 2 minutes, then the battery
must be replaced. The battery warning signals for up to 21 days.
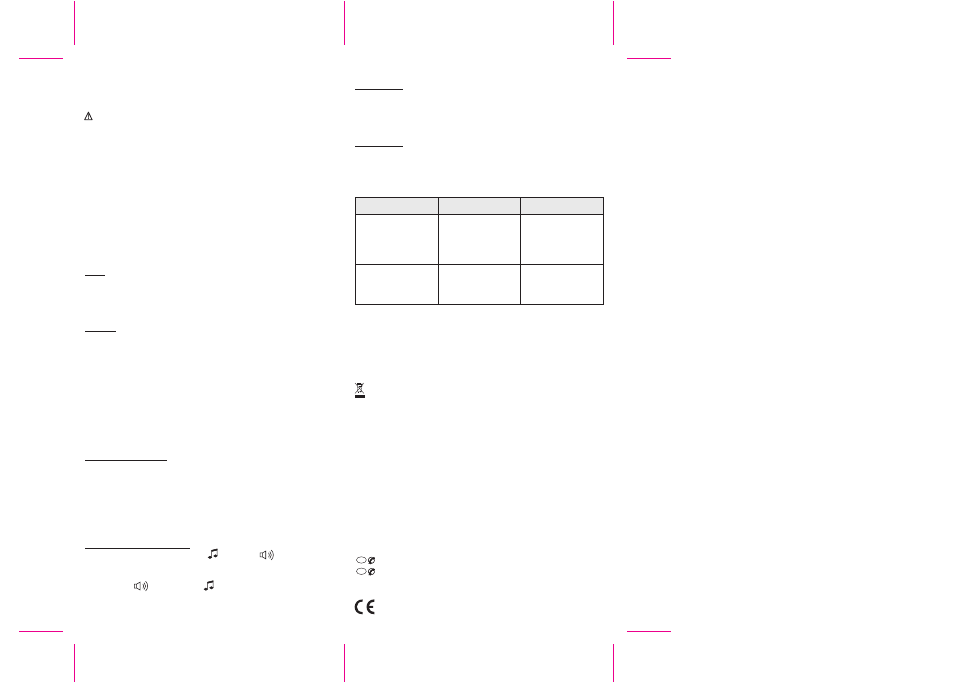
Troubleshooting
Fault
Cause
Remedy
Maintenance and cleaning
Disposal
Warranty
Service
!
!
Regularly check the technical safety and function.
Use a soft, dry cloth to clean the surfaces of the appliance.
Do not dispose of packaging material, used batteries or products as household waste. Please use
your recycling system. Details are available from your local authority.
This device is supplied with a warranty of 3 years from the date of purchase. Please retain your receipt
as proof of purchase. If you have any claim under the warranty, please contact the service office for your
country. This is the only way to ensure that your device can be sent in free of charge. This warranty is
only valid for the first purchaser and is not transferable. The warranty furthermore covers material or
manufacturing defects only. It does not apply to worn parts or damage to fragile parts, e.g. switches or
batteries. The product is solely intended for private use and not for commercial use. In the event of
incorrect and/or improper handling, the use of force or any work on the device that is not performed by
the service office, the warranty shall expire. This warranty does not restrict your statutory rights.
Information on dealing with problems can be found on the Internet at www.dexaplan.com. If you have
any queries please contact our service office by e-mail ([email protected]) or by telephone.
: 0870 - 241 3029, Monday - Friday 8.30 - 17.00
: 1890 851 851, Monday - Friday 8.30 - 17.00
Here you will receive all necessary information on service questions such as returns, etc.
Dexaplan GmbH, Paul-Böhringer-Str. 3, D - 74229 Oedheim; 05/10/2007
Ident.-Nr.: 05-10-2007-WA 620-GB-L126
The appliance gives no
warning signal and no melody
even when the sensor contacts
come into contact with water
The sound level is weak or the
appliance bleeps approx. every
2 minutes
- There is no battery connected
- The battery has run down
- The sensor contacts are dirty
The battery has run down
- Connect a battery
- Insert a new battery
- Clean the sensor contacts
Insert a new battery
GB
!
!
!
!
Leaking or damaged batteries can cause burning upon contact with the skin. Where this is the case
use suitable protective gloves.
Avoid the alarm unit coming into contact with moisture.
Remove the battery when the appliance is not used for a long time.
Place the water alarm close to a position which you would like to monitor or which is at risk of
water escaping e.g. cellar, bathroom, laundry room, kitchen.
Place the sensor at the desired monitoring position. Whilst doing so make sure that the length of
the connecting cable reaches the position where the alarm unit will be mounted. The height of the
sensor contacts determines the water level at which an acoustic alarm is triggered.
Place the alarm unit above the monitoring position so that it is not in an area endangered by water.
alarm
Attention!
!
!
!
Power the appliance using a 9 V block battery only!
Positioning
Mounting
Operation
Sensor
Alarm unit
Inserting/replacing battery
Turning the water alarm on and off
!
#
#
#
!
#
!
!
!
!
!
!
!
!
!
!
!
Position the sensor [7] at the desired position either by
laying the sensor on the surface with the sucker facing upwards
or firmly pushing the sucker [9] onto the surface. The surface here must be smooth and clean
otherwise the sucker will only adhere for a short time.
Positioning without fixing
Stand the alarm unit [1] in the desired position or lay it down with the loud speaker [2] facing
upwards.
Wall mounting
At the mounting position drill two drill holes vertically aligned, 44 mm apart.
If necessary push the plugs supplied into the drill holes.
Fasten the screws supplied into the drill holes so that the screw heads project approx. 4 mm
from the surface.
Hang the
unit with the attachment holes [8] onto the screw heads.
Open the battery compartment [11] by sliding down the battery compartment cover [4] (see diag.
C).
If applicable, lift the empty battery from the battery compartment and remove it from the battery
connector [10].
Connect an appropriate new battery, respecting polarity, with the battery connector.
Put the connected battery into the battery compartment.
Close the battery compartment cover.
To activate the water alarm set switch [3] to
(melody) or
(warning signal). After
approx. 4 seconds the alarm unit emits a short signal tone. The water alarm is now activated. When
both sensor contacts [6] come into contact with water the alarm unit triggers either a warning
signal (setting
) or a melody (setting
). The warning signal or the melody stops when
the sensor contacts are no longer in contact with water or when the water alarm is deactivated.
To deactivate the water alarm set switch [3] to “ “.
0
IR