ETA 251.265 User Manual
De f
60
20
40
30
20
10
3
6
9
AL
Am
I II III
3
1
2
1
2
2
60
20
40
30
20
10
3
6
9
OF
20
I II III
60
20
40
30
20
10
3
6
9
OF
20
I II III
60
20
40
30
20
10
3
6
9
21
D
C
B
A
I II III
2
60
20
40
30
20
10
3
6
9
07
30
I II III
60
20
40
30
20
10
3
6
9
ON
20
D
I II III
60
20
40
30
20
10
3
6
9
AL
d
I II III
A
3
2
1
60
20
40
30
20
10
3
6
9
14
57
I II III
B
C
60
20
40
30
20
10
3
6
9
58
D
C
B
A
I II III
20
1
2
4
D
E
F
3
4
G
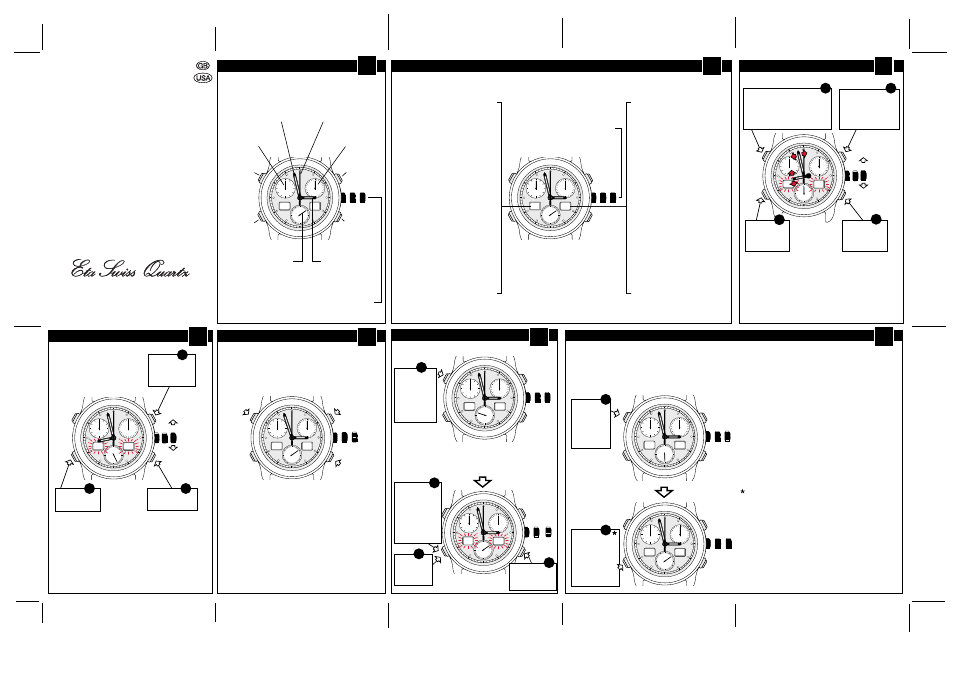
CHRONOGRAPH
WITH ALARM
ETA Cal. 251.265
Minute
hand
Pushbutton B
Pushbutton A
Pushbutton C
Pushbutton D
30 minutes
counter
12 hours
counter
Second
hand
Hour
hand
Setting crown
(position
I,II,III)
60 seconds
counter
Right indicator
1. Crown position I
Display of date d
Display AM/PM/24H of alarm
Display of alarm minutes
Display of 1/100 seconds in
chrono mode
2. Crown position II
Display AM/PM/24H of time
Display of minutes of digital
time
3. Crown position III
Display of AM/PM/24H mode
Flashing of minutes of
digital time
Flashing of day d
Left indicator
1. Crown position I
Display of alarm On/Of
Display of alarm function AL
Display of alarm hours
Display of chrono mode CH
Display of chrono functions:
- ADD function: display Ad
- SPLIT function: display SL
- LAP function: display LP
2. Crown position II
Time TI
Display of hours of digital time
according to the change of the
time zone
3. Crown position III
Time TI
Flashing of hours of digital time
Flashing of month M
In case of a leap year, February 28 will be followed
by March 1.
Set
February 29 by hand:
- Put the setting crown in intermediate position (
II)
(time zone correction).
- Turn the hour hand twice anti-clockwise
(2 full turns).
- Put back the setting crown in position
I.
Correction
of month
Correction
of digital
minutes
Set the hand
of the 60
seconds
counter
to zero
Set the hand
of the 30
minutes
counter
to zero
Set the hand
of the 12
hours
counter
to zero
NOTE:
Quick pressure on pushbutton:
put forward the hand step by step.
Long pressure (>1 sec.) on pushbutton:
quickly put forward the hand.
NOTE:
The display of the ALARM function in the left aperture (AL)
is automatically followed by the display of the alarm hours
(left LCD aperture) and of the alarm minutes (right LCD
aperture).
Selection of
ALARM
function
(f.ex. AL Am)
Press
< 1 sec.
Activate the
flashing of
hours and
minutes of the
alarm for
correction.
Press <1sec.
Correction
of alarm
hours
Setting crown in position II
Set the alarm (cont.)
Digital watch indicators
NOTE:
Once the hours and minutes of the alarm are set,
activate or deactivate the alarm as follows:
Return to
alarm/date
mode
Press
< 1 sec.
2
Selection of
activated or
deactivated
alarm,
display ON/OF
Press >1 sec.
If the alarm is active (On), a beep will confirm this
function.
You can also check the alarm-bell by pressing
pushbutton D for longer than 1 sec.
(demo alarm mode).
NOTE:
When setting the alarm, make sure that the analog
time (hands) corresponds to the digital time
(right / left apertures).
If it does not, please see paragraph
"Setting the time".
Setting crown in position III
Setting crown in position III
Watch hands
DISPLAY
Correction
of date
Selection of
MONTH/DATE
mode
Set the alarm, setting crown in position I
DISPLAY
SETTING THE TIME
Digital display of
hours/minutes
(f.ex. 20h 58)
Press < 1 sec.
Choose display of hours
AM/PM (f.ex. 11h-12h-1h...) or
24H (f.ex. 11h-12h-13h...).
Press < 1 sec.
Correction
of digital
hours
Setting crown
in position
III
STOP-
SECOND
Correction
of hour
and minute
hand
CORRECTION OF MONTH / DATE
Setting crown
in position
III
STOP-
SECOND
SETTING THE COUNTERS TO ZERO
ALARM
Correction
of alarm
minutes
ALARM
Setting crown
(position
I,II,III)
NOTE:
- Make sure that the analog time always corresponds to
the digital time.
- In order to perfectly synchronize analog and digital
time, stop the second (by pulling the setting crown
in position
III) just when the second hand reaches 60".
PUSHBUTTONS:
- Quick correction by pressing > 1 sec.
317 249 - 11.08.2004 / ETA / 01