Manifold mounting screw and secured with the extra – Fire Magic 3199-60 Electrode Kit Install User Manual
Page 2
2
FIRE MAGIC ELECTRODE REPLACEMENT KIT
FOR REGAL DROP-IN MAIN BARBECUE BURNERS
1. Remove the valve knobs from the top (control)
panel.
2. The panel is secured to the barbecue frame by
four spring clips. With the oven open, lift up firmly
from the inside front left and front right corners of
the panel frame.
3. After the front spring clips release, carefully
remove the panel from the unit.
CAUTION: The spark generator is attached to the
control panel. Carefully unplug the wires from the
spark generator before lifting the panel clear away
from the unit.
4. Remove the screw and nut securing the old
electrode kit to the barbecue liner and remove the
old kit.
Note: The new electrode wire will be easier to
install if the following procedure is followed:
a. Tie one end of the enclosed string to the end
of the old electrode wire that plugged into the
spark generator.
b. Pull the wire, with the string attached, into the
barbecue firebox.
c. Cut the string off the old wire and tie it to the
new electrode wire. Pull the string and plug
end of the new wire from the firebox into the
area below the control panel.
ROBERT H. PETERSON CO. • 14724 East Proctor Avenue • City of Industry, CA 91746
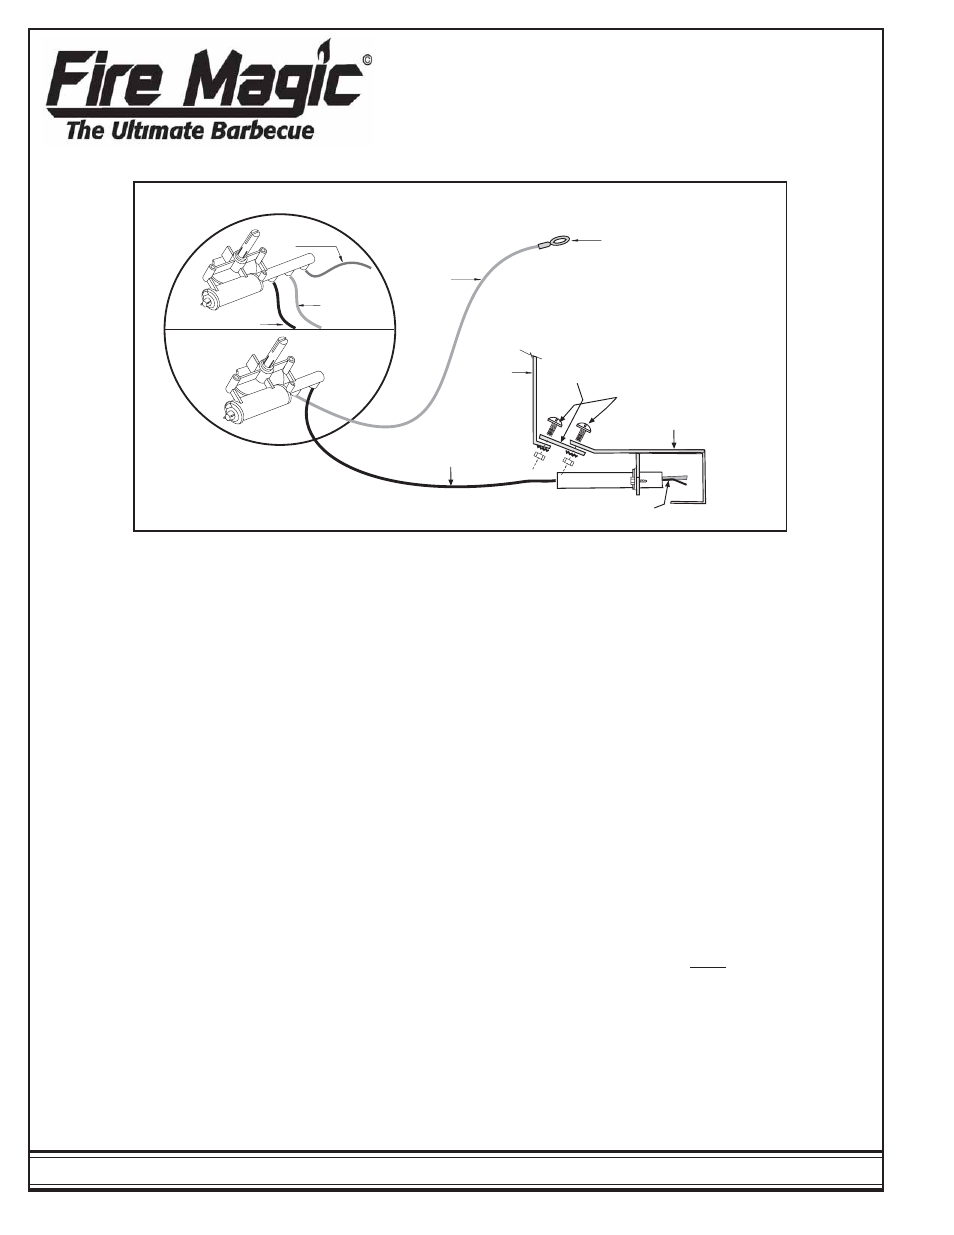
5. Attach the new electrode collector box assembly
to the barbecue liner with the screws and nuts
provided as shown in Figure 1.
Note: A mounting bracket is needed to fasten the
new collector box to the barbecue liner.
6. If the mounting bracket is not attached to the
barbecue liner as illustrated in Figure 1, bend the
old electrode out of the way and remove the
adjusting screw from the mounting bracket at the
top of the old collector box assembly. Attach the
new collector box and electrode to the old mounting
bracket with the adjusting screw (Figure 1).
7. A replacement ground wire is provided with a ring
which can be placed over the front
1
/
4
” manifold
mounting screw and secured with the extra
1
/
4
” nut
provided.
8. Plug the wires into the spark generator.
IMPORTANT: If your unit has a 3 plug spark
generator, the ground wire must be plugged into the
middle position. For 2 plug spark generators, the
wires can be plugged into any position.
9. Replace the control panel, pressing down firmly to
snap over the spring clips. Align the control panel
and replace the valve knobs.
Note: This kit may include a part or parts not needed for every installation.
ELECTRODE
WIRE
MOUNTING
BRACKET
COLLECTOR
BOX
MOUNTING
SCREWS
CONNECTS TO BBQ FRAME
OR SIDE WALL OF LINER
ELECTRODE
GROUND
WIRE
3 Plug
2 Plug
BBQ
ELECTRODE
WIRE
GROUND
WIRE
BACKBURNER
ELECTRODE
WIRE
To Spark Generator
BBQ LINER
Figure 1