Performance active wedge – Fusion CP-AW1122 User Manual
Page 2
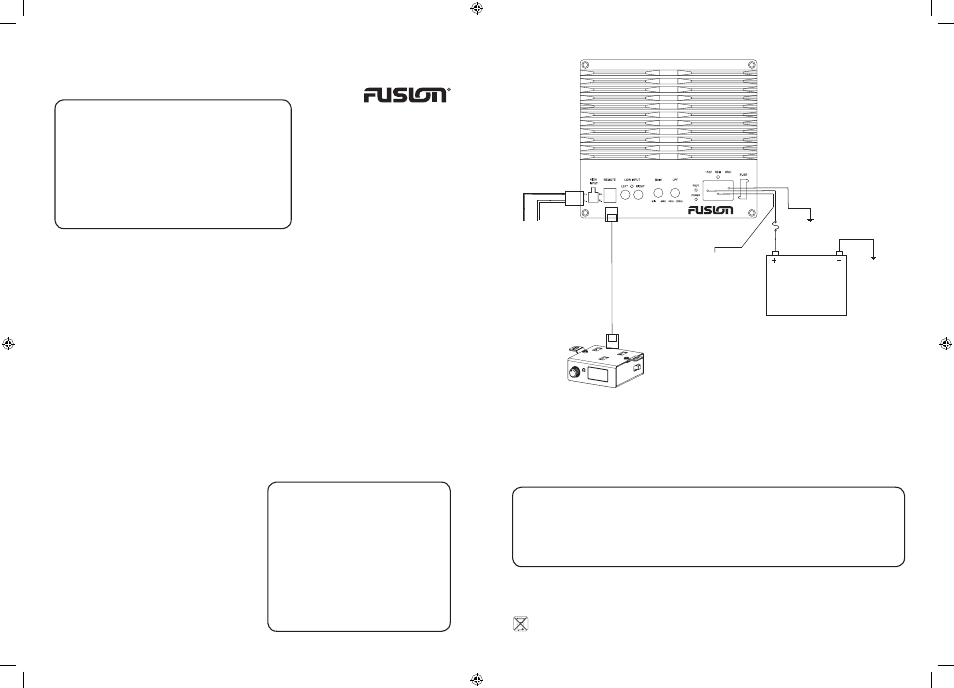
Note 1
Take care to make sure the wires are
spliced in the correct phase. Positive
to positive, negative to negative.
Failure to do this correctly could
result in loss of bass.
See Note 1
Splice into source
unit’s speaker wires
(R+) Grey/White
(R- ) Grey
(L+) Green/White
(L-) Green
Connect the remote bass level controller
lead to the amplifier and connect the
power cable to a 12V source
Connect red wire
to positive (+12V)
battery terminal
Connect blue wire to source unit’s
accessory lead or switched 12 volt
source (REM)
Connect black wire
to chassis ground
of vehicle (Ground)
Speaker Level
Input Plug
VBass Remote Bass Level Controller
Vehicle Battery
PERFORMANCE ACTIVE WEDGE
SPECIFICATIONS
CP-AW1122
Power (Watts)
1500
Rated Power (Watts)
300
Frequency Response
32Hz - 250Hz
Low Pass Filter (Variable)
40Hz - 250Hz
Tuning
Bass Reflex
Woofer Size
12”
Fuse
25A
Dimensions (mm)
567(l) x 415(w) x 389(h)
22-5/16 x 16-11/32 x 15-11/32”
CP-AW1122
CONTROL DESCRIPTIONS
LEVEL
This allows the adjustment of the amplifier level of
the subwoofer. Turn clockwise to increase the level.
If the sound becomes distorted reduce the level.
LOW PASS FILTER (LPF)
This allows the adjustment of the highest
frequency the Active Wedge will produce. This
should be adjusted to blend with your main
speakers. Typically, this will be set to around
100Hz (approximately the central position of the
control knob).
V BASS REMOTE CONTROLLER
This control can be mounted in the front of the
vehicle to give you control of your Subwoofer’s
output level. It features a Voltage Display giving
you an indication of your vehicle’s overall voltage*
to ensure you do not run your battery down too
low when you are using the subwoofer — especially
when the vehicle is not running. The V BASS
control is fitted with a 12V accessory plug for quick
installation, The preferred installation option is to
cut the cigarette lighter plug off and connect the
12V wire to ACCESSORIES — either the fuse box
or your head unit’s accessories power supply.
Connect the red wire to +12V & black wire to
vehicle ground. Note the Bass control function will
still operate even if the 12V connection is not made
on the V BASS controller.
The V BASS controller is also fitted with a red LED
light which will illuminate at 11V battery power or
below to indicate that your battery is running low and
DISCLAIMER
Always ensure the Active Wedge is securely attached, to avoid movement. FUSION accepts no responsibility for
damage or injury in relation to inappropriate securing of this product.
WIRING
• Connect the ground wire to the vehicle
first (clean dirt and paint to bare metal).
• Connect the remote on (blue wire).
• Connect the RCA cables if applicable, OR
• Connect the speaker level wire by splicing
into the headunits
speaker wires. See Note 1.
• Connect the remote level controller with
the supplied lead.
• Connect the 12 volt (red wire) to the
positive battery terminal.
• Check all connections.
PUBLISHED BY FUSION ELECTRONICS LIMITED: © Copyright 2012 by FUSION Electronics Limited. All rights reserved. Specifications and design are subject to change without notice.
YOU CAN HELP PROTECT THE ENVIRONMENT! Please remember to respect the local regulations: Hand in the non-working electrical equipment to an appropriate waste disposal center.
WARNING: Audio Systems can produce sound levels over 135dB. Continuous exposure to sound pressure levels over 100dB may cause
permanent hearing loss! Please watch for emergency vehicles as warning signals may not be heard. USE COMMON SENSE!
For further product and installation information, please visit www.fusionelectronics.com
Pour plus d’informations sur les produits et l’installation, rendez-vous sur www.fusionelectronics.com
Para obtener más información acerca de los productos y de su instalación, visite el sitio web www.fusionelectronics.com
Bezoek www.fusionelectronics.com voor meer product- en installatie-informatie.
Weitere Produkt- und Installationsinformationen finden Sie unter www.fusionelectronics.com
Per ulteriori informazioni sui prodotti e la loro installazione, potete visitare www.fusionelectronics.com
Для получения дополнительной информации о продуктах и установке зайдите, пожалуйста, на: www.fusionelectronics.com
REGISTER YOUR PRODUCT ONLINE:
For your own peace of mind, register your product purchase online at www.fusionelectronics.com
We’ll keep you up to date with any news related to your product, and any new accessories to help you get
the most from your product.
This product is backed by a 1 Year Limited Consumer Warranty and by registering your product you can be
assured that if the unexpected occurs we’ll have your details and be ready to help.
you should start the vehicle to ensure the battery has
enough charge. The controller also has a “DISPLAY
ON/OFF” switch on the side if you wish to turn the
voltage display off. Note also that the red “LOW
BATT” LED will still operate even if the display is
turned off — as long as the V BASS is connected to
either the 12V Accessory outlet, or if it is directly
wired to the fuse box or accessory power supply.
INSTALLATION
Make sure the Active Wedge is firmly fixed in your
vehicle. Check before drilling or cutting holes. DO
NOT work near gas tanks, fuel lines, hydraulic
lines or electrical wiring.
DO NOT mount the Active Wedge in such a way as
to pinch or damage the wires.
Make sure everything is firmly connected, before
attaching the +12V wire. Ensure the +12V wire is
fused as close as possible to the battery. Always
use a fuse with the recommended rating.
*Voltage is a car “system” voltage rather than the voltage at the amplifier as we want to make sure you can enjoy your tunes and still start your vehicle!