Wiring – Fusion MS-AM702 User Manual
Page 3
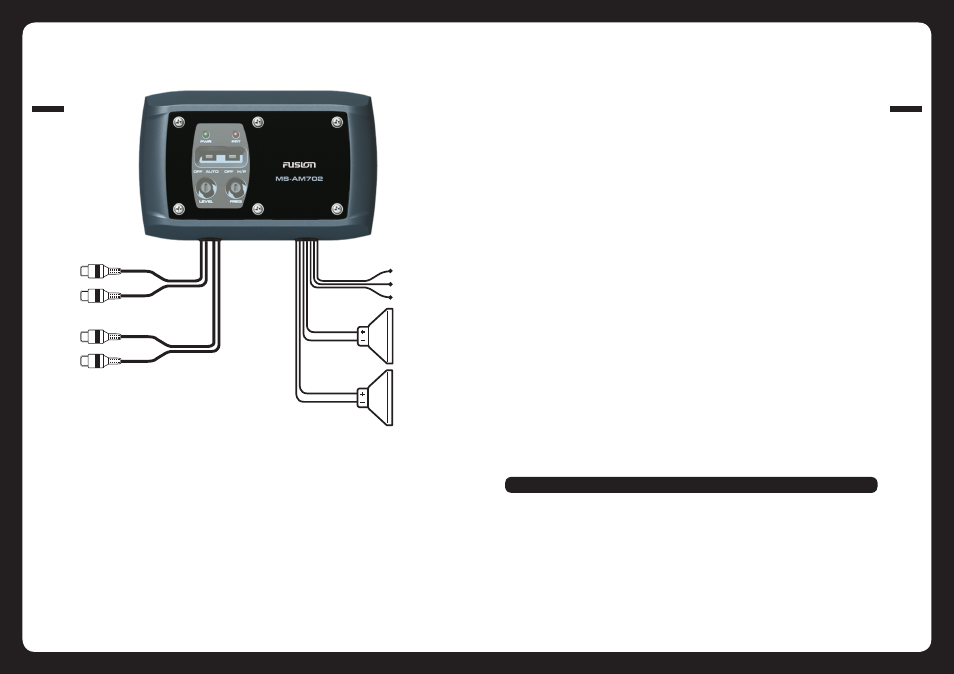
WIRING
Ensure before any connection is made to the amplifier or source unit, that you turn the audio system off. Failure to
do so could result in either the stock system or your new FUSION product being damaged.
FUSION will not warranty damaged amplifiers due to incorrect installation.
Ground
When grounding your FUSION Amplifier locate a metal area close to the amplifier that is a good source of ground.
Use either a wire brush or sandpaper to eliminate unwanted paint, rust and corrosion. This will allow a better
contact for your ground. Use the same gauge cable for the ground as you did for the power. Secure the ground
cable using a solid connection. Spread silicon over the screw and bare metal to prevent corrosion.
NOTE: Each Channel 2 Ohms Stable
ie. 2 x 4 Ohm Speakers can be run in parallel off each channel
Channels cannot be bridged
Power
FUSION amplifiers should be wired directly to the vessels battery using the appropriate sized cable. Start at the
vessels battery and run the power cable through to the amplifier. FUSION recommends the use of grommets when
passing the power cable through any metal / fibre glass walls, and to avoid sharp corners that may easily cut
through the insulation on the cable.
The use of an inline fuse at the battery position is essential. This will prevent the risk of a potential fire caused by
a short circuit in your power cable. Connect the fuse holder as close to the battery positive terminal as possible.
You may now connect the cable to the battery, but remember to leave the fuse out or circuit breaker off until all
other cable connections are made.
Avoid running the power cable over engine components.
Remote Turn On
This wire must be connected to a switched +12V source, if the “Auto On/Off ” switch is located in the Off position.
Typically, remote turn-on leads are provided at the headunit which will turn the amplifier on/off in correspondence
with the source. If the head unit does not have a remote turn-on lead then a switched +12V supply can be used,
like the ACC +12V or alternatively turn the “Auto On/Off ” switch to the ON position.
Auto ON/Off
The Auto On/Off switch allows an easy solution if a REMOTE wire cannot be used. When “ON” is selected the
amplifier will turn on when an audio signal is detected from the source, when no signal is present the amplifier will
automatically shut down after 1 minute. When Off position is selected a Remote Switched +12V supply must be
used as described above.
Speaker Wiring
Choose the correct speaker wire for your application. Most applications will require a minimum of 16 gauge. Route
the speaker wire using the same precautions you did when you ran the power cables. Terminate these wires at
the speaker end using insulated speaker terminals (not supplied) or by soldering the connection. Make sure the
speaker connections are positive to positive and negative to negative. Ensure you have maintained the correct
polarity and balance.
Speaker Load
The Marine Zone amplifier requires a minimum impedance of 2 Ohms STEREO (per channel) to operate trouble free.
WARNING: The Amplifier CANNOT operate MONO!!!!! (bridged) This will result in damage to the amplifier
Low Level Inputs
Choose the correct length and style of RCA interconnects for your needs.
Avoid running your RCA’s near large wire looms and electric fans if possible. Be sure to check for correct balance.
(Red is right channel and Black or White is left channel).
Low Level Outputs
Use these RCA output connectors to connect to a secondary amplifier.
004
WIRING
005
WIRING
AUX IN
YELLOW - Battery 12V DC (B+)
GREY
BLACK
WHITE
WHITE/BLACK
GREY
GREY/BLACK
BLACK - Negative Ground (B-)
LEFT SPEAKER
RIGHT SPEAKER
BLUE - Remote Turn On
AUX OUT