Introduction, Introduction / installation – Hansol 930D User Manual
Page 3
Introduction
User’s Manual
6
Safety information
Provided with this monitor is a detachable power supply cord with IEC320 style terminations.
It may be suitable for connection to any UL listed personal computer with similar
configuration. Before making the connection ensure that the voltage rating of the computer
convenience outlet is the same as the monitor and that the ampere rating of the computer
convenience outlet is equal to or exceeds the monitor current rating.
For 120Volt applications use only UL listed detachable power cord with NEMA configuration
5-15P type(parallel blades) plug cap.
For 240Volt applications use only UL listed detachable power cord with NEMA configuration
6-15P type(tandem blades) plug cap.
Use only a power source and connection appropriate for the monitor as indicated on the
marking label.
Slots and openings in the cabinet are provided for ventilation;
these openings must not be blocked or covered. Never push objects of any kind into cabinet
slots or other openings.
Never insert anything metallic into the monitor openings.
Doing so may create a danger of electric shock.
To avoid electric shock, never touch the inside of the monitor.
Only a qualified technician should open the monitor s case.
Unplug the monitor from the wall outlet before cleaning. Do not use liquid cleaners or aerosol
cleaners. Use a damp, lint-free cloth for cleaning.
Install the monitor near an outlet that you can reach easily. Disconnect the product by
grasping the plug firmly and pulling in from the outlet.
Never disconnect it by pulling the cord.
Introduction / Installation
User’s Manual
7
ENGLISH
Power management system
This monitor meets VESA(Video Electronics Standards Association) DPMS(Display Power
Management Signalling)standards. In order for the monitor s power saving feature to function,
the video board or computer must also meet VESA
®
DPMS
TM
standards.
Power management table
Note :
The monitor automatically goes through the DPMS steps when it is idle.
To release the monitor from the DPMS condition, press any key on the keyboard.
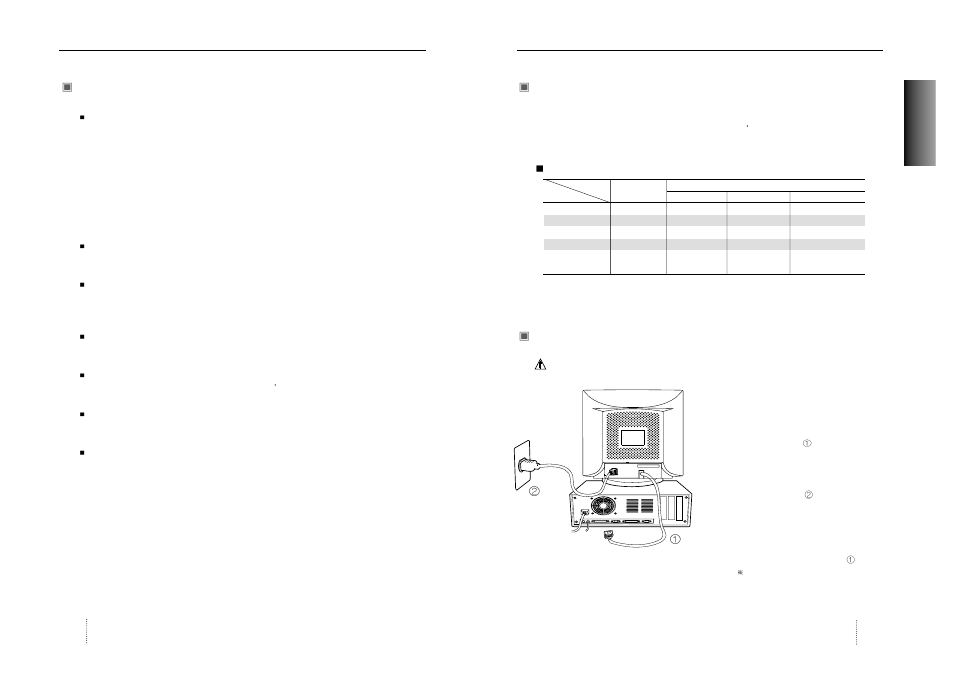
Connection to your computer
CAUTION
Ensure that both the PC and the display monitor are switched off.
To attach the monitor to your system, as shown in
the following illustrations.
1. Connect the signal cable
to the 15pin
graphics connector of the system and tighten
the fastening screws.
2. Insert the AC power cord
into monitor and
then into an AC power outlet.
3. To turn on the monitor, push the power switch.
Note :
To attach the monitor to the Macintosh system, please contact the signal cable
to the
2layer 15pin graphics connector of the system. (
The connecting direction of signal
cable is opposite to the IBM compatible system)
Normal
Operation
Standby
Suspend Mode
Power-Off Mode
Horizontal
Active
Inactive
Active
Inactive
Vertical
Active
Active
Inactive
Inactive
Video
Active
Blanked
Blanked
Blanked
LED Color
Green
Green/AMBER
AMBER
AMBER Blinking
Power
110W
Less than
Less than
Less than
Consumption
80% of MAX
15W
5W
Power saving function mode
State
Sync