Harken 7580 RigTune Pro User Manual
Rigtune pro, Digital rig tension meter, Turn on
Turn on
•
Mise sous tension
•
Einschalten
•
Accensione
•
Para encender
1
Press “on” button for approximately
1 second.
Appuyer sur MARCHE pendant 1 seconde environ.
Taste „ON“ (EIN) ca. 1 Sekunde lang drücken.
Premere il tasto “on” per circa 1 secondo.
Pulse el botón de encendido [ON] aproximadamente
1 segundo.
Set to zero
•
Mise à zéro
•
Auf Null stellen
•
Azzeramento
•
Para colocarlo en cero
2
Press “on” button for 3 seconds.
Appuyer sur MARCHE pendant 3 secondes environ.
Taste „ON“ (EIN) 3 Sekunden lang drücken.
Premere il tasto “on” per 3 secondi.
Pulse el botón de encendido [ON] aproximadamente
3 segundos.
TM
Digital Rig Tension Meter
• Tensiomètre de gréement numérique • Digital Riggspannungsmessgerät
• Misuratore digitale di tensione sartie e strallo • Medidor digital de tensión de jarcias
MY SETTINGS
MES RÉGLAGES
MEINE EINSTELLUNGEN
LE MIE IMPOSTAZIONI
MI CONFIGURACIÓN
_________________
_________________
_________________
_________________
_________________
_________________
kg
.4535
= lb
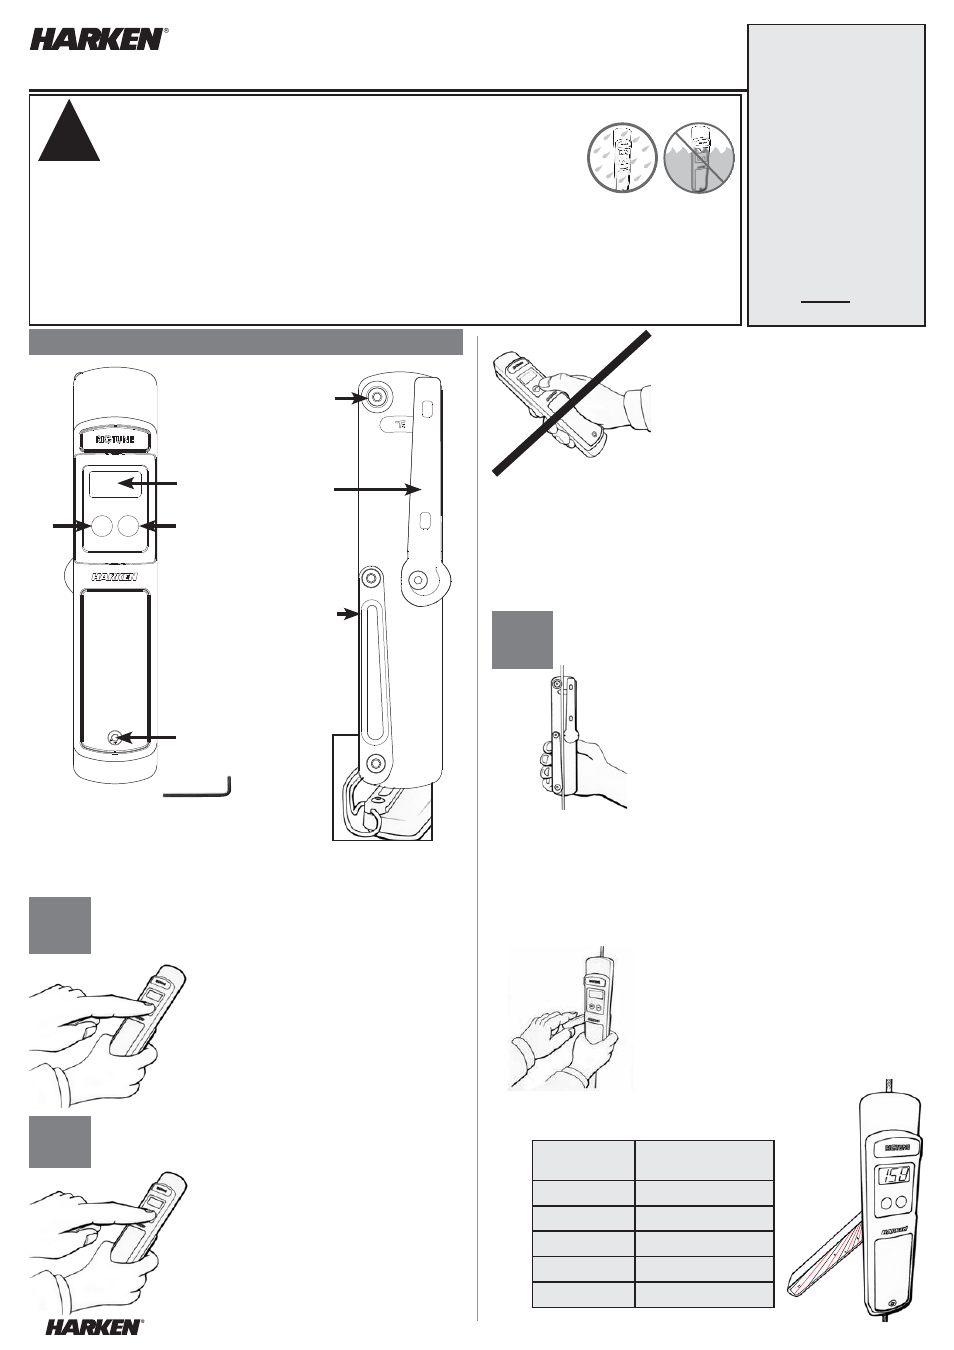
PARTS
•
PIÈCES
•
TEILE
•
COMPONENTI
•
PIEZAS
WARNING: DO NOT EXCEED 500 KG (1102 LB) STAY TENSION. FITS STAY DIAMETERS 2.5mm (3/32") TO 5mm (3/16").
• NE PAS DÉPASSER UNE TENSION D’ÉTAI DE 500 KG. ADAPTÉ À DES DIAMÈTRES D’ÉTAI DE 2,5 MM À 5 MM.
• ACHTUNG: STAG-SPANNUNG BIS 500 kp MAX. PASST ZU STAG DURCHMESSERN VON 2.5 mm BIS 5 mm.
• LA TENSIONE DELLO STRALLO NON DEVE SUPERARE 500KG. ADATTO PER STRALLI CON DIAMETRO DA 2.5MM A 5MM.
• NO EXCEDA UNA TENSIÓN DE ESTAY DE 500 KG. ENCAJA EN ESTAYS CON DIÁMETROS DE 2,5 MM A 5 MM.
Do not leave meter on stay. Do not submerge. RigTune is splash-proof, not waterproof.
• Ne pas laisser le tensiomètre sur l’étai. Ne pas immerger. Le RigTune est à l’épreuve des projections, mais pas étanche.
• Das Messgerät nicht am Stag belassen. Nicht in Wasser eintauchen. Das RigTune Gerät ist Spritzwasser-geschützt, aber nicht wasserdicht..
• Non lasciare il misuratore sullo strallo. Non immergere. RigTune è a prova di spruzzo, non subacqueo.
• No deje el medidor en el estay. No lo sumerja. El RigTune es a prueba de salpicaduras no a prueba de agua.
Meter is accurate only when both stay ends are fixed. Measure at least 2' (.5m) from terminal.
• Le tensiomètre est précis uniquement avec l'étai fixée aux deux extrémités. Mesurer à 2' (50cm) minimum de la terminaison.
• Das Messgerät ist nur dann genau, wenn beide Vorstagenden fixiert sind. Messen Sie eine Länge von mindestens 2' (50cm) vom Terminal.
• Il dispositivo di misura è accurato solamente quanto entrambe le estremità sono fisse. Misurare almeno 2 piedi (50cm) dal terminale.
• La medida es exacta solamente cuando ambos extremos del stay están fijos. Haga la medición al menos a 2' (50cm) desde el terminal.
Harken warranty and service manuals online at: www.harken.com.
• Garantie et manuels de maintenance Harken en ligne à : www.harken.com. • Die Harken Garantie und Harken Wartungs-Handbücher sind online erhältlich unter: www.harken.com.
• La garanzia e i manuali di manutenzione Harken sono disponibili online al sito: www.harken.com. • La garantía y los manuales de servicio de Harken están on line en: www.harken.com.
!
RigTune Pro
Important: Do not hold or squeeze top
of unit when you set to zero as this
will affect the unit's reading.
Important : Ne pas tenir ni presser le haut de l’appareil lors de la mise à zéro sous peine
de compromettre le relevé.
Wichtig: Das Oberteil des Geräts beim Nullstellen nicht festhalten oder zusammendrücken,
da dies die Messanzeige beeinflusst.
Importante: Non tenere o schiacciare la parte superiore dell’unità durante l’azzeramento:
così facendo, si altera il valore misurato.
Importante: No sujete ni apriete la parte de arriba de la unidad cuando la esté colocando
en cero porque afectará la medida.
How to use RigTune
•
Mode d’emploi du RigTune
•
Gebrauch
des RigTune-Geräts
•
Utilizzo del RigTune
•
Cómo utilizar el
RigTune
3
Positionner le RigTune sur l’étai comme illustré à gauche. S’assurer que l’étai est
fermement calé sur le galet et la barre-guide.
Das RigTune wie links abgebildet am Stag anbringen. Sicherstellen, dass das Stag
eng an Rolle und Führungsschiene anliegt.
Posizionare il RigTune sullo strallo o sulla sartia, come illustrato nella figura a fianco.
Accertare che sia saldamente assicurato sul rullo e la barra di guida.
Coloque el RigTune en el estay como se indica a la izquierda. Verifique que el estay
está bien asentando en el rodillo y la barra guía.
Position RigTune on stay as shown at
left. Make sure stay is seated firmly
on roller and guide bar.
OFF
ON
M3 Allen Wrench (Supplied)
Clé Allen M3 (fournie)
•
M3-Inbusschlüssel (im Lieferumfang enthalten)
•
Chiave per brugole M3 (in dotazione)
•
Llave hexagonal (Allen) M3 (incluida)
Off
Arrêt
Aus
Off
Off
On/Zero
Marche/Zéro
Ein/Null
On/Zero
On/Cero
Stay Tension
Tension d’étai
Stagspannung
Lettura tensione
Tensión del estay
Battery Compartment
Compartiment de la pile
Batteriefach
Vano batteria
Compartimiento de pila
Hole for Attaching Safety Line (Not Supplied)
Trou de fixation de la ligne de sécurité (non fournie)
•
Loch zum Anbringen der Sicherheitsleine (nicht im Lieferumfang enthalten)
•
Foro per il fissaggio della sagola di sicurezza (non in dotazione)
•
Agujero para el cabo de seguridad (no incluido)
Guide Bar
Barre-guide
Führungsschiene
Barra di guida
Barra guía
Roller
Galet
Rolle
Rullo
Rodillo
Handle
Poignée
Griff
Maniglia
Maneta
N15W24983 Bluemound Rd., Pewaukee, WI 53072 USA • Tel: 262-691-3320 • Fax: 262-701-5780 • Email: [email protected] • Web: www.harken.com
M1019
OFF
ON
4
5
6
7
8
9
10
11
12
DO NOT EXCEED 500kg (1102 lb) STAY TENSION. FITS
STAY DIAMETERS 2.5mm (
3
/
32
") TO 5mm (
3
/
16
").
Rotate handle down using your index
finger to avoid excessive force. Do not
force handle. Note number shown on
handle. Rotate handle to same number
each time you measure same diameter
wire. Record numbers below. Numbers
on handle are not wire sizes; they are
for reference only.
Wire Ø
Ø du Cable / Draht Ø
Ø Cavo / Ø Cable
Handle No.
Numéro de poignée
Griff-Nr. / Maniglia N / Maneje No.